Showing posts sorted by date for query hitch. Sort by relevance Show all posts

Tuesday, May 14, 2019

TOWING AN UPFIT T1N SPRINTER: YOU NEED TO KNOW THIS STUFF

The story I tell below, I already knew it.  And I knew that everyone who has experience with T1N Sprinter towing knows it, if they happen to be upfitted.  But here it is in detail for the record, so that it will hopefully save someone else some pain, anguish and expense:
  1. T1N upfits can never, ever, EVER be dragged.  They have to be flat-bedded.  Whatever they have in their rear ends cannot be subjected to a near-ground experience, be it a generator, water tanks, whatever.  If it's a T1N upfit, by definition it's packed with stuff under there.  Just forget the whole idea of dragging it.  
  2. Every time you call a tow, even if you are successful in getting a flat-bed on first request, you are probably going to get one which is almost unworkably small.  The one shown in the pics below can take up to a 22 foot vehicle and 10,000 pounds, and that's typically what they send in scenarios like the one I had today.  BUT - and this is the important part - inexperienced tow operators often don't know that they need really, really big shims to accomplish a successful tow of a 22' upfit T1N Sprinter.
It's that simple.  Shims, or you're screwed  - take your pick.  

By shims, I mean lengths of really heavy lumber, preferably hardwood because we are talking about one ton per tire, which can shallow up the tow bed angle enough to get this kind of job successfully done.

Let me walk you step by step through my mishap so that you can understand exactly what I mean.

So this afternoon, I'm heading east on TX-71 between Bastrop and Smithville when all of a sudden, my engine blows up, basically.  By the grace of God, I manage to get safely off the highway.
How many times have I seen this particular view?  Ugh.
If your T1N unexpectedly blows up for no apparent reason despite the thousands of dollars of bulletproofing you've done on it, the best thing you could do is get your lead mechanic on the phone ASAP.  For me, that is Joel Sell, aka Million Mile Sprinter.

I emailed Joel a 6-second video of the engine plus a description.  Clearly it lost turbo, but it didn't feel to me like a normal turbo issue.  The van was running rough like I've never seen it do, and I had even less functionality at my disposal than I would during a regular limp home mode (LHM).  I've driven a hundred miles in LHM.  It's ugly, but it can be done.  This thing I was confronted with today... I was never going to make it down the road. 

OK, so, Joel's recommendation was to flat bed it the hell out of there.  I concurred.  I got with my roadside assistance (I use Good Sam) and arranged for a tow.  

It actually showed up as a flat-bed, but not the larger size I was hoping for.  Technically, this size can haul a T1N Sprinter as I said.  It's just a poor idea to try.

You can immediately sense a departure angle issue. 


Incidentally, I'm not revealing the tow operator, because I feel bad for the guy.  He was a really nice guy and he tried his best, but he was young and inexperienced, and he didn't have the right materials in his kit.  I'll tell you what - he will be a lot more experienced when he wakes up tomorrow vs. waking up this morning.

OK, so, both the terrain and the substrate were favorable for the load-out despite the departure angle problem.  The van's skid plates dug in, but this part of it was do-able without too much drama, as you can see here.
Uh-huh.  You see the problem.  That angle is just way too unforgiving. 
In this next pic, you see what a T1N looks like on the back of this kind of flatbed.  It's really too big even if it's legal.
There's just too much hanging off the back of that tow truck.
Because I was remaining overnight with my van, Freightliner would not allow me within their fenceline.  Therefore, the tow operator had to deposit this load on the public street in front of Freightliner.  That's where things got ugly, because the off-loading environment was not as forgiving as the on-loading environment had been.
Uh-oh.
I say again:  I haven't spent the last 4.5 years on internet forums for nothing.  WE KNOW from experience that we need shims for this.  I went into the Freightliner business, and scrounged up what wood scraps I could find.

There's a little piece of wood, but that's not going to get this job done. 


Not this either, although that was a nice piece of hardwood dunnage.


Next!  Nope; not this either.


Here's a close-up showing the skid plates and how they were carving out their own little trenches in the asphalt.  On an ordinary day, I would have gotten down on the ground with my wrench and removed those skid plates.  But once the thing is in tow under someone else's control, for liability reasons, I can't touch it.  So we were stuck with this status quo.  


Then things went from bad to worse, as this picture suggests.  Do you see how there is a GAP between the bottom of the flatbed and the top of the pavement?  That's because, without proper shims, the operator had no choice but to basically roll the tow truck out from under the T1N Sprinter.  This is highly dangerous, but given the materials at hand, it was difficult to identify an alternative in the moment


It was not going that badly, until he lost control of it.  Remember, the Sprinter has to have its transmission in neutral during this process.  And it's on this angle.  So, without his ability to keep tension on the tow line, that Sprinter is going for a ride under the power of nobody.  Which is exactly what it did.  It dropped off the flat bed, rolled backwards, and plowed arse-first into a Freightliner that happened to be parked at the curb behind us.  It literally bounced off the Freightliner and landed in the position you see here.


I have to have my husband evaluate this further, but at first glance, the score was Sprinter 1, Freightliner 0.  The Freightliner's bumper wasn't nearly as robust as the custom hitch carrier that my husband had welded up to be as strong as a proverbial brick shit house (excuse my language, but there's no other way to put it).  The bumper cover ended up askew.  Do you see how it's gapping at the far left, more so than on the right side under the headlight?   Uh-huh. 


Anyway, frankly I'm glad the Freightliner was there to serve as our collision post, because I'm not sure where my Sprinter would have stopped rolling otherwise.  

My front end (ground effects) was also damaged by the tow cable during this run-away event.  It's nothing that can't be fixed, but it's a pain. 
Fiberglass mess.

MORAL OF THIS STORY:  T1N SPRINTER TOWS NEED SHIMS IF THEY LOADED ONTO THE SMALLER FLAT BED TRUCKS.  WEIGHT COUNTS FOR ALMOST NOTHING IN THIS ANALYSIS - IT'S ALL ABOUT GEOMETRY.

When roadside assistance is paying the bill, the tow companies are going to want to send the smallest flatbed they can to do this job, and it's a penny-wise pound-foolish decision.  Whatever they save in equipment costs, they are highly likely to incur ten-fold in damages.  Unless they carry really long heavy wooden shims, stuff like this is always going to happen.  

Of course I knew that years before today, and obviously after today I'm going to consider transporting MY OWN shims, possibly under the chassis.  Because my van, you see, keeps breaking down.  No matter how hard I try, nor how much money I spend on it, it just keeps happening.  So far, at least.  Maybe when I finally get to Million Mile Sprinter later this summer, I can finally make some bulletproofing headway.

Oh, and by the way, I don't know what's wrong with it yet.  I'm camped out in front of a Freightliner that is unknown to me, in a city that is not mine, waiting until they open in the morning so that they can look at it. 


Saturday, December 15, 2018

ADDITIONAL ROOF STORAGE FOR THE AIRSTREAM INTERSTATE

After more than four years of Airstream Interstate Class B campervan ownership, I am routinely amazed that I can still discover new modifications that result in large efficiency gains.  This is one of them - a valuable capture of roof space that has historically been underutilized.
When I first posed this question to Air Forums Sprinter and B Van Forum, I was envisioning perhaps mounting a storage device in the space shown, using the referenced clamps.  My solution turned out to be even simpler than that.
I found a storage device that fit this space like a glove, but it's not what I had originally envisioned.
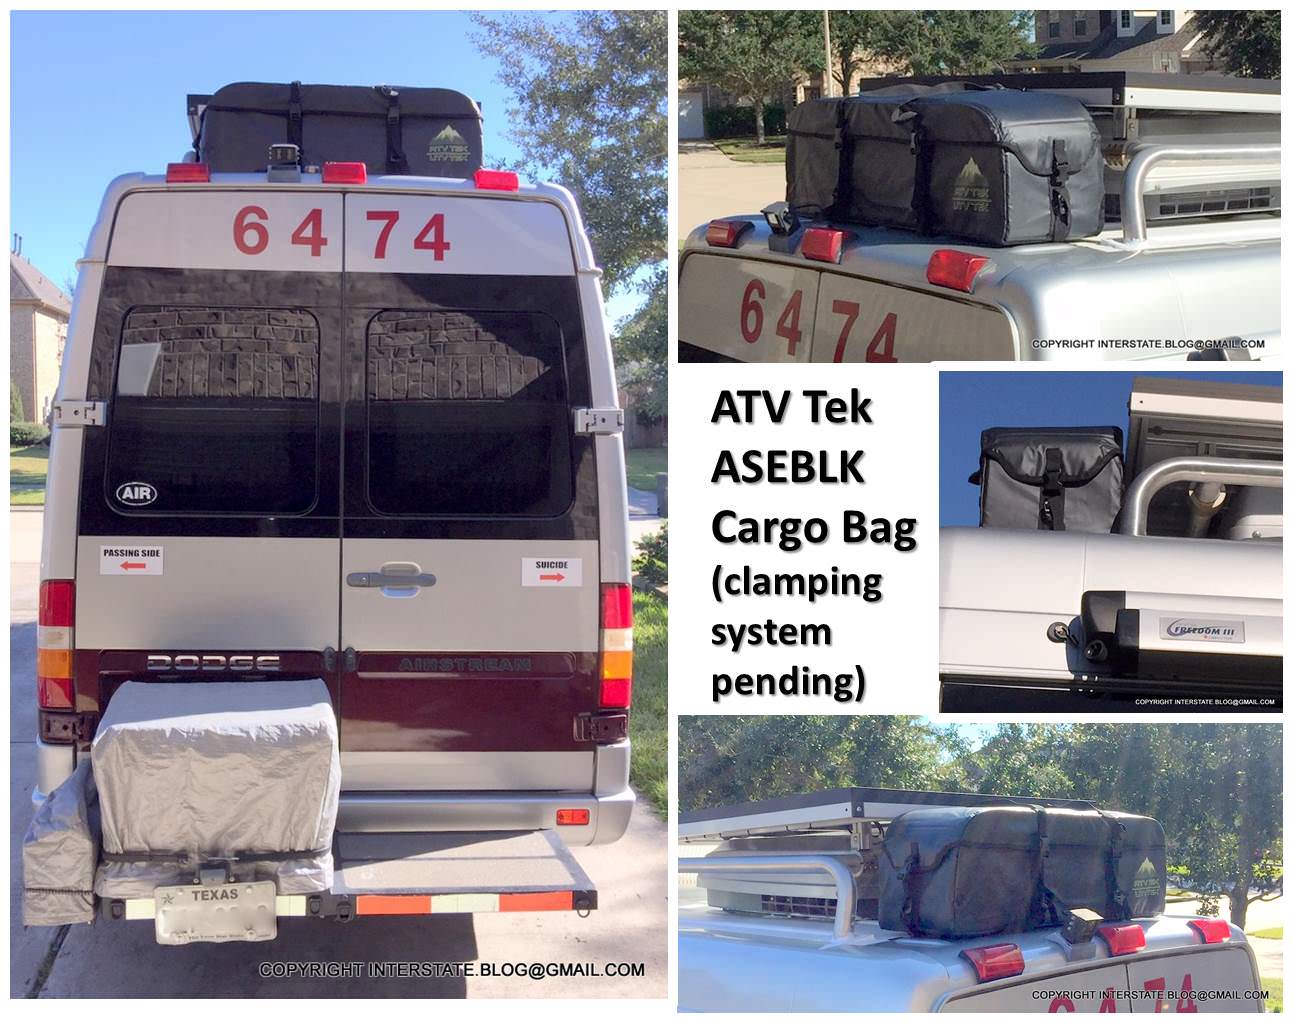
It just so happened that the ATV Tek ASEBLK Black Hunting and Fishing Expedition Cargo Bag fit the space like it was made for it.  
I used one of my favorite products as the underlayment on the roof, to allow for air circulation and drying, so that the ATV bag would not trap moisture next to the metal.
I cut a 1' x 3' strip of a Taskmaster rubber restaurant mat, which is the same product I cut down for our wet bath floor mat.  This product is officially known as the A1HC 35.43 in. x 35.43 in. Anti Fatigue Rubber Restaurant/Kitchen Mat.
Bonus with the Taskmaster: it could be pulled off the roof and used as a traction assist device if I ever got stuck.  I used a third of one of these mats to underlay the ATV bag, and I'll probably find another reason to put the other two thirds up on the roof eventually.

Here's what the ATV bag looks like positioned to fit:
It covers the raw open end of the solar panels on the rear end, giving it a more finished look.
I mentioned above that I didn't need to use the referenced clamps that I originally thought I would need.  Given the way the thing butts up against the 8020 solar panel frame, and given that existing hold-down straps were mounted on the bag in key areas adjacent to the frame, I decided to use screw eyes instead.  My husband sourced stainless steel eyes and also bolts that were compatible with the 8020.  With those in place, I simply attached the bag using 175 pound zip ties.  Here are a few pics.
Eye bolted into the underside of the 8020 solar frame, right next to one of the carrier clasps.

View underneath, showing the zip ties connecting the eyes to the existing bag straps.
Gratuitous pic of dog in the process of solar recharging.
Detail of how this attaches:  

(1) The bag is attached to the Taskmaster rubber underlayment mat using the straps that would typically attach it to the back frame of an ATV.  

(2) The rubber underlayment, in turn, is attached to the roof rack using 175-lb zip ties.  This commercial grade rubber mat is extremely strong and it would take tremendous force to rip through it (these mats are so tough that one of my professional clients uses them in a petrochemical plant application).  I don't anticipate any issues with it.

(3) The upper edge of the bag is attached to the solar 8020 frame.

Like this. 
Now, you may be wondering two things.  First, what the heck do I put way up there?

Answer:  Necessary junk that would otherwise consume valuable space inside the van. Nothing expensive that it would hurt to lose if a thief got his nosy self up there (which is unlikely).
Like these painting supplies for a renovation project we are working on.  I'm transporting the paint itself, 3 gallons worth, inside the Yeti that this is sitting on.  I don't want paint inside the van. 
Secondly, how the heck do I get up there to load and unload the bag?!  It's ten feet in the air!
Using my Telesteps 1400E, ladder of a thousand uses, which I have secured to the hitch platform.
I have a dedicated very-tight bungee so it won't slip.  And if I'm really struggling with anything in the bag, I can also bungee the top of the ladder to the roof rack itself for added stability.  
The hitch platform is covered in non-skid tread, plus the ladder is secure.  It's actually safer in this configuration than it is when I'm using it on open pavement.

Anyway, I'm delighted with this mod.  Glad I found an appropriate bag to create this most unlikely combination.

Sunday, September 23, 2018

PSA: ALTERNATOR CLUTCH PULLEY FAILURES ON LITHIUM SYSTEMS

I put this information on Instagram (@interstate.blog), but not everyone is on IG, so here is a regurg, starting with what I posted, upon which I will then expound in this blog post, because this is super-important.  For you guys who have a lithium system charged by a single engine alternator (plus or minus other charging options such as generator, shore power, or solar), if your alternator behaves as mine did, the outcome could be life-threatening.  DO NOT ASSUME THAT YOU ARE SAFE FROM THIS TYPE OF FAILURE IF YOU HAD A PROFESSIONAL INSTALL YOUR LITHIUM SYSTEM. 

My IG tile. 
Text

Our 17-month-old 200 A Bosch alternator began failing last month when I was on the road between Houston and Nova Scotia. This was a particularly pernicious problem because my first sign of trouble had nothing to do with our camper van’s lithium system - instead what happened is that I started losing the chassis electrical system, which would have developed into a middle-of-the-freeway potentially catastrophic breakdown if I hadn’t caught it in time. There’s a #vanlife myth floating around out there that if you have a Sterling battery-to-battery charger in your system, it will protect against engine alternator damage. This is not true - it will protect against SOME types of alternator damage, but it will NOT prevent your alternator’s clutch from wearing out grossly prematurely, which is what happened to ours (we had it diagnosed by a repair shop today; I estimate that this alternator did perhaps 20 hours of heavy-load lithium recharging spread across the 17 short months of its life before failing). Those of you who have single-alternator lithium rigs might be sitting ducks if you haven’t hardened your electrical system against this kind of weak-link-in-the-chain breakdown scenario. See vids by YouTuber Alternatorman for more detail on alternator clutches. Thanks once again to @million_mile_sprinter for helping me out last month.

OK, now the expound.  When I said "I started losing the chassis electrical system", what I meant was that I began noticing that I could no longer crank my air conditioner fan up to its highest setting.  I was driving through Mississippi in August - trust me, under those conditions, it's noticeable if the a/c starts to wane.  I literally had a panic attack when I realized that there's basically only one thing that could bring about that result - a failed or failing alternator.  I opened up the OBD Fusion app on my iPhone which bluetooths to a reader that we have permanently mounted in the van's OBD socket.  Sure enough, the chassis battery was reading 12.8 V, which is way below what it should have been.  The alternator was not charging the chassis battery.  The van was about to stop dead in the middle of IH-59 between Hattiesburg and Meridian (i.e., middle of nowhere). 

I pulled off the road and sprang to the back of the van to look at the lithium charging status.  I had done my usual thing that day by driving from Houston to Laf Louisiana, stopping for lunch, and running our roof air conditioner off our 300 AH lithium battery for about an hour while I took a nap.  I then got back on the road with the alternator engaged to bring the lithium battery back up to full charge (a heavy-load scenario for the alternator because I'd run it down to about 50% state of charge (SOC)).

Cue additional horror when I got to the back of the van, which is where our electrical control system is located:  my lithium was reading about 90%, which means that the alternator had been, and perhaps still was, charging the house battery at the expense of the chassis battery.  That should never, ever, EVER happen, and I didn't understand how it was even physically possible given the way we had configured our system. 

Immediately I de-loaded the alternator by isolating the lithium charging circuit.  (Yes, we'd had the foresight to install a kill switch for that when we DIY'd our electrical system). 

I then got back on the road, praying that whatever was remaining of the alternator functionality could then put its full contribution into the chassis battery, which was dangerously low at that point.  I had planned to stop for the night in Toomsuba MS, but I kept driving straight through to Tuscaloosa AL to give the battery time to recover.  That's a 615 mile run on the day, more than I prefer to do when driving solo, but it was necessary.

I got to Tuscaloosa (excellent boondocking Cracker Barrel there BTW), pulled out my voltmeter and measured the chassis battery directly, terminal to terminal (we don't rely on the OBD exclusively because it seems to not have foolproof accuracy; story omitted for brevity).  It was reading not ideal but reasonable.  I knew I'd have enough juice to get the van running properly in the morning. 

No more deep lithium discharges from that point forward.  No more alternator charging, period.  I was in a rare pocket of cooler summer air (a cool front had passed through) such that I could live without a/c, and rather than bailing on the trip and returning to Houston, I continued heading north, hoping to intercept Joel Sell (Million Mile Sprinter) in Philadelphia.  I had my husband (who was still back in Houston) make contact with him to see if he could replace the alternator while I was en route, and he said yes.  A Philly detour would add only an hour or two to my total route.

Here's the maddening part:  Through no fault of his own, Joel couldn't determine conclusively on the spot what was wrong with the alternator.  Of course he could take it off site and get it diagnosed, but that takes time.  I arrived at his place around 2 p.m. on a Friday afternoon and I didn't necessarily want to hang around until Monday morning.  So we made the decision to just go ahead and replace the existing alternator, which clearly had something wrong with it, so that I could get back on the road.

The replacement deed in progress.
As for what was wrong with the alternator, that would have to be determined later.  Joel and I did some preliminary testing just so that my engineer husband could have data to noodle on.  It looked like this:
Tap to expand for clarity.  If you are a less-technical person, know that higher voltages indicate a better-performing alternator. 
I continued to Nova Scotia without further incident, carrying the half-dead alternator with me.  A 200 A alternator is big and heavy and a pain to tote around in a small van.  After I off-loaded my meal-encapsulating solid ice blocks at my father's place, I used our hitch-mounted Yeti to carry it.

These were my 2018 ice blocks, 35 pounds apiece with vacuum-packed home cooking embedded in them.  Many good meals were had by at least seven adults courtesy of these, which I prepared in Houston and took with me. 
Five weeks after I set out, my husband and I returned to Houston, never having resumed alternator charging.  We had the old alternator diagnosed yesterday.  The clutch was worn out and was slipping under high-load usage scenarios.  It's being repaired as I speak, and I'll follow up with a separate blog post on that process.  And BTW, who even knew that alternators have clutches?!?!  They did not used to have this failure-prone add-on.  I'll also discuss that subsequently. 

First moral of this storyNO MORE SINGLE ALTERNATOR OFF-GRIDDING.  We are going to reconfig our van for a second isolated alternator which will be dedicated to just the house lithium battery.  That way, even if we have another such failure, it won't kill the chassis battery and disable the Sprinter's native electrical system to boot. More on that later.

Second moral of this story:  This whole failure episode of mine is exactly why off-grid vans need as many redundant systems as they can support within their space limitations.  Many have asked why we'd go to all the trouble and expense to put solar on the roof when the alternator is going to outperform solar's recharging ability by a factor of somewhere between 3 to 4.  The answer is that STUFF BREAKS.  Sometimes it breaks in ways that nobody can predict.  Never before this had I heard about alternator clutches failing, and I've been following all of the vanning and off-gridding forums for four years now!!  Neither had my husband ever heard of this phenomenon, and he had done months of research on mobile lithium systems.

My boondocking property in Canada, where there was no crimp in our style.  We completed a 5-week off-grid trip even with this limitation of not being able to use our new alternator, because our solar alone took care of our lithium battery.  We had to be careful with our usage, because my property is surrounded by these high trees, limiting sun exposure.  But we spent 2 of our 5 weeks here without any recharging problems, running on solar alone. 
I'll close this post with this 3-minute video that describes alternator clutches.  Read it and weep.  Watch it and weep.  The manufacturers took a pretty good device (alternators have been around for a long, long time) and screwed it up by adding this failure-prone clutch part.  More on that later, too.

Link:  https://www.youtube.com/watch?v=QUs4Y5ZMiTU

Embed:


Thursday, August 17, 2017

YETI COOLER PERFORMANCE ENHANCEMENT, PART 2: OUTER LIMITS

In Part 1 of this post, I talked about a strategy to freeze food directly into solid masses of ice in order to extend the range of our Yeti cooler.
Here's the second of two, which I had referred to in Part 1 as the "straight" block.
But there's also additional insulation potential to be realized outside the cooler.  I don't have a vision for that yet, but here are a few initial pics of my stop-gap ideas.

By the way, I never proceed with elaborate plans unless there is a firm vision for the project in my head.  If the vision doesn't materialize, that's my brain trying to tell me something - that key elements have not occurred to my conscious mind just yet, and so it's better to wait for the idea to fully gestate.  I've learned through trial and error not to try to force a project when I get into this condition.
No, V are not there yet.  But V are currently making final preparations for the Long Journey.  
Having recently experimented with the insulating fabric product known as Insul-Bright (see my blog post on making a slider door window covering here), I'm wondering what could be done to fashion a jacket for the Yeti, to increase its effective R value.  In the pic above, I simply doubled over the fabric, and wrapped it around the cooler, holding it in place with pins and loops of clothing elastic.  This will do for testing purposes.

There's also the potential offered by closed-cell foam.
I had been placing these two pieces on top, but I cut one of them to form an interior pad, because the bottom of the cooler was not getting any additional insulation due to the way it sits on the hitch carrier. 
My existing tarp sleeve still fits over the Yeti with the extra insulation in place.  It looks a bit more bulky, but it does fine. 
So this is an idea for further development and refinement in the future. In the meantime, for this upcoming trip, I'm just going to try it as-is.

Tuesday, August 15, 2017

YETI COOLER PERFORMANCE ENHANCEMENT, PART 1: SOLIDIFICATION

Those of you who follow this blog know that my husband and I moved heaven and earth to create a custom hitch carrier for our Yeti cooler (blog posts Part 1, Part 2, and Part 3) so that we could carry frozen food on our extended family vacations.  In 2014, I fell in love with this idea, because it allowed me to make most of the food at home, freeze it, transport it 3,000 miles, and be thusly freed from the task of being chief cook and bottle-washer for a house full of people.  By this strategy, I could have more of a vacation myself, instead of spending a lot of my time slaving over a hot cottage stove, making meals from scratch.

However, we noticed significant performance differences between our inaugural 2014 trip with the Yeti, and the repeat performance in 2016, for two reasons.
Number one, in 2014, we took the Yeti 6,000 miles in our floggin' minivan, before we purchased our Airstream Interstate.  The Yeti was kept within the air conditioned space of the vehicle, and thus was at least 20 degrees below the worst heat of the day for the entire trip.  
Number two, our 2014 trip was characterized by much cooler weather overall compared to 2016, so there was an antagonistic impact on performance.
Not only did we shift the Yeti to the outside of the vehicle where temperatures were significantly hotter, the weather itself was hotter overall - up to 100 degrees.  Even with a closed-cell foam augmentation on the lid and this reflective tarp cover, the cooler still heated up significantly more than it had in 2014.  
It still kept the food from spoiling, but it was a pain in the ass to have to keep attending to the diminishing ice load throughout that trip.  Furthermore, once we crossed the Canadian border, ice was extremely expensive, if it could be located at all.  A replenishment that might cost us $3 in the U.S. could be $15 in New Brunswick.  

For these reasons, I decided to concoct a different scheme for our 2017 trip.  The best inventions relate back to some sort of real life precedent, and this was no exception.  We are in high summer in Houston right now, and there is no shortage of howling out of my husband because I like to keep the internal house temperature at 77 F, which is too hot for him.  And why is that temperature comfortable for me, but a burden for him?  Because my surface area to volume ratio is much larger than his.  

And so it was with the ice.  I was having excessive melt problems because cube ice has too much surface area for optimal performance during heat wave conditions.  

So how to reduce that surface area?  Rather than simply adding super-cooled ice cubes to a super-cooled load of food, for this upcoming trip, I decided to try freezing the food in solid blocks of ice.  This required that I develop both strategy and apparatus, so here's the story of how that went.
Here is our culprit, the inside of the Yeti cooler, looking down from above with toes for scale. 
Based on the configuration of our Yeti 50, I decided that the most practical, and not to mention easiest, approach would be to create two solid blocks of food-encapsulating ice, side by side.  The cooler is bilaterally symmetrical, so I could create one mold, freeze a batch of food in it, take it out, and simply freeze the second batch, flipping it 180 degrees to fit the other side.  Two pieces would be easier to handle than one massive, unwieldy block.  Plus, I'd be able to thaw one at a time, reserving half the food for later consumption.  

I started with a paper tracing of the internal shape, because the cooler sides are flared rather than being at right angles to the base, as you can see.  From that, I proceeded to craft the shape out of cardboard.
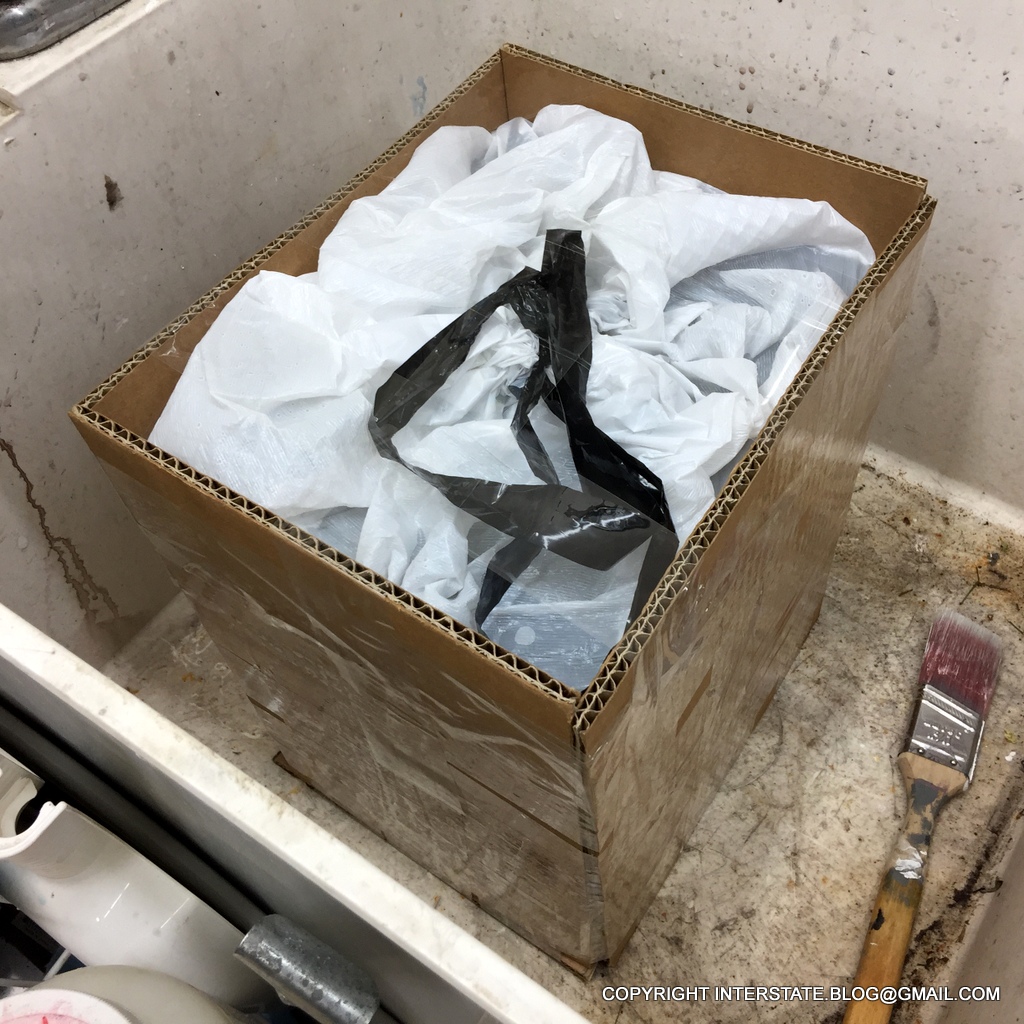
I used remnants of the cardboard shipping crate that our new Vitrifrigo refrigerator came in, so it was double-thickness cardboard - much stronger than average. 
I taped the crap out of it, for a reason that will become obvious in a second.
Around and around and around we go. 
We kinda figured that the final mold would need to be made out of thin plywood or perhaps even sheet metal, but I wanted to run tests on this cardboard prototype, so...
There it is lined with a kitchen trash bag and filled with water in our garage utility sink, which is embarrassingly filthy, obviously. 
And there's the kitchen bag tied off with the water in it, so that I can carry the thing without sloshing (which would wet the cardboard, which would then disintegrate rather catastrophically, LOL!).  After I tied the bag, I put clear tape straps across the top to keep it from bowing. 
The damned thing was heavy.
About 30 pounds.  The main risk with the cardboard prototype is that the bottom would fall out if it were not well-supported. 
I left it in the utility sink overnight to confirm that it would not bow excessively, because if it did, then the frozen block would not pack into the cooler.  

Once it passed that test, it went into our upright freezer for the next stage of this proof-of-concept.  
And of course, in this freezer, you can see a lot of the home-made meals that I intend to take with us.  We have over 150 different Pyrex storage containers because much of our diet is freezer-based (a natural off-shoot from home gardening, where the entire harvest has to be cooked and put up at once).  I would be liberating the frozen contents from the Pyrex and transferring each one to freezer-grade plastic wrap, which saves a lot of space and weight.  But you can see that, with two of these frozen blocks, I could transport a lot of that food. 
OK, now here's where it starts to get funny.
Sooo... it appears to be at least partially frozen the next morning...
...but all was not well in paradise.
Oh, sh!t - it's leaking on the floor!  LOL
Aaaaand the foreseeable demise:
Note to self:  Don't try to freeze 30-lb monolithic blocks of ice all at one time.  
Aaaand it just keeps getting better.  It started to leak before I got it out of the cardboard, thus blowing out the cardboard. 
This little experiment taught us what should have been obvious from the outset:

  1. We need to pre-chill the surrounding water before placing the works in the freezer.
  2. We need to freeze in lifts, rather than all at once.
  3. We need a mold that won't dissolve.
  4. We need some means of wrangling the solid blocks of ice once they are formed.  
  5. It also occurred to us that we had to minimize floating of the individual food packages that are submerged in the water before it turns into a block of ice. 

On that third point, my husband constructed this out of thin plywood:
Well that looks much better.
Regarding that fourth point, I decided to embed some webbing sections that I had inherited via a free grab bag of strapping scraps from the vendor Strapworks of Eugene Oregon.
Intending no disrespect, I decided to name my two blocks of ice the gay block and the straight block.  Well, don't blame me - Strapworks had sent me this nice scrap of rainbow webbing, plus some blue and some pink.  What's a person to do??  I also cataloged which foods were going in the gay and straight blocks respectively so that I'd have that record two weeks down the road when it was time to take the food back out again.  
I put the rainbow strap at the very bottom as a lifting aid (it would be frozen into the ice once the block formed), and I also began working with this device for the first time:
A low-ended Foodsaver FM-2000 system plus two 50-foot rolls of bags (large and small) for less than a hundred bucks all in.  Sometimes it's really wonderful that Amazon Prime delivers on Sundays.  
As you can deduce from the photo above and the previous shot of the freezer, we freeze in Pyrex because of the convenience, but there's no room for all that glass in the Interstate, whether it be the Yeti cooler or the internal refrigerator.  So I have to remove the food from the Pyrex and transfer it to plastic, either freezer bags (as in the past), or now this.  All it takes to pop those frozen masses out is to melt a micron-thick layer by immersing the Pyrex in some warm water.  It then frees from the glass, and this can happen next:
Vacuum power, baby!
I hastily put my first lift (layer) of food in the form's gay block, dumped in a slurry of icewater, and slammed shut the freezer door.  I did this so quickly with the intention of minimizing melt that I never got a "before" pic.  But here are the "after" pics, the money shots, after the second layer was added and frozen a day later.
Looks solid enough.  Now let's take it out.
Next note to self:  Don't remove each block from its trash bag unless absolutely necessary for fit purposes.  It's just too messy.  
Now for the fit test.
And you can see that the next block, the straight block, will fit nicely beside this gay block.  A layer of cube ice on top, and we'll be ready for the road.  
Now that I've gone to all this monolithic trouble, will this strategy actually work?  Will those 30-lb blocks extend my boondocking range?  For the answer to that, you'll need to check back.