Monday, July 31, 2017

HITCH CARRIER EXPANSION FOR THE AIRSTREAM INTERSTATE

Last year, I published a post trilogy (Parts One, Two, and Three) describing our EPIC struggle to obtain a hitch carrier that met our specific travel and family needs.  We ended up custom DIYing the best carrier that either of us have ever seen, bar none.
And our dog agreed. 
Fast forward a year and a nagging voice in my head kept saying, "Lady, yer gonna need a chain saw where yer goin' next!"  And the chain saw we picked requires a gas can.  And a gas can presents a serious challenge for carriage in a Class B camper van.
It was just a small gas can, a Wavian 2.5 gallon military spec steel jerry can, but still, it presented a big challenge.
I wanted to do something as simple as possible - maybe bolt it temporarily to the back of our existing hitch carrier, because it will only need to live there briefly during local trips when we were actually hauling a couple of gallons of gasoline to our property.  But my husband had other ideas, and due to the cuteness factor of this project, I could not find it within myself to object to his plan.

Basically, he built a custom bracket that bolts onto our existing carrier.

The secret to retrofitting this device, the need for which we had not foreseen when we designed the original hitch carrier, was to "hang" the bracket off that main structural member, and extend it out to the driver's side.
Close-up of those two main bolts.
The Wavian frame could therefore be bolted, in turn, directly to that bracket.
View from above, without the gas can in place. 
The result was just too precious for words.
The Yeti cooler had a baby!  And it looks like it was a mixed marriage because coolers don't typically give birth to jerry cans!
Of course I made a matching sun shield / modesty cover out of silver tarp for the gas can.
I used the same approach as for the Yeti cooler, described in Part 3 of that trilogy linked above.
#vansizedsewing
You'd almost think that we designed the hitch carrier this way, given the fit in the remaining space and the fact that the gas can does not extend one millimeter beyond the body of the Sprinter.
Couldn'ta planned it better if we'd tried.  
Anyway, mother and baby are doing fine, and I'm dying from the cuteness factor here.
Awwwww!!!  It's not often that I get to use the word 'cute' in a Class B context!

No, ours is way cuter than that.

Sunday, July 30, 2017

UNDER CHASSIS CARGO STORAGE FOR THE AIRSTREAM INTERSTATE

In a previous post titled UNDER CHASSIS STACKER STORAGE, I described how I created a holder for a series of Valterra stackers.  This current project also involved the re-capture of chassis space, but for a different purpose.  Unlike some other Class B RVs and most if not all Class Cs, the Airstream Interstate does not have exterior storage compartments because Airstream leaves the body of the Mercedes Sprinter unmodified when it makes its upfit.
This is a Roadtrek 190 Popular.  Do you see those hinged compartments at the very bottom of the body?  At least a few of those open into under-floor storage compartments, of which the brochure (PDF) states that there are two.  
We don't have any of those, so if we wish to re-capture space below the floor, we can't go in from the side.  We need to go up from below.

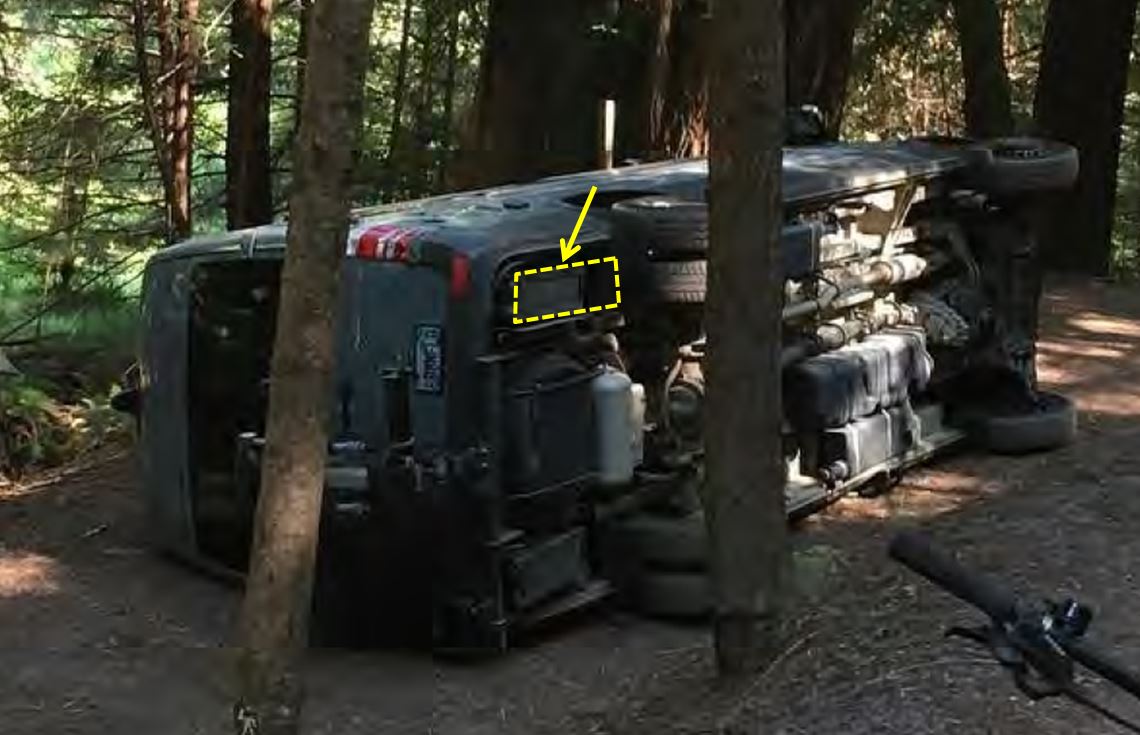
The space I'm going to talk about in this post is perhaps best illustrated by this unfortunate image that was posted in this Sprinter Forum thread, uncredited, in a PDF euphemistically titled "Sleeping Sprinter".
Sleeping, indeed.  In the case of this upfit, you can see that a battery box appears to have been installed in this same void space to which I refer, where I've annotated the source-less photo with this yellow arrow to so indicate.  Our batteries are inside our coach, so we will never need this space for a future battery.  Therefore, I'm going to show a different adaptation of it. 
I have been coveting that void space for years, wondering what productive thing I could do with it, but it did come with a constraint:
Aaaarrghhh, I hate it when that happens!  The damn propane line for the hot water heater was placed smack dab in the middle of the space.  Why couldn't Airstream have scooted it out of the way?  
But it also came with a built-in advantage.
There's an unused support structure already integrated into the chassis. Perhaps it was intended to be used to hang a battery box. 
The propane line that runs to the hot water heater is a copper line encased in PEX (presumably just for extra protection). It is fairly durable and so as long as I pack only soft objects into this area, objects that avoid whacking the line, it will be fine.

The project, then, consisted of fabricating a shelf with attachments so that this space could be utilized.  My general steps are described below, and I'm going to provide more detail than I sometimes do, just to encourage people to tackle DIY projects like this.  As I've said in other posts, it's not that hard if you break it down step by step.  I'm a middle-aged woman with no DIY background and I learned how to scope projects and work with metal.  This stuff is do-able by ordinary people.

The difference between this carrier and my last carrier is that this one was designed to have an inset liner of spread metal, and so rather than being a simple butt-jointed skeleton in which the two side rails overlap the end rails, it had to serve as an inset frame in three dimensions.  So it's a bit fancier, in a sense, with compound cuts.  I can't find a decent line drawing on the internet to explain what I mean, but hopefully these pictures will convey it.

First, let's start with the raw materials.
(1) A scrap of spread metal left over from an outdoor table project, measuring approximately 12 inches by 21 inches; (2) 4 feet of 1 inch x 1/8 inch angle iron, (4) about 1 foot of 1 inch x 1/8 inch bar steel, (3) about 1 foot of 3/8 inch all-thread, (4) 2 corner braces, (5) #12 x 3/4 inch self-drilling hex metal screws with neoprene washers (which I'll explain later), and (6) various 3/8 inch hardware including nuts and washers.  All off the shelf at Lowes. 
Here's the main tool for the prep part of the job.
A 14-inch chop saw with a metal-cutting blade. We don't have a table or anything, so I simply put it in our driveway.  It gives our neighbors something to think about. 
Well, how do you use a chop saw that is plopped directly on the ground, you may wonder?
I squat in front of it.  With legs pulled back wide like this, I can avoid the sparks that are thrown, which is important because I do all this work with bare feet and legs (Houston in July).  I'm an old gardener so my squatting skills are pretty good, given the extent to which I have used them over the years.
A rectangular frame in 3-D will require the upper portion to be a simple rectangle, while the underside pieces must be cut at 45 degrees in order to mate together properly.
So I start by nipping off the ends of a few of the steel segments.
I draw a lot of notes to myself on my workpieces, whether they be steel projects or sewing projects.  That way I don't get confused.  I hate do-overs.
The chop saw has a 45 degree setting, so you can nip off those initial corners like this, without disrupting the vertical portions which have to remain "straight up and down", in other words, at 90 degrees to the long axis of the piece.   
It's difficult to show some of this properly on a 2-D computer or device screen.
I cut these off but they both appear 90 degrees whereas the two on the left are actually at 45 degrees to that plane. 
Here you start to get the idea of what I mean, although now the opposite visual effect is happening due to the oblique view - everything looks like it's 45 degrees whereas only the bottom sides are cut that way.  
Chop saws don't actually cut so much as they melt their way through bar steel and angle iron via frictional heating (throwing a great shower of sparks in the process).  For that reason, the cut ends end up being a mess.
The metal gets smeared. 
Those smears (burrs) have to be removed with a bench grinder.
I was hoping to get a nice spark-throwing picture but it didn't turn out. 
As with sewing, to the extent possible, I fit one piece, then put it up against the next piece, and it becomes self-evident what has to happen next.  I rely more on iterative common sense and less on technical measurements.
Now you can see it.  The one on the bottom needs its corner nipped off at 45 degrees in order to fit with the one to the right.
Here's what the frame looked like when finished, as held together with welding table magnets.
I cut that cross piece to nest in the same plane.  That way the spread metal could drop right in and the entire assembly would accommodate it. 
This project was a little backwards because our rig was not at our house when I did the metal cutting. It was in its off-site storage locker instead.  Normally I would make a cardboard template first, then design the metal workpiece off the template.  But because the rig wasn't here, I took rough measurements, made the cuts, and then re-verified with the cardboard before my husband went to all the trouble to weld this. It was a little backwards, but we have other projects in progress (as usual) and there were time constraints.
I measured my cut tray, took the cardboard template over to the locker, and re-verified against the battery well.  
Here's what it looked like when fully drawn, with corner braces added just as an approximation.  The final positions of the corner braces had to be established carefully due to the subtle curve in the side of the Sprinter.

At this point, an unforeseen complexity entered into the project (as they always do).  Unlike my Valterra under-chassis rack which floats semi-freely on top of our ground effects supports, this one was going to sit quite close to the body of the Sprinter (inside panel).  Therefore, I had to go to special effort to add attachment points to it, as I wasn't going to simply be able to wrap bungee cords freely around all sides of it such that they joined and hooked in the middle.  So I had to incorporate attachment provisions into the design, before it was welded up.

Cue the next major annoyance:
The one on the left is from a fabulous internet retailer called Strapworks.  The one on the right is this piece of junk from Home Depot.

EDIT:  My husband took a look at this thing on the right and said, "Nnnnnope!"  He hates installing junk on our rig. We may eventually go back and retrofit some of the D-rings on the left (which I have on order) but in the mean time, we're just using wrap-around bungees, as you'll see below.  The side clearance of the tray is too narrow to add and remove the bungees because of the thicker hooks on their ends, so we just mounted it with them already in place.  Dedicated bungees, in other words.  Can't be removed without removing the entire piece, which I would be loathe to do.  
My projects are often one step behind ideal because I simply cannot source parts locally, and I don't always have time to wait 2 to 5 days for shipping.  Every time I find a new source of valuable stuff, I order a collection of what they offer preemptively, so I'll have it on hand.  The next time I build another under-chassis storage option, I'll have the best hardware available to me in advance.
Shopping locally is often an exercise in frustration, and a classic case of "from the ridiculous to the sublime", because when it comes to D-rings, local retailers carry really small, and really big, and virtually nothing in between.  They are rated for twenty pounds or four thousand pounds - that is all.  At the big end of that scale, this is the useful mega-ring that my husband and I installed as one of our security enhancements (not discussed in blog posts).  
Next came the weld-up.  My husband keeps saying, "You are going to take that welding course later this year.  It's only two days long."
These pics are fun to take, because of course I have to do it with my eyes closed, and I never know what I've got until I upload the pics from my SD card.  Nooooo!!  Don't look at the liiiight!!!!

After the welding and my paint job, then came the mounting.  But first, look at this:
HOLY CRAP!  It's amazing what happens when one removes eleven years worth of road grime!!  It's clean!!
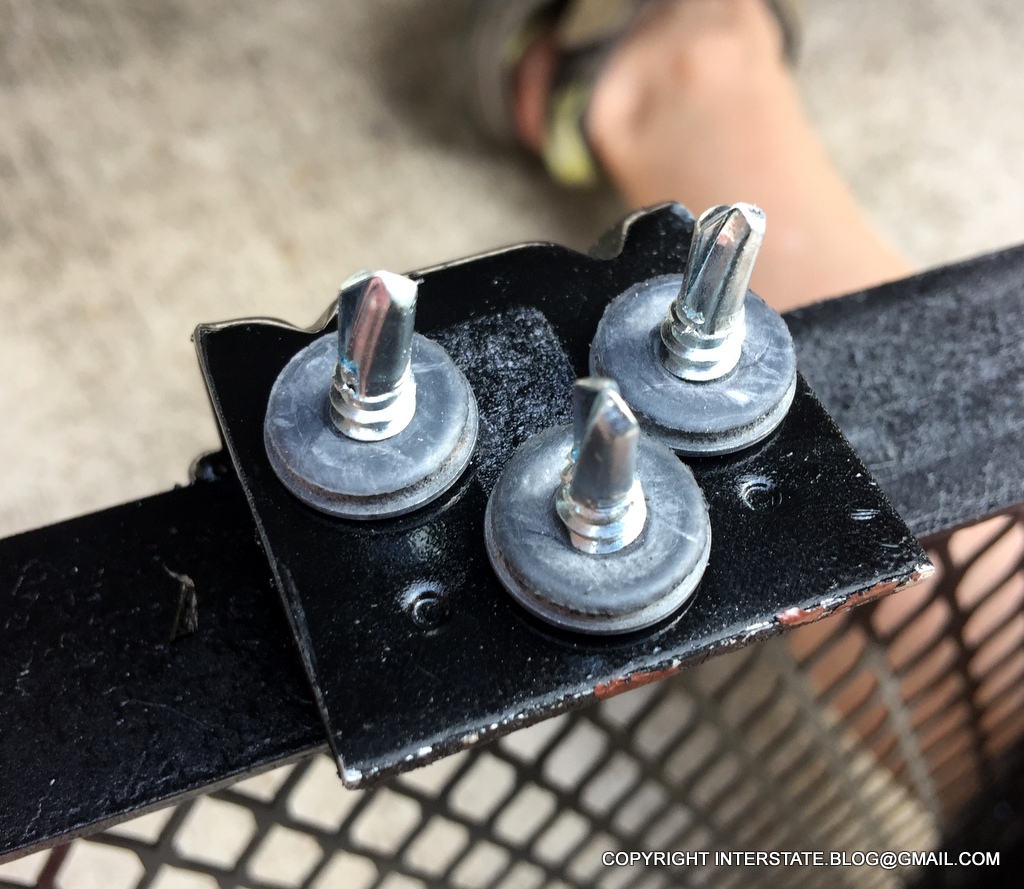
It'll get dirty again, of course, but I might as well start with a clean slate.  You can see the six holes pre-drilled above, for the screws that mount the shelf to this inner body wall.
And the neoprene washers go on the outside, so that they will press against the body and help prevent water from getting in those screw holes.  
This is a little tricky because this structural member itself is actually threaded (3/8ths) - I don't know why.  But it's hard to get that nut on top tightened down because of the clearance issues.   
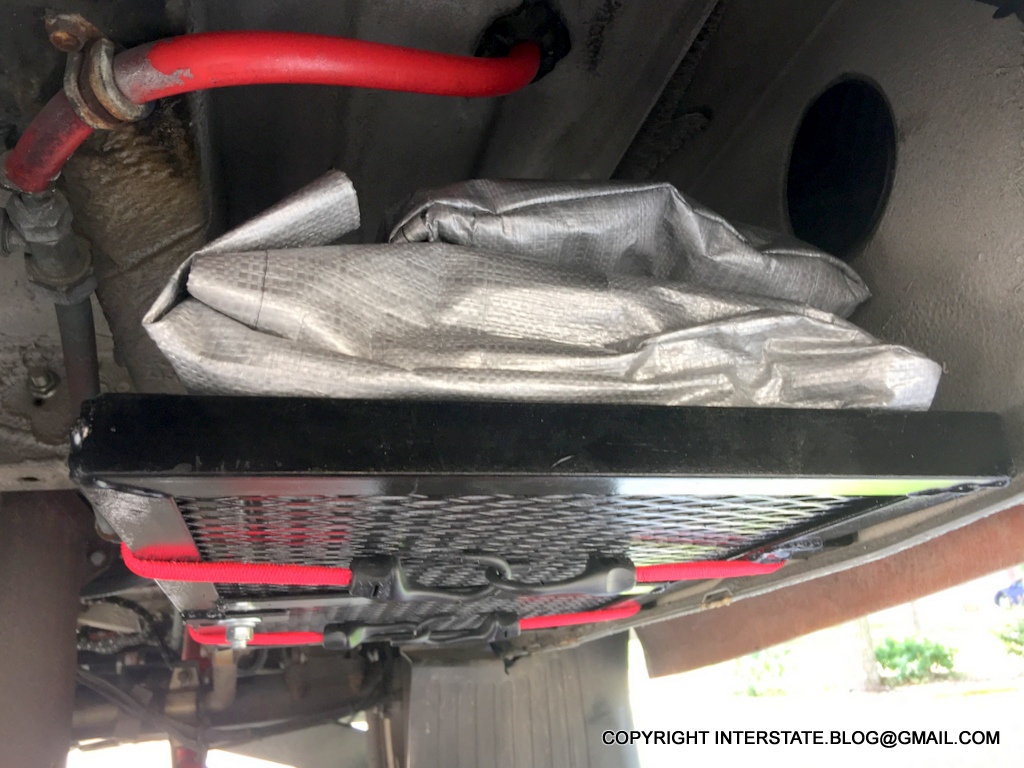
And now for the money shots:
You can see there's plenty of clearance below that propane line. 
Initially my husband was like, "What the hell do you plan to put up in there?!"  Answer:  Squishy things that won't be damaged if they get wet.
Like my knee boots, for instance.  They're quite heavy, the real thing, woodsman-style.  I don't think anyone would desire to steal my stinky lady boots, would they?  So these are good candidates for storing down there. 
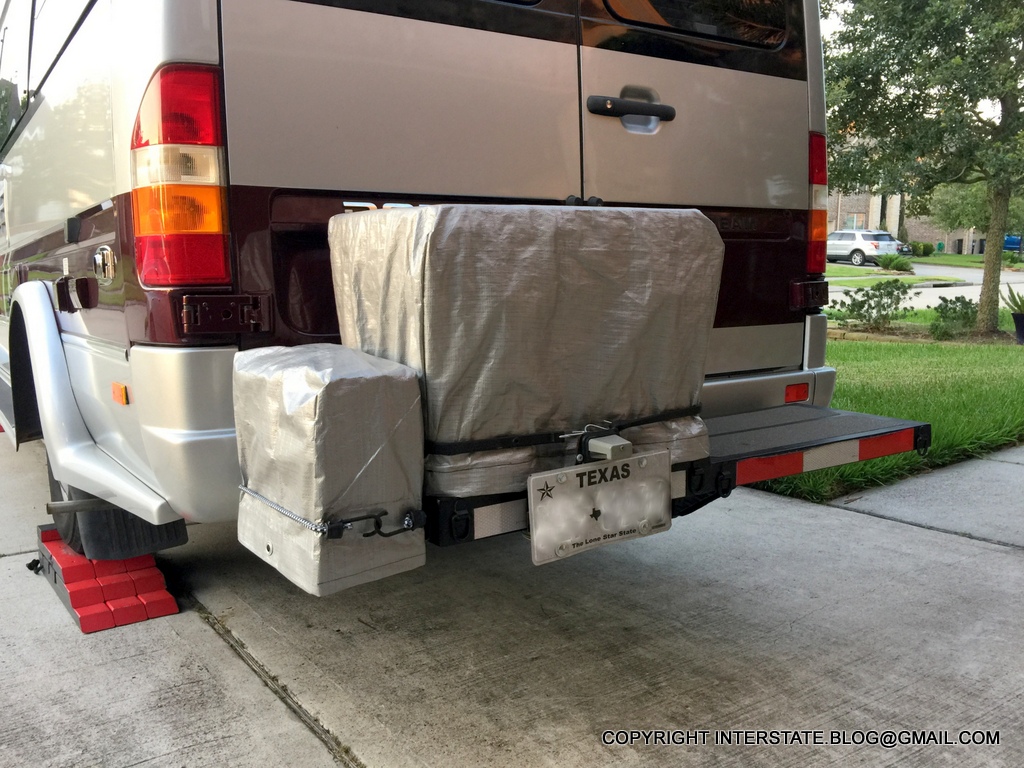
Of course I sewed tarp envelopes to fit the items destined for the space, to keep the dirt away.
Also in there:  Multiple kayak accessories.  None of which are worth a damn without the kayak itself, so I wouldn't expect any of it to be a theft target. 
The amount of space I've recaptured here is probably more than what one of our unmodified overhead cabinets holds.
There's those two packages on the rack, and there is still space remaining.  
Another view:

Anyway, I'm as pleased as punch.  Yet another storage expansion achieved, and the pressure to find space for everything I want to take on longer, more elaborate trips is duly reduced in yet another new way.
No pressure, no DIYamonds.  Ohhhh, yeahhhhh. 

Tuesday, July 25, 2017

PRODUCT REVIEW: LET'S GO AERO'S TENTRIS ARCRV

I'm intrigued by, but not convinced of, this new product called the Tentris ArcRV.
It's a tent-like structure designed to expand RV living space.  Reportedly, the fit has been optimized for a Sprinter.  Photo from the Let's Go Aero website.  
Many have asked what's the best way to expand the sleeping and living space in Class Bs such as the Airstream Interstate.  There are a number of exterior room-like options on the market, and this one does seem to offer the advantage of packing down to a sufficiently small bundle for carrying in a Class B, plus its dimensions were reportedly optimized for the Sprinter.  And its weight of 24 pounds is not obscene.  

However, I question why a solid nylon enclosure would be needed.  It certainly won't hold a bit of heat with it being the massive size it is (said the old backcountry tent camper), and while it might protect its occupants against rain, its deployment leaves the open doors (either rear pair or slider, depending on where it is installed) vulnerable to getting their inside finished surfaces soaked and ruined.  One would have to develop some serious door protectors if it were to be used in rainy conditions.  And that would add cost and weight.  Plus a DIY commitment of time and materials because there's no product like that on the market right now.
I made stop-gap protectors for our Sprinter out of heavy-mil contractor trash bags that slip over the door tops, but obviously they don't protect 100% of the door.  When I first posted this pic on the Air Forums Small Space Living thread, I prefaced it "Caution:  Content may trigger intense Jeff Foxworthy flashbacks."
:-)
Well, one could say, this Tentris ArcRV provides privacy, at least.  But anyone sleeping outside a Class B in a tent-like contraption is likely to be children or teenagers, and I'd wonder how much privacy they really need at an individual campsite that presumably is reasonably private to start with?

I'd prefer to see more practical awning expansion options take the place of something like the ArcRV.  A permanently-affixed awning is already delivered with almost every Class B that is sold today, but it never has been properly exploited for its living space expansion potential (the expansion products that are on the market were not optimized for Class Bs or vans - they are generally too large, too heavy, too cumbersome, and they don't fit).  That's why I created an awning screen that actually could be used as an overnight camping structure in both fine weather and in certain light rain scenarios (as long as it wasn't a blowing, stormy rain) without leading to the ruination of the inside finish of the slider.
You might get away with leaving the slider open, although you'd have to be mindful of the passenger pillar perhaps getting wet... maybe you'd want to supplement with a nylon ground cloth positioned in that area for added protection.  
And my contraption certainly packs down smaller than the ArcRV.
Plus it weighs only one-tenth as much.  
Anyway, my point with this blog post is hopefully to stimulate the development of additional aftermarket ideas.  I'm not in a position myself to get into this area on a commercial level - I'm a simple DIYer who invents stuff as a hobby.  I think that this product, the ArcRV, will fit the needs of certain customers, but still, I would like to see the loose ends such as rain protection addressed, and more options available overall for this kind of space expansion product.  Personally I think the market is there - it just hasn't been properly developed yet.  
Sometimes it takes its own bloody time, though.  

Sunday, July 23, 2017

ROOF CARRIER FOR THE AIRSTREAM INTERSTATE

With all the appurtenances on our roof, there was no room whatsoever to add a conventional roof rack or commercially-designed carry case such as a Thule, SportRack, etc.
The solar panels are occupying Airstream's unconventional roof rack.  
However, out of sheer necessity, I'm in the process of squeezing every last cubic inch of storage space until it screams, and I discovered a neat little slot for this particular item.
It's my new inflatable kayak, minus the paddles, seats, and foot pump.   
It fits this space like it was made for it.
Under the leading edge of the solar array.  The kayak is a cheapie - it was $75 including paddles and seats.  I wouldn't want to store anything really expensive on this roof because I haven't devised any way to secure it.  Not that I expect that anyone would climb 9 feet in the air to get it. 
Furthermore, it's a boat, duh.  I don't have to worry about it getting wet if its on the roof.  Don't have to worry about making a carrier be waterproof.  
Side view.  That's the roof a/c unit at photo right.  Talk about a triple-duty space - solar array, a/c, and kayak.  
Once the kayak was cinched into a bundle with compression straps, it was surprisingly easy to haul it onto the roof.  We carry a Telesteps 1400E ladder at all times, and I'm accustomed to working on our Airstream Interstate's roof, so getting this on and off was a piece of cake for me (minus the paddles, seats, and foot pump, the kayak itself only weighs about 20 pounds).

Obviously, though, I couldn't just stuff the kayak in this available space and be done with it.  I needed to compact the kayak, cover it, and strap it down securely.  This blog post briefly describes the cover that I created to custom-fit this area.

These were my materials for this project, almost.
I know this sounds ridiculous, but I really like Harbor Freight's tarps.  They are supposed to be a "discount" store (read: cheap, cheap, cheap) but I like their silver tarps better than the offerings at the more upscale big box chains.  It's a 9 mil two-sided silver tarp.  You'd be amazed how difficult that is to find - most chain stores are still carrying conventional blue, or tarps that have only one side silvered.

I did NOT use the smaller strap cinchers that are shown here, just the parachute buckles, four of them.  And I had that belt webbing leftover from my custom computer table and suspended under-cabinet shelves projects.  The color coordinated perfectly with the silver tarp.

For once, I conceded to use outdoor gauge thread. It tends to mess up my sewing machine because it is too heavy and resilient.  But for this object, clothing weight thread would not suffice.  I did snap one needle on my sewing machine as a result of this decision. 
Whenever I'm faced with a custom #vansizedsewing predicament, I do my usual thing:  I start by making a tarp envelope.
I fit the tarp around the kayak with the opening along the long axis for ease of stuffing and stripping (= longshoring vernacular for adding to and removing from, typically used in reference to intermodal containers, said the industrial consultant).    
Here's where this project represented a significant departure from my ideal scenario, however.  Because I was going to integrate four attachment straps, and I mean integrate, as in sew all straps directly to the body of the carrier for strength, I had to position and attach all such findings before sewing up the sides to form the envelope.  If I didn't approach it this way, I wouldn't have proper access to what ultimately needed to be sewn to the body of the carrier.  For this reason, I could not engage in my usual iterative pattern of sewing, re-fitting and adjusting, sewing the next step of the project, etc.  This was a one-shot, all-or-nothing deal owing to those project logistics.

I mean, think about it.  A person could take an ordinary cylindrical dry bag, such as is used in whitewater rafting, and cram it into that same available space.  But then the hold straps would simply have to go around the bag, not be part of the bag.  That didn't appeal to me for safety reasons, because a bundled kayak is not rigid, and with road vibrations, is very capable of migrating itself around the roof in a way that it should not be allowed to do.

Edit 20170726:  After I published this post, Instagram fed me the following image, which is a perfect example of what happens when objects are not sufficiently strapped to a roof:

Wanting to avoid any such scenario, I came up with this instead:
The rationale will become more apparent once we switch from a 2D to a 3D rendition.  The second trio of Velcro strips for closing the envelope are under the right edge, hidden from view.  
Here it is in envelope form with the sides sewn up and the three mated Velcro pairs of strips visible.
Now you're starting to get the picture.  The belt webbing is extremely long in each of the four attachment points because I wasn't able to refine the fit in real time, for the reasons explained above.  Hence I left myself a lot of extra length, just in case.  Too bad about the waste, because this stuff is expensive, but whatever. 
Now you can see the largely-finished morphology even better, because in this pic, I've placed the kayak inside of the carrier (during the execution of this project, I joked to my husband, "Be sure not to trip over that dead body I left on the kitchen floor.").  In this pic, I have not yet fitted the package and trimmed the web belting to better reflect the final positions of the parachute buckles yet - that had to be done in situ, on the roof.

You can see that the lip of this tarp envelope folds backwards toward the roof a/c unit.  That way, on-rushing air cannot force its way beneath it and try to tear the envelope open.

The front two attachments will clasp around the 80/20 aluminum frame bar that supports the solar panel array.  The two side belts will buckle around Airstream's longitudinal roof rack support members.  Those are intended to maintain strict positioning only.  The weight of the kayak will actually rest directly on the roof.

Dog be like, "Damn, it's hot out there!"  And it was - once again, close to 100 degrees, and you'll excuse me for not getting sick of complaining about it, because it never tires of being a burden on us (Houston in mid-July, ugh).  I had to wait until the sun got low in the sky to get my money shots because it was too hot for me to even put my hand on any part of the roof framing to steady myself as I was up there. 
Because this was an "all or nothing" one-shot sewing deal, I did not have leave to refine the positions of any of those four attachment web belt strips.  I put them where I thought they made sense, and resolved to simply refine what I could once I got the whole shootin' match up onto the roof.  The main thing, again, is that all attachment belts are fully integrated.  They are sewn directly to the carrier, to ensure that the whole thing will not come undone while the van is traveling at high speed.  Each individual sewing stitch may not be that strong, but there are a lot of stitches in this creation, and cumulatively, they should make for a device that should withstand 70 mph headwinds for thousands of miles.

And now for the money shots.
Very nondescript.  Looks like it goes with everything else that is up there. 
Side buckle. Rainwater tends to gush down the channel closest to the shoulder, so I wanted this carrier to lift up a bit at the ends, so as to not trap water on the roof.  

View from the side. 
It's not one of my most elegant projects, obviously.  I wanted to leave as many tarp grommets exposed as possible, just in case I prove to have an unforeseen need for them.  But it doesn't look elegantly finished as a result.

I haven't road-tested it yet because we are simultaneously working on installing an EasyStart electronic device so that we can run our coach a/c from the lithium battery bank, so the solar panels are currently unhinged at the rear.  I'll re-edit this post if I have any follow-up wisdom to offer.

Rather than closing with a meme as I often do, here's a picture of our riotous subtropical summer sky, the one I saw while I was up on the roof completing this job.