Following up on
this Air Forums thread, we decided to go with perforated rubber (
SBR) instead of teak for our wet bath. A good point was made in that thread about sand grains carried in on shoes and potentially being ground into the floor of the wet bath, and in fact, I had noticed some wear on our floor (which is otherwise unused to the point of still having the factory stickers in place). A custom teak floor mat version was quoted in a separate Air Forums thread at about $350 plus tax plus shipping to have made. Flow through rubber? About $12, assuming you will use the residual pieces somewhere else. This series of pics describes the sourcing and fitting.
 |
| First, create a template using butcher paper. |
 |
| Next, get thee to the Big Orange Retail Giant (BORG) and locate this commercial-grade rubber anti-fatigue mat. I cannot find a URL at this price, but the item codes are in the inset for reference. Note that there's also a product called a "flow-through rubber mat" which is widely for sale, especially at restaurant supply stores, but when advertised using those words, they tend to be about twice the cost of "anti-fatigue". |
 |
| Advisory: This mat was not intended to be walked on in bare feet. Some people might find its texture not to their liking. But I wanted the very heavy gauge and stiffness of a commercial rubber product because I was worried about it potentially sliding around when wet. |
 |
| Cuts are best accomplished by folding over the mat and scoring it repeatedly with a scalpel-like very sharp instrument. Rubber does not like to cut easily. This is best done as a two-person job - one person to hold the mat upright and the other to cut along the fold. Two people because the whole mat is quite heavy. |
 |
| Twins in form only, not in substance. |
 |
| Money shot! I think it looks tres cool. Circle motif once again (rivets). |
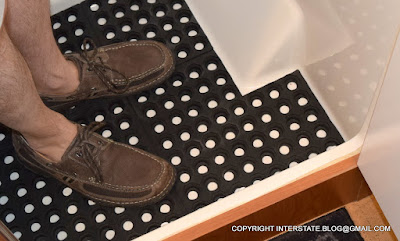 |
| We both jumped up and down on it to ensure it would not slide around. We have not yet tested it under wet conditions but flow-through mats are designed to be used wet so I'm not anticipating any issues. Spousal approval was easy to get for this project. The un-cut mat spent a week tossed onto our garage floor before we found the time to size and install it, and my husband decided he liked walking on it because of the cushioning effect. |
One caveat: This is an industrial grade of rubber and we are a bit worried about it transferring pure black shadows (staining) onto the pure white fiberglass floor of the wet bath. I don't know if this is a real risk or not, but better safe than sorry, so I'm only going to leave it in place on the floor while we are on the road. While the Interstate is in storage, it will remain on our countertop (we have a piece of shelf liner to cover the glass stove and sink top and I'll just leave it on top of that).
I still have over half of the original mat left over. I will either trim that and use it as a slop mat next to our garage utility sink, or maybe I will cut a piece to fit the Interstate floor near its rear doors, because that is a location where I drag in a ton of sand and mud on my feet. A holed mat segment would help to catch and contain some of that mess before it spreads over the rest of the motorhome.
 |
| With the bucket of money I saved on this little project versus what I might have paid for teak, I'll be able to also afford one of these! Yippee! |


