Showing posts with label UPGRADES. Show all posts

Monday, June 11, 2018

REPLACING THE FRONT STRUTS ON AN AIRSTREAM INTERSTATE

Every time I fail to blog post something that we have done to our van, there's usually a reason I regret it later.  This is a short one designed to capture information pertaining to a simple replacement that has been well-covered elsewhere by others.  But here goes anyway.

This is the replacement gear - 87 2638 - Koni Shock - Heavy Track Series, is what they are called.  We had to wait several months because they were back-ordered.  The manufacturer apparently creates them on an as-needed basis when existing supply runs out.

Here's what the interior mounting points look like under the floor.
Curb side, by the right hand portion of the OEM bottle jack.

Street side.  The weight is holding back the floor covering and the rubber bushing has been moved a few inches below the location where the strut pierces the floor of the cab.
Here's an action shot showing work in progress on the street side.  The central vertical piece is the old strut.

Old strut in hand on curb side:

As for the rest of the instructions, this YouTube video below covers that fairly well.  Low video quality, but the author does present information in an organized way.  The only difference we found is that, with this newer pair of struts, Koni seems to have changed the tensioning mechanism such that it takes fewer turning motions to set it.  And my husband adds these elaborations to the videographer's instructions. 

We tested this new installation by driving to Galveston and back, given that it's too hot to go anywhere else at this time of year, and given that Galveston offers a good test drive because of the reliable onshore breeze.  The Koni struts did help to dampen certain large-scale oscillations, especially vertical bounces.  However, there's still more sway in the front end than I would like, and I'm not sure if anything can be done about that.  Maybe I'll research Sprinter Forum.

Direct link: https://www.youtube.com/watch?v=ZD0tRBrgOUQ

Embed

Saturday, April 21, 2018

ADAPTING A LAGUN TABLE FOR THE AIRSTREAM INTERSTATE

Reading that post title, many of my readers (maybe even all five of them at once) would wonder, "Why does she need a Lagun table?  She already made herself a custom computer table."
And what a beauty she is.  The blog post linked above describes how I repurposed all of Airstream's original hardware for this improved design. 
More accurately, I made a custom computer table top.  Which I am now free to deploy elsewhere in the van should it prove to suit my purpose.

And it might, because there is the infernal issue of the dismal ride quality in the rear of the Sprinter where this tricked-out table typically functions (for a tri-forum collection of ride-quality grousing, see discussion threads here and here and here, and I could go on with many more).  Try as I might, I have not been able to gain any "sea legs" to help me deal with the constant fish-tailing and pounding roughness of life on the road in our aft section.  Sitting back there usually makes me acutely ill inside of 30 minutes unless I spend my entire time staring out the window at the horizon to minimize inner-ear disruptions.  That approach, of course, would not be compatible with working on a computer.  

Ergo, if I want to be able to work when we are under way, and as a small business owner I very much want to do that, then I have exactly two choices:  Either find a way to retrofit rear air suspension to the van, or find another less-punishing place to work.

Air suspension is a pricey option - between $5,000 and $10,000, with the added complexity that out-of-the-box systems are no longer sold for the T1N Sprinter, which is now more than 10 years post-production.  Newer systems are not compatible because of chassis changes.  The one older system that has the potential to work is the Glide-Rite package sold out of the UK.  The problem there is that we would have to fabricate some of our own mounting hardware, as they no longer sell it.  That introduces a lot of work, and far more importantly, it introduces technical unknowns into the purchase decision.  What if we spent all that money and the installation proved to be more trouble than it was worth? (For instance, we never did confirm whether that system was retrofittable with our propane tank being located where it is). 

It dawned on me recently that there may be a workaround.  If I could find a way to work at the front of the van instead of at the back of the van, the issue of rear sway and roughness largely becomes moot.  

So I set about the process of experimenting with options in this regard.  My early efforts tended toward the conventional, and they proved to be unworkable.
For instance, I tried shrouding myself with a tent of light-gauge fabric in the passenger seat in order to cut the window glare well enough to see the computer screen, but this blocked the driver's line of sight to the curbside mirror.  That was plainly unacceptable.
And then I remembered -- we installed a seat swivel that we proceeded to hardly ever use.  What if I could work up front, but facing the rear insead?  
Remember Southwest Airlines' old lounge seating areas?  They were discontinued probably because they were unpopular - many people did not like the idea of flying backwards.  I was often the passenger who volunteered to sit in that row, because I did not give a flip which way my seat faced.
Image courtesy of Airliners.net.  
Maybe that swivel seat could be used for a task more productive than map reading. 
The question then became -- if I were to use my computer table here, how would it be mounted?  

We really didn't like the idea of sinking two additional leg receivers into the floor at this location, right in the way of traffic.  They may be close to being flush with the floor surface, but those holes are a pain the ass, plus I find them unsightly.  
Nope.  I think it would require tapping into the chassis, which I absolutely do not want to do.
Image from this site.
I got the Lagun table idea from the forum poster known as GeorgeRa, whose self-built van is named Voila (see if this link to a photo album, and see also here and here).   The Lagun is sold by a company named Marine Teak.
Marine Teak's facility in the UK.  Notice that solar camper van near lower right.  Clearly, its presence was A Sign.
If you look at the installation pics that are available on those threads linked above, you will notice one regrettable design feature: the Lagun hardware has to be mounted substantially proud of any vertical surfaces that might otherwise interfere with the table's swivel function.
GeorgeRa's installation, with the table top and arm being in the stowed position.  Not too bad, but you can see that he extended his cabinet mount with what looks like a rectangular block of wood.
Another user's installation in a Travato, from the B Van thread linked above.  Holy frijoles - what is that huge block sticking out into the aisle of the van??  Both of my shins would get bruised to pieces if we had that in our rig!  (Head of the seated person chopped off for privacy, intending no disrespect). 
The reason why these bump-outs are necessary has to do with this:
The butt end of the horizontal hardware sticks out beyond the vertical support, especially when it's at a 45 degree angle.  Therefore, in order to have clearance to swivel to and fro, the receiver must extend outward, if this is to be mounted on a vertical surface such as the side of a galley cabinet.  
OK, so, this blocking issue is a necessary evil of the design, but lacking superior alternatives, I ordered the Lagun table support anyway.  Nothing is perfect.
It arrived from Merry Old England as an undisturbed bundle of joy.

However I was not impressed with the unwrapped quality of it. There were dings on both the horizontal structural member and this fastening piece.  There was no evidence to suggest that this happened during shipping.  It was packed up that way. 
If I have to concede the use of a mounting adapter, I at least want something a bit more elegant and a bit less bruising than some of the published variants.  So I fashioned an alternative with aspects of quality and appearance in mind.
Solid red oak, with a beveled edge.
But God forbid I should be able to purchase a single piece of oak thick enough for this job.  No - I had to get two and sandwich them as shown above.  This was the first of several successive First World miseries associated with this project.  I don't mind doing projects - in fact, I really enjoy projects.  What I do not enjoy is not being able to easily buy the basic feedstocks that I need for the projects.  

There she is, Miss America.  A woman's place is in the kitchen - baking parts that she fabricated in the garage.  That's the oak sandwich glued, cut, drilled out, and painted with Sherwin Williams oil-based enamel in "Iron Ore" color formulation, which matches our countertop.   
Here's the next pain in the ass where hardware was concerned.
The hardware included by Marine Teak was excellent quality stainless steel, but was not large enough to accommodate the adaptive fitting that many installers are obviously going to require for this project.
To make matters worse, in ordering this from Merry Old England, of course it came with metric hardware.  Metric stainless countersunk bolts, to be specific.  I might as well be seeking to buy a lock of hair that had been taken from Christ Himself.  
The problem with common retail stores that, upon downstepping from the OEM metric to its nearest English equivalent, which is a one-quarter inch bolt, I commensurately had to downstep to a three-inch long bolt.  Everything above three inches upstepped from four-sixteenths to five-sixteenths in diameter.  And five-sixteenths was too large for the bracket holes. 
The bolt length matters because of the backing plate that was delivered with the Lagun.  It was made of half-inch plywood so it was going to add considerable thickness to the overall fastener design.  Of course I could order the optimal hardware for this job off the internet, but if I did that every time I needed a specific item, it would be a month of Sundays before I got anything finished.  So typically what happens is that I make do with whatever crap can be located in big box stores.
I will show the half-inch OEM backing plate below.  Not being sure in the hardware store whether a 3-inch bolt would be long enough to extend through the whole kit and kaboodle, I brought home this piece of metal plate in case I had to use that instead of the plywood.  Some van owners, should they try to do this kind of installation, may have to substitute a thin metal plate as a backer, depending on where they are mounting the Lagun. 
But even the damned metal plate could not be sourced properly.
This is what Lowes hardware keeps in stock - quarter inch steel plate, and sixteenth inch steel plate. Nothing in between, absolutely no eighth-inch, which is what I (and every other hobbyist) really need.  
OK, enough howling about product availability.  Here are a few installation shots.  

This is what the OEM half-inch plywood backer looked like once I painted it and trimmed it sufficiently to fit in our space.
This is the view inside the cabinetry.  The installation kit did not come with the fender washers.  We added those.
In order to achieve an optimal height for the bracket mount, we had to bump down the location of the propane detector.  Here you see my husband Dremeling out that space.  And also you can see the bracket mount which looks like a finished piece that belongs there, I think.  I didn't want a squared-off design like the others I showed above because someone coming through the sliding door would hook something on the edge of it, a piece of luggage or whatever.  A sloped design like this is better, I think. Any items bumping up against it would tend to slide by rather than hook.  
And a few money shots of the installation:
You know a project was successful when you sit in the midst of it and you don't want to get back up again.
If you look at that pic above you'll notice something curious.  I've used one of the OEM pedestal legs as an additional support on the right side.  Most of the time, I don't think this will be necessary, but if we are pounding across really rough roads, I will probably slip this leg in there just for extra support, so as not to put too much stress on the Lagun.

Most importantly, the table does not impinge upon the dog's space.
View from the side.  Yes, I know I need a foot rest.  The swivel mechanism has the effect of raising the seat.  
In order to get up without removing the table, I just push it away, and then swivel it to the side.
I get a great view from this location, too.  And I get my dog's full attention when the dinner hour approaches.
The ratchet handles will bump the edge of the cabinet, preventing a full 180 degree travel distance.  But there is a workaround for that - simply flip the horizontal support over, placing the handle on the other side, and then swivel.  By this method, the table can be rotated left instead of right, including part way out the sliding door.  I can see this being convenient for BBQing and whatnot.   
And how do I store this lofty apparatus when it is not in use?
Same thing I did with the original table top - hang it on the outside of the wet bath door. 
If you look carefully at that image above, you'll notice that the Lagun base does not line up perfectly with the perforated aluminum sheet.  That's because the sheet is made to English measurements and the Lagun is, once again, metric.  I will need to add about two holes in the table base so that I can better align the tiny nuts and bolts that hold it to the aluminum sheet, but I want to do some road testing before deciding on the exact final position for the base, so for the moment, I'm holding off on that part.

Like I always say, our van keeps getting bigger and bigger.  I just doubled both my working options and my comfort level, because now I can sit in a full captain's chair instead of perching on the couch to do computer work.

Stay tuned for my road testing notes.
No, actually, I don't.  The office on wheels that I have is constantly on the improve.  
UPDATE 20180427 I'm pleased with the initial road testing I've done, with one caveat.  Working at the front of the van means the same thing as working anywhere else - office and computer clutter that needs to be controlled.  Here's a photo showing some of the organizational features I've added so far - a Container Store magnetic bulletin board with two magnetic mesh baskets, plus a wall pocket cut down to fit the left / front side of the galley cabinetry.

UPDATE 20180510:  Those sharp corners were proving to be a pain now that the table is mobile and swiveling, so they were trimmed and the edge re-bound as follows, which I expect will furnish a significant ergonomic improvement:

Friday, October 6, 2017

ROAD NOISE CONTROL IN AN AIRSTREAM INTERSTATE

This is the kind of blog post that puts bloggers in a "damned either way" position.  It supplies not enough information to get us off the hook with readers who are professional engineers, as such readers will quickly spot technical flaws in this limited analysis.  At the same time, this post might be guilty of supplying too much information to the point of confusing the hell out of non-technical lay people.

Engineers, please realize that we know this work is sloppy and incomplete - it is so by design.  Our intent here is not to establish rigorous quantitative proof of a specific result so much as it is to give a more general "feel" for the outcome of this van improvement project.  We are DIYers and bloggers, not automotive researchers.  But at the same time, we have to supply some de minimis level of actual measurements and data in order to substantiate our qualitative (quality of life) claims, so that's what we've tried to do here, is split that difference. 

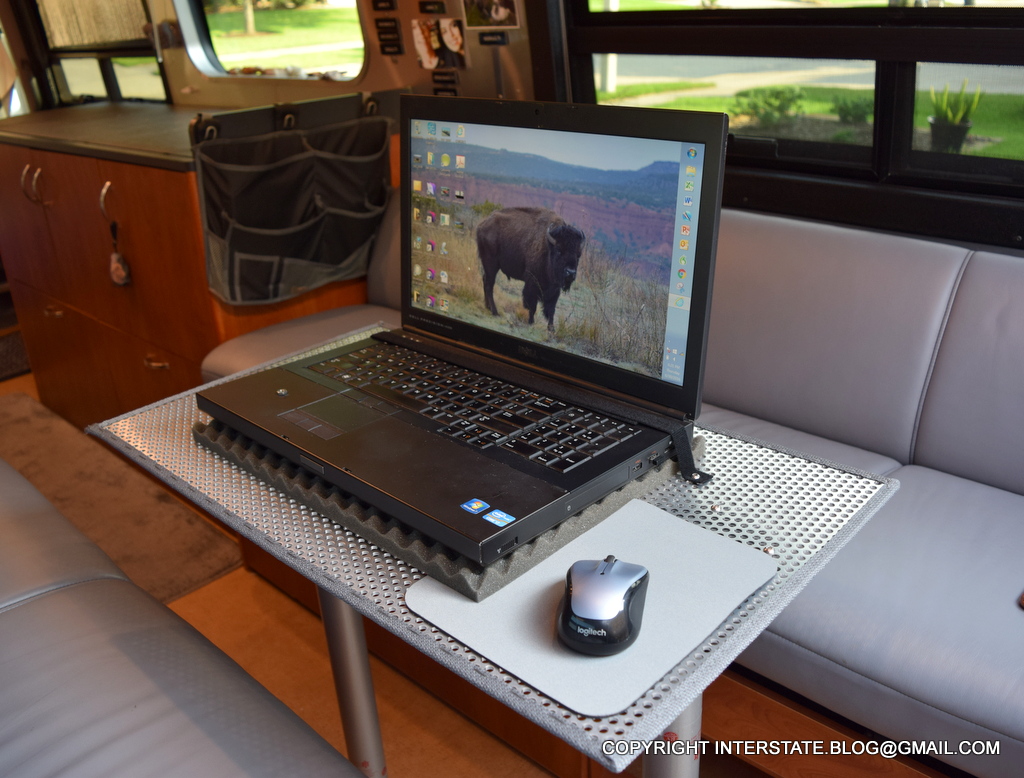
OK, with that massive disclaimer aside, we undertook a project to add sound deadening improvements to our 2007 Airstream Interstate.  This Class B RV was built on a T1N Mercedes Sprinter cargo van, and no cab noise control had been integrated into the design of Airstream's upfit.  
We had already realized substantial improvements by commissioning a custom carpet job for the cab, but that left the remainder of the body in its original "tin can" condition.
Here's a picture of that carpeting job.  After we got this, we noticed, "Wow - we can actually hold a conversation on the road now!"  
But here's what the door looked like on the inside with the finish trim removed.  Tin can.
I must confess that I didn't take many photos of this project because part of me doubted that it would amount to much.  We had already done the carpet, and I assumed that most of the controllable road noise had been coming through the floor, courtesy of the wheels.  So my show-and-tell is limited in the sections that follow.

My husband chose the vendor Sound Deadener Showdown LLC as the supplier of the products that we used in the doors and on the firewall.  It's basically a 3-part process as follows, and as demonstrated more completely on their website:
  1. Control vibration and resonance using what that vendor calls CLD Tiles.
  2. Block sound with a dense barrier that consists of mass-loaded vinyl (MLV). 
  3. Absorb middle to high frequency sound using a closed-cell foam product.
In tackling those additions, first, the interior door trim has to be carefully disassembled.  There are various sources of information on how to do that, including this Sprinter Forum thread.  

Next, the CLD Tiles are added.  Here's a photo of the interior of one of our doors with those in place.  They intentionally don't cover the entire interior door surface. 
Those silver rectangular things. 
Here are some scraps of the other two products on our garage floor.
The MLV is on the bottom.  It reminds me of dance floor material, what they cover dance studio floors in. 
After the CLD Tiles are applied (they have an adhesive back), sheets of the other products are cut to fit the inner door frame area, with cut-outs for all the little knobs and pieces and whatnot.  Unfortunately, I don't have any pics of those materials as they are added to the interior of the trim section.  I will say that it's easiest to lay the trim section upside-down on a cushioned surface so as to not damage it, and fit them that way.  

Once those are fitted, the trim piece is then replaced on the door, and re-attached using the integrated clips and bolts that hold it on.

Here are two data compilations showing noise measurements taken before and after the completion of this project.
Readings were taken with the sound meter held in the same position mid-cab, along the same stretch of concrete freeway, under comparable weather conditions and time of day.  (Tap or click the image to expand for a clearer view.)
In this graph above, you can clearly see the that suite of "after" measurements is reflecting lower road noise levels as measured in the cab.  Laypeople need to realize that the decibel scale is not a linear scale - what looks like a small average reduction here is actually substantial.  I'll explain more about that in the chart that follows. 

There are visible differences in the two data suites - most notably, why is there so much greater spread among the "after" measurements?  Well, we tried to hold all variables constant, but we don't dictate what transpires on Houston's freeways.  Traffic was worse during the "after" measurements.  I was stomping the accelerator more frequently, trying to hold proper speed for sound measurements, I was lane-weaving, and I was having more vehicles blast past me.  That explains a lot of it.  

Despite those distributional differences, you can clearly see the effect of the sound deadening effort, which becomes even more apparent when we attempt to look at it in baseline terms rather than looking at the more complete suite of data above.
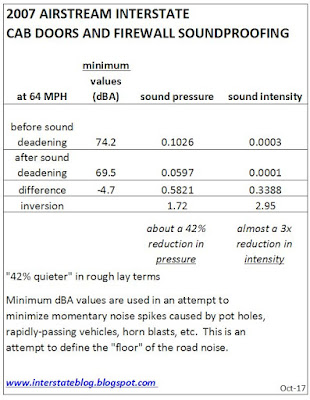
My husband used the Omni calculator for some of these calculations.  I'm omitting details for brevity. 
The human sensory apparatus is not very good at defining absolute sound intensities, light brightness levels, etc. in anything remotely resembling quantitative terms.  I can't tell you definitively what's twice as bright or half as loud using my ears or eyeballs.  I can tell you perceptually that this door and firewall sound deadening job has made a BIG improvement in driving quality of life.  I can say, "Our Interstate is much quieter now."  By these rough mathematics, the typical level of freeway speed noise was reduced almost by half.  Very roughly speaking.  Which was a big surprise to both my husband and me.  We expected to maybe realize a little in the way of gains.  We got a lot.  

It cost about $250 for the materials we used in this project, plus we have some left over from that purchase.  I'd say it's well worth it, and I recommend a similar approach for anyone who has a camper van in which this kind of improvement was not a part of the original upfit.  
Fat chance of a stereo helping that ^^ situation.  Maybe now that we've got this improvement done, I'll be able to listen to some of my music on the road without going slowly deaf from having to turn it up so loud to hear it over the road noise.  

Wednesday, May 10, 2017

LITHIUM BATTERY CABINET MOD ON AN AIRSTREAM INTERSTATE

Inch by inch, life's a cinch.  Yard by yard, life is hard.
There are numerous versions of that quote floating around out there, and we may never know who coined the original phrase. Given that Ms. Giffords is married to an astronaut and lived a few miles from us, and given that my husband works as a Flight Controller for the International Space Station, I thought I'd use this one.  
"Inch by inch" is my best piece of advice where DIY is concerned, and I'm going to give an example of what I mean with this blog post.  It's fairly unlikely that there's another person out there who will need to do this exact mod to their Airstream Interstate, but that's not the point.  The point is to illustrate the general headspace associated with tackling modifications when you possess no formal skill in the area of issue, which is the case with me when it comes to woodworking and metalworking.  I hear from people who express reservations about their own ability to tackle DIY jobs and van modifications.  A lot of that can be overcome by simply taking things one small step at a time.

Let me start from the very beginning and proceed incrementally with successive photos to show you what I mean.
Originally, the space under our coach's closet contained this conventional electrical converter and a bunch of miscellaneous electrical and water lines kinda tossed back behind it.  You can see that there's a mounting panel cut out of cabinetry material, to which this converter was attached.  
This is what that mounting panel looked like when removed from the Interstate.  It's a piece of OEM cabinetry material, but it was cut very crudely by Airstream.  You can see that the cut lines are jagged and the right side leg is a conspicuously different width than the left side leg.  Despite these limitations, I had to find a way to re-adapt this piece during our lithium battery upgrade project (blog posts on the technical aspects of that project itself are still to be published).  I had to re-use this piece because we did not have access to any more of this cabinetry material. 
This is what the lithium install looked like with the closet door removed, closet floor removed, and that front mounting panel also removed.  You can see the shallow tray on top of the batteries, a frame painted white, but the new electrical inverter had not been installed in that spot when this photo was taken.  Nevertheless, you get the general idea of this lay-out.  
This was my temporary protective cover for that under-closet lithium chamber - it's simply a piece of black coroplast (plastic cardboard) with some mosquito screen covering two ventilation cut-outs, with the mosquito screen being held on the back side using duct tape.  The coroplast piece was then screwed into the mounting frame using the same screws and holes that had held the original electrical converter. But that wouldn't do as a long term solution.  It was strictly a stop-gap measure. 
I knew that the final modified panel had to include a kick plate on the bottom.  In the tiny space of the Interstate, stuff gets bumped, kicked, and generally smacked around - it happens.  I didn't want anything to accidentally punch itself through that opening and impact the lithium batteries or other electric components.  We have a miter saw and I've gotten reasonably good at making precise wood cuts using it.  So I cut a strip of half-inch furniture-grade plywood to be added across the bottom.  The plywood was left over from my custom closet shelf project.  
You might observe that it's a very thin kick plate that I added above - possibly not very strong.  But knowing that the original converter opening had been crudely cut by Airstream, I knew I'd have to make an overlay for the ventilation opening.  There was no way to re-cut that panel to make it visually presentable, especially given that one leg was wider than the other.  So I began to measure for a quarter-inch furniture-grade plywood overlay to hold the ventilation screen.  Together with the half-inch strip at the bottom, it would be strong enough when all attached together.  
At that point I needed to size the opening.  I wanted as large an opening as possible for maximum ventilation, but I had to account for the irregularity of the underlying cabinetry mounting piece.  I settled on this size as represented by the blue construction paper, and my husband and I worked together to cut the opening.  Basically, he used a jig saw freehand, with me standing on the workbench, standing on top of this piece of plywood to hold it steady as he cut (we don't own a lot of sophisticated woodworking tools).  
OK, so now I'm one more inch further along in this process, with the overlay cut.  Next I painted it and the underlying strip using a Sherwin Williams oil-based enamel color formulation that matched our Interstate's counter tops.  
Once the paint had dried, I needed to determine how large to order the perforated aluminum sheet, which was by far the most expensive part of this process (about $37 with tax, shipping, and handling).  For that reason, I wanted it to be as large as the opening would tolerate, knowing that we might do further mods down the road and maybe I'd want to re-purpose that piece on a different future cabinetry mod.  So here you see the overlay opening in blue, and the aluminum plate sizing in pink.  Given that we are not professionals, we always create project mock-ups out of cardboard and/or construction paper.  It's a practice that tends to eliminate both accidents and unforeseeable sizing mistakes, no matter what we are working on.  

I ordered the piece from Online Metals, which also supplied the same perforated aluminum sheet for my custom computer table and my under-cabinet shelving projects.  They have given me really good service.   
After the aluminum piece arrived, the next task was to attach it to the gray painted overlay.  This was more challenging than you might first assume, because I was using the existing perforations rather than drilling holes electively in locations of my choice.  As such, I had to drill the small bolt holes partially blindly from the back side.  You can see that I'm a couple of millimeters off being completely centered with those bolts.  As my husband would say, "If you could achieve better than that on a first try, then you wouldn't be called a DIYer.  You'd be called a professional instead and you'd be getting paid accordingly."  
I had originally planned to add a second quad of small bolts to hold the overlay to the original cabinetry mounting piece.  But once I realized that my first four bolts were slightly off center, I didn't want to add any more because it would visually amplify the imperfection.  For that reason, I decided to attach the overlay to the original cabinetry piece using 3M exterior grade double-sided tape, one of the few applications in which I would agree to use that product (adhesive products generally don't stand up well here in the Deep South).

However - next inch please - using the 3M tape caused a domino effect in that the overlay was now standing a bit proud of the cabinetry mounting piece.  Which means that my strapping for the bottom reinforcement strip was no longer flush.  So I added a spacer washer on either side in order to close the gap between the kick plate strip and the small mending plates I was using to attach it to the cabinetry mounting piece, as you can see above.  
In order to create a good seal along the bottom of this workpiece, I had to add something flexible and compressible to exclude dirt or spilled materials from potentially penetrating the bottom edge and entering the lithium chamber.  This is what I chose.  
And here you see it applied to the bottom edge. 
My husband wants to be able to pull off key cabinetry pieces quickly without having to mess with screw drivers and hardware.  For that reason, we've used neodymium magnets to attach certain structural pieces, rather than fixed screws.  Several of them were attached to the back of this workpiece to hold it in place against the cabinetry frame below the closet.  
This and the jig-saw cut to the overlay were the only parts of this project that my husband assisted with - I could have done the entire job without him, but two heads are better than one, and he decided that he wanted to counter-sink screws into the steel washers that would go on cabinetry frame, to which the neodymium magnets would attach.

"You don't have to make every last thing fancy,"
I noted to him as he was purchasing the counter-sink drill bit needed to do this.

"What's the point of doing any project if you're not learning at least one new thing in the process?"
he asked.

I replied (paraphrased), "I've got four additional projects stacked up on the heels of this one.  I'd never get them all done if I don't simplify and choose a path of least resistance at times." 
Here's the counter-sunk screw sitting in its metal washer, stuck to the neodymium magnet in the workpiece.  
And this is what it looks like from above, peering down into the small gap created as the new front panel stands a bit proud of the existing cabinetry frame.  That small gap allows one's fingers to pry the piece off the cabinetry - in other words, we designed it this way intentionally.  Those neodymium magnets are very strong, and leverage is required to dislodge them.

The mat you see lining the closet floor is an IKEA Oplev which I cut to the shape of the closet.  Its purpose is to trap grit and dirt that falls off my folding bicycle which I store here.  I don't want that dirt making its way down into the lithium chamber.  
And after proceeding through this little project all those incremental inches one at a time, here's the final result.
I think it looks pretty good.  It does a good job of resurrecting a badly-cut cabinetry piece while meeting the ventilation and chamber protection goals.  
This project represents one more small step in the life of a couple of van DIYers.