Just a wee blog post here to let you know that one CAN successfully resize a CGear Sandfree mat for a Class B RV.
I don't know what in the hell I was thinking when I bought an 8 foot by 8 foot mat of this brand name. I used it once and realized that it was way too large for our needs. Furthermore, it doesn't pack down very small size as the high-density polyethylene (HDPE) of which it is constructed is rather unruly. Furthermore, it is only sold in square sizes, and I wanted a rectangle to fit beneath our awning.
NNNNNOOOOOOO!!! I want RECTANGULAR!!!
Here are a few #vansizedsewing tips for working with this product.
I used this binder for my cut edges, which bought via Amazon. Strapworksrules. I've bought stock from them before, usually directly because their entire inventory is not on Amazon. Color is silver gray.
So I chopped my 8'x8' mat in half, but may I say, this mat is truly aggravating to sew. It's made of two independent layers of HDPE fabric, both of which float free except at the bound edges.
It's quite springy and it became a bit of a chore to wrangle both halves into the new bound edge.
Important: As you are feeding it through your sewing machine, keep it under tension. Left hand pulls away from you, right hand pulls toward you. This will prevent rumples and wrinkles. And for goodness sake, bind up your excess so that it's not running away from you. I used binder clips to keep it under control.
Push-me-pull-you.
Can you tell which part of it is my bound edge, vs. CGear's OEM work?
Wait until it gets a bit dirty. Then this slight difference won't be visible at all.
Of course, I had to sew new binding on both of my chopped halves, because if I had left the other half just sitting there, I'm afraid it would have started to curl and perhaps unravel. But I'm satisfied with the finished product, and if the first half gets worn out from use, then I've got another half to fall back on. Two of the right rectangular size, for the price of one square.
Half the size and half the bulk. And yes, I know my grass needs to be cut.
Fair warning - if you Google "push me pull you", you'll get a few pics like this, plus a large number of pics of animals copulating.
Our 2007 Airstream Interstate came without a dedicated trash can or even an obvious area in which to place a can, and I've been struggling for a couple of years now to figure out the best arrangement for this function.
One of these, and I don't care which term is used.
Here is one of my earlier less-than-ideal early solutions.
Container Store usually has good stuff, and this was useful, but it had its drawbacks. Even after I moved it to the wet bath and kept the door shut, flies still got into it.
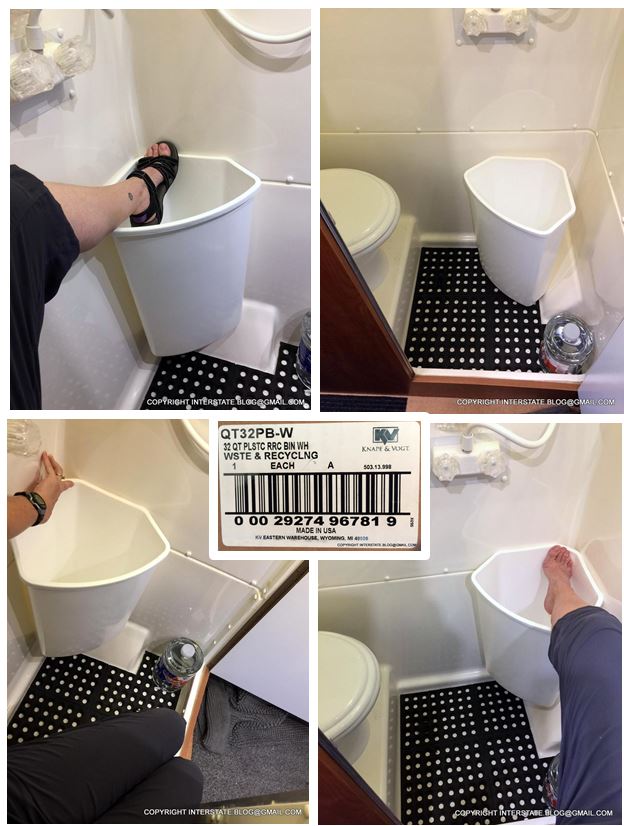
I moved on to an attempt to adapt this triangular beauty to the space. We need a lot of trash storage volume because we boondock, and if we go through a rainy period, we can't burn anything. The trash can pile up in the van for a few days, ugh. So that's why I began looking at adapting this as a possible addition to the wet bath.
It's a plastic insert for a stick-and-brick recycling center. It's rather large, yes it is.
But then I got Shanghai'd by a different idea that I had several years ago but never developed. I had purchased this Oscar the Grouch Sesame Street soft-sided (collapsible but stiff enough to stand up on its own) trash can which was round with a heavy wire rim. I bent the rim into the triangular shape that I really wanted to see here. And then I fitted a triangular lid that I cut out of coroplast and edged in nylon belt webbing (tough to sew, but do-able). I used tabs of waist elastic band to make "hinges" on the far edge of the can.
It's cute - admit it.
Video of the operation:
Well, that was smaller than I wished for a trash can to be, but it did have that all-important fly-deterring lid, and the cuteness factor got to me.
"Meet your new bus mate!" That's an Oscar bean bag toy.
Simultaneously, for more trash storage space, I added this product behind the commode:
I got it at West Marine.
In order to add this in a way that was responsive to the fact that I change my mind every five minutes regarding where I want items to be placed, I had to build a bracket for it, so that I could mount it without piercing the wet bath wall.
It came with this white mounting piece, but I wanted to attach it with outdoor Velcro and so I had to expand the surface area. I made this out of thin plywood...
...and countersunk the mini-bolts that hold on the OEM bracket, love it. I was reaping the rewards of having reorganized much of our hardware over the past few weeks. I actually found this stainless hardware without having to scrounge.
See, the lip of the top cover extends over the body of the can, so I could not simply Velcro the can body to the wet bath wall. I had to build this out.
Here's the result of this little satellite trash can.
We plan to travel with a young lady who is a dear friend of the family this summer, so this familiar women's restroom type of stall receptacle might be appreciated.
So there's Trash v. 2.0 and we'll see how it goes with these improvements. I still don't know if this is enough storage space for our needs, but it's better than what I had rigged previously.
Tugging at the heart strings of DIYers everywhere.
Every time I fail to blog post something that we have done to our van, there's usually a reason I regret it later. This is a short one designed to capture information pertaining to a simple replacement that has been well-covered elsewhere by others. But here goes anyway.
This is the replacement gear - 87 2638 - Koni Shock - Heavy Track Series, is what they are called. We had to wait several months because they were back-ordered. The manufacturer apparently creates them on an as-needed basis when existing supply runs out.
Here's what the interior mounting points look like under the floor.
Curb side, by the right hand portion of the OEM bottle jack.
Street side. The weight is holding back the floor covering and the rubber bushing has been moved a few inches below the location where the strut pierces the floor of the cab.
Here's an action shot showing work in progress on the street side. The central vertical piece is the old strut.
Old strut in hand on curb side:
As for the rest of the instructions, this YouTube video below covers that fairly well. Low video quality, but the author does present information in an organized way. The only difference we found is that, with this newer pair of struts, Koni seems to have changed the tensioning mechanism such that it takes fewer turning motions to set it. And my husband adds theseelaborations to the videographer's instructions.
We tested this new installation by driving to Galveston and back, given that it's too hot to go anywhere else at this time of year, and given that Galveston offers a good test drive because of the reliable onshore breeze. The Koni struts did help to dampen certain large-scale oscillations, especially vertical bounces. However, there's still more sway in the front end than I would like, and I'm not sure if anything can be done about that. Maybe I'll research Sprinter Forum.
Direct link: https://www.youtube.com/watch?v=ZD0tRBrgOUQ