Sunday, March 29, 2015

TRAVEL TOWELS FOR THE AIRSTREAM INTERSTATE

A couple of pics here of the compact towels I bought for our Interstate, given that this topic came up on the Air Forums Small Space Living thread.
Two Shandali microfiber towels fit nicely on the wet bath towel bar.  The same cannot be said for conventional cotton towels, which are too thick.  These are the medium and small sizes for my husband and I.  
This is the Packtowel Nano that I bought for use as a kitchen towel.  It has an integrated stuff sack, so when it's dry and not in use, it can be kept out of the way...
...and then unfurled when needed, without needing to be detached from the cabinet (that means it's harder for me to lose it, yay).   

INSTALLING A DIGITAL THERMOMETER ON A DOMETIC RV FRIDGE

We recently had to troubleshoot our Dometic 2351 propane fridge, and found that a blown fuse was at least a part of the reason for its failure.  Well, guess what??  Confucius say that an RV fuse that blows for no apparent reason has a good chance of blowing again for no apparent reason.  And for that reason, we decided to proceed with installation of a digital temperature display so that we could keep a much closer eye on the behavior of this little fridge.
When it works, it works very well, but there is no visual cue for when it might be deciding to take the day off.  The only functional indicator we have is whether the Auto light is on.  But as we found out the hard way, just because the Auto light is on does not mean that the fridge is actually working.  And the next time this kind of failure happens, I don't want to find out about it only after all of our food has reached room temperature.  
In many cases, my husband and I are the Makers, the ones inventing work-arounds for whatever predicament faces us.  In this case, most of the headwork was done by Air Forums user Hoonanea, who in this WDYGFYTT post provided excellent instructions for retrofitting a Dometic fridge with this device.
It's a pretty simple process - you just buy the battery-operated temperature meter from Amazon or some other retailer, and install it in the fridge.  The batteries are said to last 2 to 3 years.  
Installation requires carefully cutting a hole in the fridge face plate.  Our fridge is a smaller model than Hoonanea's, so we had only one choice of where to squeeze in the meter, and that was right next to the corner.
Once you get the hole made for the digital unit and install it in the face plate, you just take its line and fish it through to the back of the fridge...
...feeding it through to the fridge interior and attaching it with tiny zip ties to the existing line.  
Now THAT is a sight for happy eyes!!  Like I said above, when this thing decides to work, it works very well (some people complain that their Dometic propane fridge does not get cold enough for their needs, but we haven't had that problem yet).  In a perfect world, I would have preferred to place the unit somewhere other than right up to the corner, where it is more likely to be smacked by a passing suitcase.  But you can see that there was no other available space on this tiny face plate.  
In our refrigerator.  Only in our refrigerator.  Seriously.
:-)

REPLACING THE HORN ON AN AIRSTREAM INTERSTATE

Our 2007 Airstream Interstate came with an OEM Mercedes Sprinter horn, which unfortunately wasn't optimal for the vehicle in our opinion and in the opinion of numerous other Sprinter and Interstate owners.
Video embedded above (may not display on some mobile devices):  The joke is oft made, but there's some truth to it.  The German Sprinter horn really does sound like the American Road Runner cartoon character, the Warner Brothers classic.
Image courtesy of Wikipedia.
 An Air Forums user recently commenced a thread inquiring about how to improve the Interstate's safety factor via modifying the horn to change it into something to which other drivers might respond better.  There are also Sprinter Forum-related threads on this topic, including this one titled "Horn replaced with Hella Supertones".
As I explained on the Air Forums thread, I'm in a phase of personal logistics whereby I'm doing some heavy driving in downtown Houston.  This is what IH-45 looks like at 10:00 a.m. on a Saturday morning - hell has already broken loose and it's not even noon yet!  With a large lumbering Interstate in heavy traffic, a good horn is often needed for polite communication purposes. If the horn on the vehicle doesn't correspond to what people expect to hear, it can result in other drivers becoming confused or ignoring the message.  
No oversized vehicle gets through stuff like this without a bit of negotiation.  An occasional beep may be part of that. Let me through!!
:-)  
To boldly go where no RV has gone before:  I spent the morning traveling with my DSLR in my lap so that I could take a few representative pics of the kind of messes one typically encounters in this urban realm.  These guys did move that far right barrel and let me through as soon as that loader delivered the pallet.  Regarding that metal plate covering the gaping hole in the right lane, I thought to myself, "Hmmm... I hope these guys spec'd that thing correctly.  I guess we'll find out..." 
:-)
My husband did the research on which horn to use as the replacement, and chose this:
Hella Super Tone B133 horn set.  
The following photo series documents how the replacement was achieved.  If you attempt this as a DIY project, mind that you will be working with the vehicle's electrical system, and if you screw it up, the result could be bad.  See also our BIG FAT DISCLAIMER.
Not my husband's typical garage work attire, but he did this little project just prior to leaving for backshift. Such is the life of the non-retired. 
On the T1N Sprinter, the horn is easily accessed by removing the front grill.  
It's that nondescript little round thing in front of the radiator. 
Here is how that original horn appeared looking down from above (photo center).  The green plug thing to the left was attached to it.  
Here it is removed, compared to one of the new Hella pair.  
The main time sink and complexity with this project involved the creation of a second mounting bracket, as the T1N Sprinter only had one to start with, because it only had the single horn unit.  The come-with Hella bracket had to be modified to fit the available space. 

That other bracket, as finished, can be seen at photo left.  The two horn units were attached side by side with the new bracket mounted near the radiator base. 
Another shot of that attachment.  
My husband did the research on how to wire this properly (the horn pair is wired in parallel).  Something about verifying a Sprinter relay and not needing to add another relay because one was already there.
Horn wire feeding from the Sprinter, green connector snipped off. 
Attempted soldering action shot. 
And shrink-wrapping.  
And spray-painted, because the crimson showing through the front end looked tacky.  Normally I would spray paint parts prior to installing them, but we did the installation Friday night and I needed to use the Interstate Saturday morning to take our daughter to a class downtown.  So our order of operations got reversed - I spray painted them after returning home on Saturday. 
I did a better in situ spray painting job than Airstream had done with the Interstate's garnet trim paint.  Good grief, there is sloppy workmanship everywhere I look in this rig.  
And here is the money shot, job all done.  Ta da!  No more in-your-face lipstick color.  
On my maiden horn-voyage into downtown Houston, I had to issue one warning tap to a scatterbrained freeway driver who felt strangely obligated to try to broad-side me.  These horns, with dual tones, sound much more American style than the single-toned original Sprinter unit.  They are not overly loud or obnoxious - just typical, as in, what you'd expect from a large motor vehicle.  We actually took video of the before-and-after horn sounds, but the iPhone did not capture the comparison well so I won't bother to upload it - the new one is louder, but the iPhone microphone was saturated by both, so the representation is not accurate.

Oh, and just in case you were wondering, we have no imminent plans to install an air horn in our Interstate, an option that some folks contemplated on Air Forums.  We were shooting for a normal-sounding horn, not something that would scare people half to death.  Although I must admit, when I saw this YouTube video below, which illustrates the result after one owner installed an air horn in his Sprinter, I had to giggle at the absurdity of it.  Be sure to turn the volume down on your device before watching.  BAAA-AAARP!!!!

Link: https://www.youtube.com/watch?v=ouaJdrUQPvA

Embed:

I'll close with a short photo series from today's urban journey because why not??  Because pretty pictures are always cool and because Houston is now in its most beautiful season.
The aforesaid newly-horned Interstate nestled in the urban landscape beneath a shady live oak.  Where possible when parking in urban locations, Interstate owners should try to back into parking spaces (we don't have our back-up camera installed yet, so I did not).  As the day progresses, parking areas infill, sometimes to unworkable levels of density.  It can become quite a challenge to back out again.  
Houston is known for its spectacular live oaks.  Hermann Park, an approximately 500 acre recreational area near the city center.  
Entering the McGovern Centennial Gardens in Hermann Park.

View from atop The Mount, an earthen sculptural feature with a spiral access walk.  
Houston blooming.  
And growing. 
Confucius say, go ahead and replace your Airstream Interstate horn.  You won't regret it.  
Still in Hermann Park with the Texas Medical Center in the background, the largest medical complex in the world.  

Sunday, March 22, 2015

TROUBLESHOOTING A DOMETIC 2351 PROPANE FRIDGE

When we purchased our 2007 Airstream Interstate in September 2014, we had a number of systemic upgrades and repairs that we needed to tackle, but to our delight, the Dometic 2351 refrigerator was not among the malfunctioning systems.  In fact, on our first couple of trips, we were impressed by how well it worked - it kept our food very cold.
It was original equipment in our Interstate, thus 7 years old at the time of purchase. We initially were not sure how it would perform, but it's nice to have a pleasant surprise now and again.
Fast forward five months and on a routine and unremarkable overnight trip, suddenly our dear Dometic became dearly departed - it simply stopped cooling.  This post describes some of the troubleshooting steps we took to restore it to operation (see also this thread titled "Dometic will not work" for additional tips, plus there are other Dometic-related threads on Air Forums and on other RV boards).
At first we thought that the little front panel had gone bad, because the Auto light was clearly winking on and off.  Sometimes it would need to be pressed five or six times before it would actually engage.  But then when it did engage to the point where we had a persistent solid light, the fridge would still not cool.  
Replacing this component is very simple - some guy sells them on eBay for about $25.  All you need to do is unscrew the front face of the fridge, remove this piece, detach the multi-pin connector that fits into the slot indicated by the red arrow, and reassemble. 
Having done that much, what we ended up with was resolution of the winking Auto light - it remained solid from that point forward.  But the fridge still would not cool, so clearly there was more to the situation.

At that point I phoned our closest local RV service center, which is Dues Camping Center in League City Texas, and asked if they could diagnose a Dometic.  The gracious gentleman who answered the phone said yes but he advised me to do this first:  Turn on the Dometic and 24 hours later, open up the back and feel the coils.  If a heat differential could be felt across the coils but the interior of the fridge was still not cool, then the cooling unit itself is probably kaput, which essentially means that the fridge is a write-off because it costs so much to replace the cooling unit that you might as well buy a new fridge.
In order to get at the coils, you have to open up the hatch on the exterior of the vehicle to access the back of the fridge.  There should be a ventilation panel that looks something like this, if your rig has a propane fridge.  
So we did that as instructed, but we felt no heat whatsoever anywhere.  Which suggested that the fridge wasn't even starting up despite the fact that the Auto light was on.  Which led my husband to research various on-line forums.  Which led him to conclude that the most likely next culprit was the control board.
The controller is that contraption with the black plastic housing marked by the number 1.  I will describe number 2 toward the end of this post.
So my husband scooted over to PPL Motorhomes in Houston and bought a new one of those for about $85.  Replacing it was a bit of a pain because the fridge had to be moved slightly forward to allow sufficient clearance for access.  Propane fridges are sealed in place because the RV manufacturers don't want products of combustion to enter the vehicle.  So we had to break a very tenacious rubber-like seal around the fridge, especially the bottom edge.
I did not see anything particularly wrong with the old controller board, except, one of the two on-board fuses showed corrosion, which can lead to erratic appliance behavior if the corrosion is sufficient to disrupt electrical current. 
After getting that board replaced, guess what?  There was still no activity in the fridge.  Which prompted my husband to open up our main electrical converter and discover this:
You can count on the likes of this ruining your RV-ing day, every single time, guaranteed.  
We never thought to check the main fuse array because the Auto light on the Dometic was on, which signaled to us that the fridge was receiving 12 V power.  It never occurred to us that a teeny weenie 12 V / propane fridge might actually be running on more than one circuit, but it clearly was, because as soon as we replaced this fuse and started it up, we heard the tic tic tic of the piezo lighting the propane.

What this means, then, is that said teeny weenie fridge has its operation dependent on at least four different fuses, and perhaps more (many forum users have noted in passing that the Airstream Interstate contains in-line fuses as well as the main fuses in the converter).  Furthermore, two of those fuses are only physically accessible if you first gut the fridge, including breaking the gas seal that helps to hold it in place within the vehicle.  In other words, this isn't exactly an ergonomic optimization coup we're talking about here, in the way this thing is put together from a design standpoint.

Anyway, after we got through all of this, I looked at my husband and said, "We probably spent $85 on a new circuit board that we didn't need."  He replied, "Yeah, well, there is a learning curve to all of this stuff."  That's what I call an understatement.  Actually I don't know that I regret buying the new circuit / controller board because I suspect that the corroded on-board fuse would have caused us an issue sooner or later, and by taking it apart now, we were able to discover it.

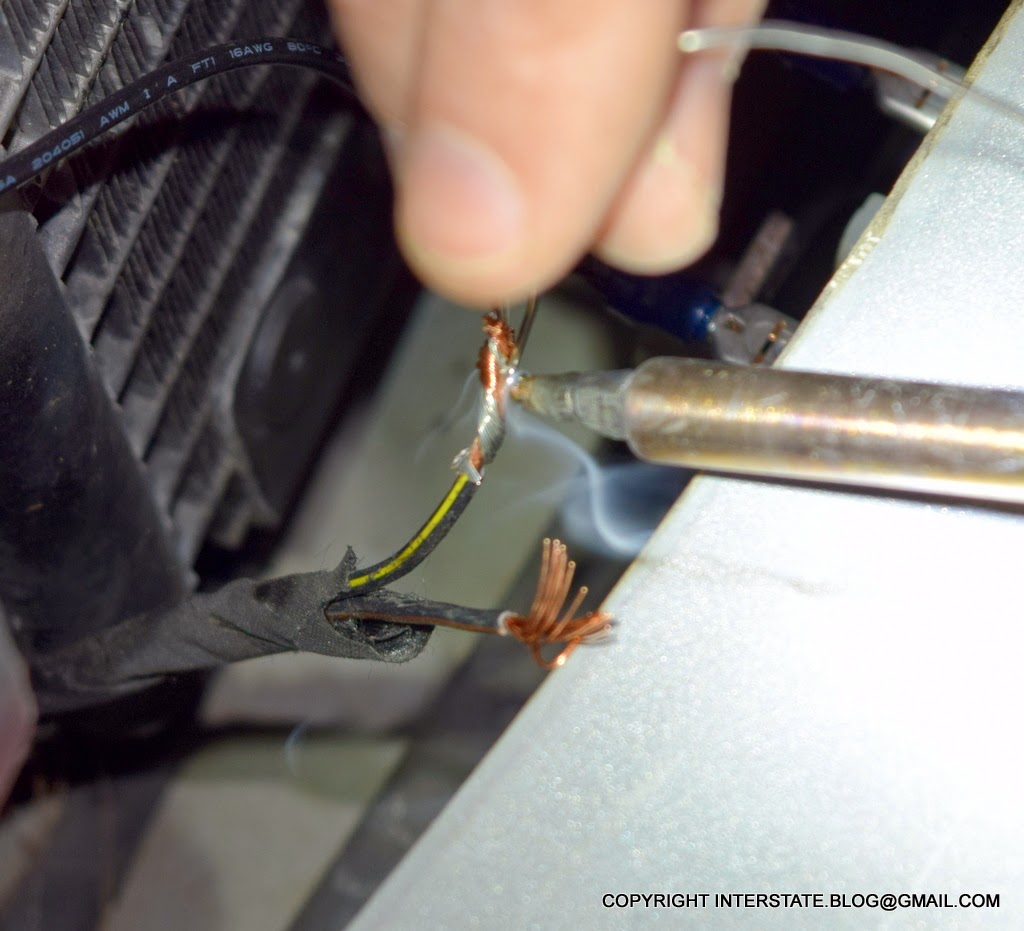
Additionally, this little repair escapade also revealed Problem #2 in the photo above, which is that the drain line for the fridge was apparently not constructed of a UV-resistant grade of plastic (UV light comes in through the ventilation panel).  You can see two halves of the line in the photo above.  It's supposed to be a continuous solid line, but it literally disintegrated in the hand when we touched it - the plastic was completely brittle.  So if we hadn't opened up the fridge to troubleshoot this other mess, we would not have discovered that the fridge was going to commence draining into the inside of our vehicle.

This adventure has also convinced me that we need to retrofit a digital temperature sensor, as was recently discussed on Air Forums.  Clearly, we need to be able to keep a closer eye on how our fridge is performing.  And we might as well install it now, while the fridge is still unsealed from the vehicle.
I have ordered this one, the Buler brand digital temperature meter. Why in the hell Dometic could not have included one of these in the first place is beyond my ability to comprehend. 
Unanswered questions associated with this incident:

  • Why was the Auto light winking on and off?  Whatever the cause, it appears unrelated to the blown fuse. 
  • What blew the fuse in our converter?  This occurred under very unremarkable circumstances.  I had taken the  Interstate for one night and I was boondocking, so whatever happened cannot be blamed on some issue with shore power.  Besides, we recently installed an integrated surge suppressor, so theoretically, things like shore power problems should no longer be as much of a concern.  

This is what we installed.  It's mounted on the exterior wall beneath the port side rear couch. 
We also recently installed two additional rear brake lights, but I don't think a blown fuse could be related to that.  One would hope that the refrigerator and the brake lights are on wholly unrelated circuits!
The Interstate has a very large rear end which is characterized by conventional-sized brake lights - two on either side and one central one at the top.  Adding two additional top lights along the top edge resulted in a significant improvement in the braking visibility of the vehicle. 
Anyway, this post may be updated in the future as we learn more about what has affected our refrigerator and what else we should be doing to prevent a repeat non-performance.
Where the Interstate is concerned, we are still doing quite a bit of both.