Normally I title my maintenance- and repair-related blog posts,
"BLAH BLAH BLAH IN AN AIRSTREAM INTERSTATE" but this issue is all on
Mercedes Benz, with nothing to do with
Airstream's Class B conversion.
The
T1N Sprinter van series was designed with an unfortunate configuration along its upper windshield seam.
 |
| A picture tells a thousand words. |
From a
materials science perspective, those upper corners could scarcely have been fashioned into a more vulnerable configuration. Not only are they highly stressed at the molecular level to begin with by virtue of their shape, they have to receive a deluge of drainage coming at them with a certain degree of force. It's a one-two punch that eventually might lead to the likes of this:
 |
| The gasket begins to peel back. |
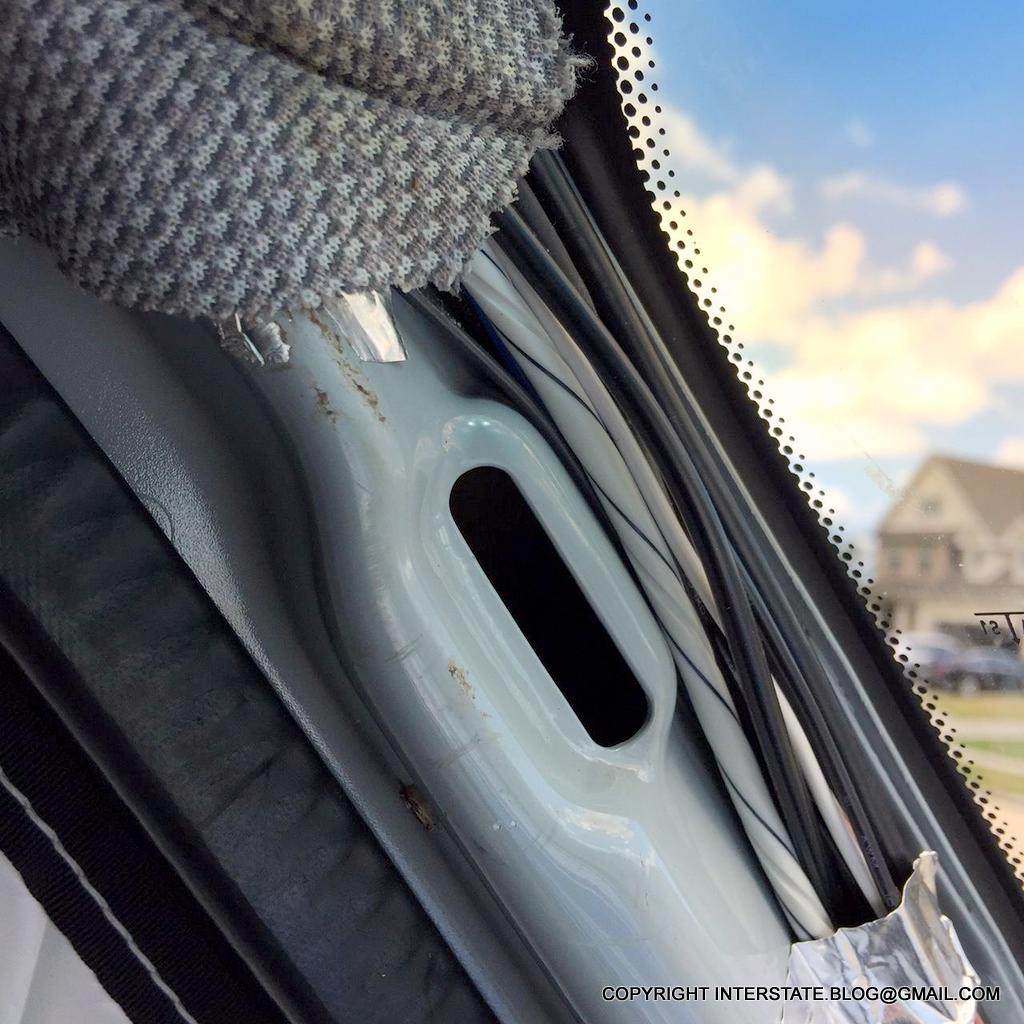
One of those corners looks worse than the other. Let's see it in close-up.
 |
| Ewwww. As soon as I saw this, I said to myself, "Well, my original plans for the day just went into the toilet." |
It's just a tiny area on a very large van, which may make you wonder,
"How did she even notice it?"
May I offer the obvious answer: Water penetration. Actually, only the driver's side degradation had worked its way all the way through to form a pin-hole leak. The passenger side looked bad but was still water tight.
I always wash and wax our Sprinter and I always encourage other people to learn to do the same. Every time someone on a forum gloats about having gotten a cheap and convenient truck wash, I wonder,
"Yeah, but what incipient maintenance conditions might you have missed because you yourself were not examining your vehicle during that process?" This case in point is a typical answer. There is always something demanding attention with a large, complex machine.
And some of those things can get serious quickly if they aren't caught early. In our case, we are triply motivated to not let any condition like this get out of hand.
 |
| We have a great deal of extra tech in our van, and a lot of the wiring for that tech runs down the driver's side pillar. Water in here is a bad, bad thing. |
Fortunately, I spent much of the weekend working on some cellular improvements in the van, and so I had dismantled the Airstream trim-out and removed the headliner on the same day as I happened to hand-wash it. For that reason, everything was exposed and I spotted the pinhole leak immediately, a condition that otherwise might have gone unnoticed for quite some time. What did I say above? Doing your own work is a good thing.
Do you see the white twisty wire in the foreground of the photo above? That actually belongs to this device.
 |
| It's a long-corded water leak detector. I had been using it around my fresh water tank, but I pulled it up and repurposed it for the driver's side pillar (I'll put another detector at the water tank). I ran the detection wire the entire length of the pillar... |
 |
| ...even shoving it up above the headliner... |
 |
| ...and then I mounted the noise-making end of the device under the dash next to the bluetooth on-board diagnostics (OBD) scanner. In case you're wondering why it's upside down, that's because the 9-volt battery is replaced via the "top" end which would be too difficult to access in this location if I put it rightside-up. This way I pop off the little flap and the battery falls out the bottom instead. |
So, OK, that's my future leak alarm system for this vulnerable location, but what about fixing the leak itself? That process went like this.
 |
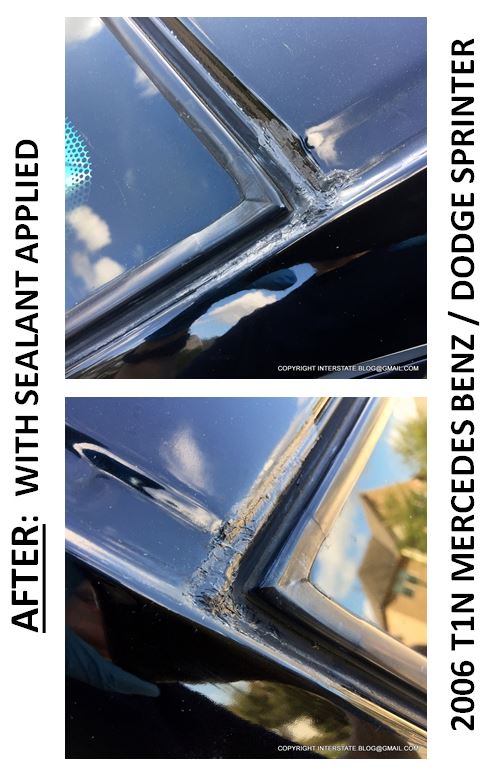
| Being a POR-15 junkie, I first used a toothpick to coat the exposed areas, where the gasket had pulled away. I let that dry for about 4 hours. We had a beautiful 80 degree sunny day here, so 4 hours was more than enough time. |
 |
| Then I applied an RTV sealant over the top of the degraded areas. You'll notice that I did not attempt to bend back or push flat the portions of the rubber gasket that were lifting away from the body of the van. That material is a decade old and stiff and I was afraid that if I tried to lay it back down, it would just pop off again, tearing away any new sealant with it. Rather, I mounded up the RTV compound to encapsulate the corners that were poking up. These are very small areas and this patchwork is not noticeable from the ground, so I'm OK with the somewhat amateurish-looking application. The main thing is that it Must Not Leak. |
This is the product I used, which might not be ideal.
This Sprinter Forum thread is not necessarily fond of using any silicone-like product around the windshield perimeter, but (a) I wasn't sure what else to use that I could obtain in sufficiently small quantities on short notice, and (b) I was only doing a couple of linear inches, so we'll just pay extra attention to prepping those corners in the future if we ever have to do a wholesale windshield replacement (there's some suggestion that a silicone product might interfere with a future sealant application during windshield replacement).
So there you have it, another chunk of a Sunday afternoon devoted to rig maintenance.
EDIT 20170321: See also
this Sprinter Forum thread on this issue for further discussion.
 |
| Actually, it never stops. |


No comments:
Post a Comment