This gets my vote for
Worst Class B Maintenance Job Ever. Seriously, I'd rather dis-mount the black tank.
 |
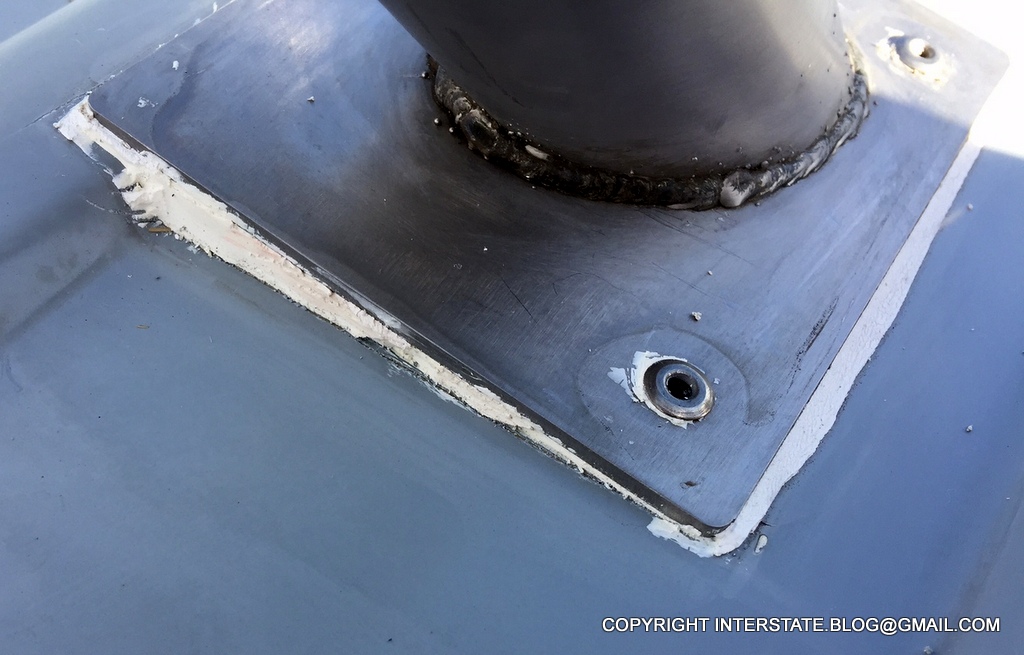
| When you see the likes of this, you know you've got trouble, and you need to deal with it pronto. That caulk is cracking and pitting and is past its useful lifespan - it needs to be re-done. This is one of the four "feet" that support our roof rack, which in turn, supports our solar panels, so these connectors must be maintained in tip-top shape. |
The question has been asked previously on Air Forums... what's the best way to tackle removal of the old caulk and application of the new? There were a variety of responses. Here's a few observations of mine.
 |
| The main tools I used were blunt-nosed pliers, a metal putty knife, and a plastic putty knife. General rule of thumb: Use the plastic blade right up until the point where you are forced to use the metal blade. The plastic is preferable in that it will not scratch the roof, but for much of this work, only the metal will be strong enough to free the existing caulk. |
I suggest that this job be done by a male of the species, if possible. I'm not saying that to be sexist - just realistic and practical. Obviously there are huge physical strength differences between males and females. In my DIY experience, nowhere do those differences manifest more starkly than in the hands. My husband is not a husky guy, and yet still, his hand strength is easily twice mine.
In our case, though, I've been doing a lot of smaller projects single-handedly (pun intended) because I don't want my husband to be diverted from our lithium battery retrofit. If he gets diverted, we'll simply never get it finished. So I had to suck it up on this re-caulk.
 |
| If you are lucky, some of your old caulk will come off in one piece. But in numerous places on our rig, it was a painstaking process of cutting and yanking tiny fragments one by one. Awful job. |
 |
| And as far as I know, most of the work has to be done by brute force. There isn't really a product on the market that can chemically penetrate the caulk, which was designed to be impenetrable in the first place. This product called Marine Forumula DeBond was recommended to me by one of my marine fabricator clients. But it can't be used for wholesale removal - just for residue removal. |
A special note regarding roof appurtenances that may be
underlain by caulk, not just surrounded and encapsulated by it.
 |
Our roof rack "feet" are an example. Airstream built up the area beneath each foot with a sealant layer. I trimmed away the old excess that was surrounding that original layer, so that a new protective layer could be added on top. This seemed like a sensible way to proceed because that underlayer was still intact and in good shape.
In the course of this, I did not spray the DeBond product directly on the exposed edge of the underlayer because I was worried that would seep underneath it and break down the underside of it. I sprayed the DeBond onto a paper towel and used the towel to wipe the surrounding surfaces to get them as clean as possible for the new application. You can see how nice it looks after doing that. |
The most outrageous issue that I uncovered on our roof was this.
 |
| It appears to be yet another example of Airstream's legendary build quality (I'm being sarcastic). This is the black and gray tank vent, stripped of all layers of its caulk. |
It appears as if Airstream simply smashed an ill-fitting vent into the roof as best they could manage. It was too large to be set properly between the Sprinter roof ribs even after they cut down the left side of it, so they just forced it like this, shattering much of the plastic base in the process. Obviously we have to deal with replacing this with a more suitable vent, but God knows what we're going to find once we pull this one off. That could spiral into a massive project in itself, and right now we don't have time for it. So we temporarily re-caulked the whole mess as-is, to be sure that it's waterproof (the vent sits directly above the bulk of our electrical system so it absolutely cannot leak), and we will revert to the job of wholesale replacement when we get the time.
Now for a word about the Fantastic fan, and the Ultrabreeze cover that we put on ours. If you initially decided that you don't really need a cover on your own Fantastic, what I have to say here just might change your mind.
 |
| Here you see the unexpected benefit, the unadvertised special, associated with having a Fantastic cover in place. The bottom lip of the cover shields the Fantastic caulk line from a lot of environmental exposure (see this blog post for cover installation instructions). As a result, the caulk in that area breaks down more slowly. This layer of self-leveling product was added by the previous owner more than two years ago. Compare the appearance of this to the "foot" of the roof rack shown in the very first pic at the top of this blog post. Both applications were done on the same day, and yet look at the difference in the integrity of it now. |
I estimate that, when the time comes, it's going to take me at least a half day's work to strip and re-seal this Fantastic. Given that this re-caulking process must normally be done every year or two, I'm estimating that having the cover in place will save me a couple of days of work over the term of our Interstate ownership. It's already saving me a half day's work right now, because I don't have to do it yet. That fact alone makes the $50 price of the Ultrabreeze cover an absolute, utter no-brainer.
So basically my Fantastic-related work yesterday was limited to removing the Ultrabreeze cover, visually inspecting the caulk lines, and cleaning both the Fantastic and the Ultrabreeze before re-installing the Ultrabreeze.
 |
| The Ultrabreeze hadn't been removed since its initial installation 18 months ago, and it was filthy in there. I always haul a small pail of wash water up onto the roof as I'm working up there. This is what it looked like after I got done cleaning the Fantastic, the Ultrabreeze, and two of the three solar panels I could reach from amidships. |
 |
| The solar panels were absolutely filthy. Remember, we mostly store our rig indoors, and still, they looked like this. I'm going to research waxes or some other product-compatible application that might help these to repel dirt because this kind of build-up simply has to degrade panel efficiency. |
Now for a word on the re-caulking process. Forum users had recommended a product called
Sikaflex 221, so we tried it. Or rather, my husband tried it, because by the time I got done stripping the caulk, I was physically exhausted and didn't want to deal with it.
Sikaflex 221 caused my husband to literally utter more expletives than I've ever heard come out of him in a single interval during our 9-year marriage. It was very difficult to manipulate, especially given that we were both very tired.
 |
| Oh, this is waterproof, alright, but it's also uglier than sin. This was one of my husband's experimental applications. |
You've heard the expression
"friends don't let friends drive drunk"? Well, an analogous expression is
"wives don't let football-obsessed husbands try to do automotive work after they were up until 2:00 a.m. watching the Texas Bowl and then had to report to work by 7:00 a.m. that same day and now it's 4:30 p.m. after an exhausting day at work." This is a great reality-check for people doing DIY who also have full-time jobs. I opened up the roof yesterday because the weather was finally optimal for it - in order to keep the lithium project on schedule, I had to get the roof re-caulked because it becomes doubly important that we don't spring any water leaks. And I knew how bad that existing caulk had become. And
Houston's weather simply didn't cooperate in the month of December, so I had to seize the opportunity when it became available to me. Which was bad timing from other perspectives, but one plays the hand one was dealt.
Nevertheless, exhausted or not exhausted, I still don't know how best to manipulate this Sikaflex product, which is not self-leveling and which has the consistency of extra-sticky chewing gum.
 |
| We are going to have to remove and re-do some of this mess. This is the wet bath vent, and my finger is pulling yesterday evening's bead of caulk away from it because by this time it's only half dry. |
One potential strategy that occurred to me based on the photo directly above was as follows: What if I apply the Sikaflex, then let the outer skin harden a little bit, and then push the bead more firmly into place? The problem with trying to manipulate it straight out of the tube is that it just turns into a sticky, stringy mess. It's not like a bead of household caulk where you can just take your finger and smooth the fresh wet bead into place.
Anyway, those re-caulking experiments are forthcoming, and in the meantime, let me just say... lessons learned. A few of them, anyway. I'm sure there are more to come, but hopefully they'll be a little less painful than the one associated with stringy Sikaflex.


No comments:
Post a Comment