Sunday, September 23, 2018

PSA: ALTERNATOR CLUTCH PULLEY FAILURES ON LITHIUM SYSTEMS

I put this information on Instagram (@interstate.blog), but not everyone is on IG, so here is a regurg, starting with what I posted, upon which I will then expound in this blog post, because this is super-important.  For you guys who have a lithium system charged by a single engine alternator (plus or minus other charging options such as generator, shore power, or solar), if your alternator behaves as mine did, the outcome could be life-threatening.  DO NOT ASSUME THAT YOU ARE SAFE FROM THIS TYPE OF FAILURE IF YOU HAD A PROFESSIONAL INSTALL YOUR LITHIUM SYSTEM. 

My IG tile. 
Text

Our 17-month-old 200 A Bosch alternator began failing last month when I was on the road between Houston and Nova Scotia. This was a particularly pernicious problem because my first sign of trouble had nothing to do with our camper van’s lithium system - instead what happened is that I started losing the chassis electrical system, which would have developed into a middle-of-the-freeway potentially catastrophic breakdown if I hadn’t caught it in time. There’s a #vanlife myth floating around out there that if you have a Sterling battery-to-battery charger in your system, it will protect against engine alternator damage. This is not true - it will protect against SOME types of alternator damage, but it will NOT prevent your alternator’s clutch from wearing out grossly prematurely, which is what happened to ours (we had it diagnosed by a repair shop today; I estimate that this alternator did perhaps 20 hours of heavy-load lithium recharging spread across the 17 short months of its life before failing). Those of you who have single-alternator lithium rigs might be sitting ducks if you haven’t hardened your electrical system against this kind of weak-link-in-the-chain breakdown scenario. See vids by YouTuber Alternatorman for more detail on alternator clutches. Thanks once again to @million_mile_sprinter for helping me out last month.

OK, now the expound.  When I said "I started losing the chassis electrical system", what I meant was that I began noticing that I could no longer crank my air conditioner fan up to its highest setting.  I was driving through Mississippi in August - trust me, under those conditions, it's noticeable if the a/c starts to wane.  I literally had a panic attack when I realized that there's basically only one thing that could bring about that result - a failed or failing alternator.  I opened up the OBD Fusion app on my iPhone which bluetooths to a reader that we have permanently mounted in the van's OBD socket.  Sure enough, the chassis battery was reading 12.8 V, which is way below what it should have been.  The alternator was not charging the chassis battery.  The van was about to stop dead in the middle of IH-59 between Hattiesburg and Meridian (i.e., middle of nowhere). 

I pulled off the road and sprang to the back of the van to look at the lithium charging status.  I had done my usual thing that day by driving from Houston to Laf Louisiana, stopping for lunch, and running our roof air conditioner off our 300 AH lithium battery for about an hour while I took a nap.  I then got back on the road with the alternator engaged to bring the lithium battery back up to full charge (a heavy-load scenario for the alternator because I'd run it down to about 50% state of charge (SOC)).

Cue additional horror when I got to the back of the van, which is where our electrical control system is located:  my lithium was reading about 90%, which means that the alternator had been, and perhaps still was, charging the house battery at the expense of the chassis battery.  That should never, ever, EVER happen, and I didn't understand how it was even physically possible given the way we had configured our system. 

Immediately I de-loaded the alternator by isolating the lithium charging circuit.  (Yes, we'd had the foresight to install a kill switch for that when we DIY'd our electrical system). 

I then got back on the road, praying that whatever was remaining of the alternator functionality could then put its full contribution into the chassis battery, which was dangerously low at that point.  I had planned to stop for the night in Toomsuba MS, but I kept driving straight through to Tuscaloosa AL to give the battery time to recover.  That's a 615 mile run on the day, more than I prefer to do when driving solo, but it was necessary.

I got to Tuscaloosa (excellent boondocking Cracker Barrel there BTW), pulled out my voltmeter and measured the chassis battery directly, terminal to terminal (we don't rely on the OBD exclusively because it seems to not have foolproof accuracy; story omitted for brevity).  It was reading not ideal but reasonable.  I knew I'd have enough juice to get the van running properly in the morning. 

No more deep lithium discharges from that point forward.  No more alternator charging, period.  I was in a rare pocket of cooler summer air (a cool front had passed through) such that I could live without a/c, and rather than bailing on the trip and returning to Houston, I continued heading north, hoping to intercept Joel Sell (Million Mile Sprinter) in Philadelphia.  I had my husband (who was still back in Houston) make contact with him to see if he could replace the alternator while I was en route, and he said yes.  A Philly detour would add only an hour or two to my total route.

Here's the maddening part:  Through no fault of his own, Joel couldn't determine conclusively on the spot what was wrong with the alternator.  Of course he could take it off site and get it diagnosed, but that takes time.  I arrived at his place around 2 p.m. on a Friday afternoon and I didn't necessarily want to hang around until Monday morning.  So we made the decision to just go ahead and replace the existing alternator, which clearly had something wrong with it, so that I could get back on the road.

The replacement deed in progress.
As for what was wrong with the alternator, that would have to be determined later.  Joel and I did some preliminary testing just so that my engineer husband could have data to noodle on.  It looked like this:
Tap to expand for clarity.  If you are a less-technical person, know that higher voltages indicate a better-performing alternator. 
I continued to Nova Scotia without further incident, carrying the half-dead alternator with me.  A 200 A alternator is big and heavy and a pain to tote around in a small van.  After I off-loaded my meal-encapsulating solid ice blocks at my father's place, I used our hitch-mounted Yeti to carry it.

These were my 2018 ice blocks, 35 pounds apiece with vacuum-packed home cooking embedded in them.  Many good meals were had by at least seven adults courtesy of these, which I prepared in Houston and took with me. 
Five weeks after I set out, my husband and I returned to Houston, never having resumed alternator charging.  We had the old alternator diagnosed yesterday.  The clutch was worn out and was slipping under high-load usage scenarios.  It's being repaired as I speak, and I'll follow up with a separate blog post on that process.  And BTW, who even knew that alternators have clutches?!?!  They did not used to have this failure-prone add-on.  I'll also discuss that subsequently. 

First moral of this storyNO MORE SINGLE ALTERNATOR OFF-GRIDDING.  We are going to reconfig our van for a second isolated alternator which will be dedicated to just the house lithium battery.  That way, even if we have another such failure, it won't kill the chassis battery and disable the Sprinter's native electrical system to boot. More on that later.

Second moral of this story:  This whole failure episode of mine is exactly why off-grid vans need as many redundant systems as they can support within their space limitations.  Many have asked why we'd go to all the trouble and expense to put solar on the roof when the alternator is going to outperform solar's recharging ability by a factor of somewhere between 3 to 4.  The answer is that STUFF BREAKS.  Sometimes it breaks in ways that nobody can predict.  Never before this had I heard about alternator clutches failing, and I've been following all of the vanning and off-gridding forums for four years now!!  Neither had my husband ever heard of this phenomenon, and he had done months of research on mobile lithium systems.

My boondocking property in Canada, where there was no crimp in our style.  We completed a 5-week off-grid trip even with this limitation of not being able to use our new alternator, because our solar alone took care of our lithium battery.  We had to be careful with our usage, because my property is surrounded by these high trees, limiting sun exposure.  But we spent 2 of our 5 weeks here without any recharging problems, running on solar alone. 
I'll close this post with this 3-minute video that describes alternator clutches.  Read it and weep.  Watch it and weep.  The manufacturers took a pretty good device (alternators have been around for a long, long time) and screwed it up by adding this failure-prone clutch part.  More on that later, too.

Link:  https://www.youtube.com/watch?v=QUs4Y5ZMiTU

Embed:


Saturday, June 23, 2018

SIZING A CGEAR SANDFREE MAT FOR THE AIRSTREAM INTERSTATE

Just a wee blog post here to let you know that one CAN successfully resize a CGear Sandfree mat for a Class B RV. 

I don't know what in the hell I was thinking when I bought an 8 foot by 8 foot mat of this brand name.  I used it once and realized that it was way too large for our needs.  Furthermore, it doesn't pack down very small size as the high-density polyethylene (HDPE) of which it is constructed is rather unruly.  Furthermore, it is only sold in square sizes, and I wanted a rectangle to fit beneath our awning.
NNNNNOOOOOOO!!!  I want RECTANGULAR!!!
Here are a few #vansizedsewing tips for working with this product.
I used this binder for my cut edges, which bought via Amazon. Strapworks rules.  I've bought stock from them before, usually directly because their entire inventory is not on Amazon.  Color is silver gray. 
So I chopped my 8'x8' mat in half, but may I say, this mat is truly aggravating to sew.  It's made of two independent layers of HDPE fabric, both of which float free except at the bound edges.
It's quite springy and it became a bit of a chore to wrangle both halves into the new bound edge. 
Important:  As you are feeding it through your sewing machine, keep it under tension.  Left hand pulls away from you, right hand pulls toward you.  This will prevent rumples and wrinkles.  And for goodness sake, bind up your excess so that it's not running away from you.  I used binder clips to keep it under control.
Push-me-pull-you. 
Can you tell which part of it is my bound edge, vs. CGear's OEM work?
Wait until it gets a bit dirty.  Then this slight difference won't be visible at all. 
Of course, I had to sew new binding on both of my chopped halves, because if I had left the other half just sitting there, I'm afraid it would have started to curl and perhaps unravel.  But I'm satisfied with the finished product, and if the first half gets worn out from use, then I've got another half to fall back on.  Two of the right rectangular size, for the price of one square.
Half the size and half the bulk. 
And yes, I know my grass needs to be cut. 
Fair warning - if you Google "push me pull you", you'll get a few pics like this, plus a large number of pics of animals copulating. 

TRASH CANS FOR THE AIRSTREAM INTERSTATE

Our 2007 Airstream Interstate came without a dedicated trash can or even an obvious area in which to place a can, and I've been struggling for a couple of years now to figure out the best arrangement for this function. 
One of these, and I don't care which term is used. 

Here is one of my earlier less-than-ideal early solutions.

Container Store usually has good stuff, and this was useful, but it had its drawbacks.  Even after I moved it to the wet bath and kept the door shut, flies still got into it.
I moved on to an attempt to adapt this triangular beauty to the space.  We need a lot of trash storage volume because we boondock, and if we go through a rainy period, we can't burn anything.  The trash can pile up in the van for a few days, ugh.  So that's why I began looking at adapting this as a possible addition to the wet bath.
It's a plastic insert for a stick-and-brick recycling center.  It's rather large, yes it is.
But then I got Shanghai'd by a different idea that I had several years ago but never developed.  I had purchased this Oscar the Grouch Sesame Street soft-sided (collapsible but stiff enough to stand up on its own) trash can which was round with a heavy wire rim.  I bent the rim into the triangular shape that I really wanted to see here.  And then I fitted a triangular lid that I cut out of coroplast and edged in nylon belt webbing (tough to sew, but do-able).  I used tabs of waist elastic band to make "hinges" on the far edge of the can.
It's cute - admit it.
Video of the operation:

Well, that was smaller than I wished for a trash can to be, but it did have that all-important fly-deterring lid, and the cuteness factor got to me.
"Meet your new bus mate!"  That's an Oscar bean bag toy.
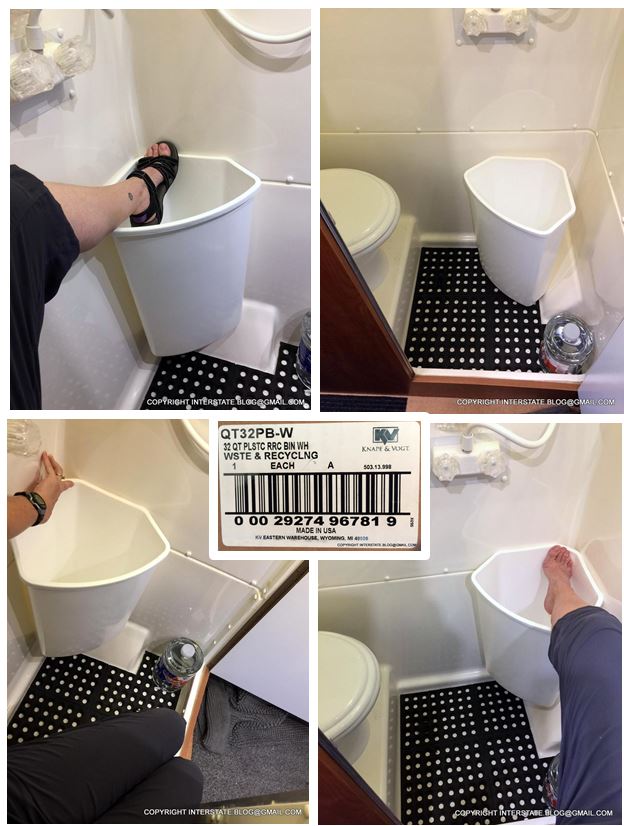
Simultaneously, for more trash storage space, I added this product behind the commode:
I got it at West Marine. 
In order to add this in a way that was responsive to the fact that I change my mind every five minutes regarding where I want items to be placed, I had to build a bracket for it, so that I could mount it without piercing the wet bath wall.
It came with this white mounting piece, but I wanted to attach it with outdoor Velcro and so I had to expand the surface area.  I made this out of thin plywood...
...and countersunk the mini-bolts that hold on the OEM bracket, love it.  I was reaping the rewards of having reorganized much of our hardware over the past few weeks.  I actually found this stainless hardware without having to scrounge. 
See, the lip of the top cover extends over the body of the can, so I could not simply Velcro the can body to the wet bath wall.  I had to build this out. 
Here's the result of this little satellite trash can.
We plan to travel with a young lady who is a dear friend of the family this summer, so this familiar women's restroom type of stall receptacle might be appreciated. 
So there's Trash v. 2.0 and we'll see how it goes with these improvements.  I still don't know if this is enough storage space for our needs, but it's better than what I had rigged previously. 
Tugging at the heart strings of DIYers everywhere. 

Monday, June 11, 2018

REPLACING THE FRONT STRUTS ON AN AIRSTREAM INTERSTATE

Every time I fail to blog post something that we have done to our van, there's usually a reason I regret it later.  This is a short one designed to capture information pertaining to a simple replacement that has been well-covered elsewhere by others.  But here goes anyway.

This is the replacement gear - 87 2638 - Koni Shock - Heavy Track Series, is what they are called.  We had to wait several months because they were back-ordered.  The manufacturer apparently creates them on an as-needed basis when existing supply runs out.

Here's what the interior mounting points look like under the floor.
Curb side, by the right hand portion of the OEM bottle jack.

Street side.  The weight is holding back the floor covering and the rubber bushing has been moved a few inches below the location where the strut pierces the floor of the cab.
Here's an action shot showing work in progress on the street side.  The central vertical piece is the old strut.

Old strut in hand on curb side:

As for the rest of the instructions, this YouTube video below covers that fairly well.  Low video quality, but the author does present information in an organized way.  The only difference we found is that, with this newer pair of struts, Koni seems to have changed the tensioning mechanism such that it takes fewer turning motions to set it.  And my husband adds these elaborations to the videographer's instructions. 

We tested this new installation by driving to Galveston and back, given that it's too hot to go anywhere else at this time of year, and given that Galveston offers a good test drive because of the reliable onshore breeze.  The Koni struts did help to dampen certain large-scale oscillations, especially vertical bounces.  However, there's still more sway in the front end than I would like, and I'm not sure if anything can be done about that.  Maybe I'll research Sprinter Forum.

Direct link: https://www.youtube.com/watch?v=ZD0tRBrgOUQ

Embed

Sunday, May 13, 2018

LAGUN TABLE, PART 2: REAR MOUNT

I don't think I mentioned this in Part 1, but when I ordered that Lagun table from Merry Ol' England, I bought an extra receiver.  Today with some help from DH, the second mount got installed in the rear of our Airstream Interstate.  I've covered some of these installation ideas in Part 1, so this post is mainly a photo tour.

There is one place in the rear of our van, a cabinetry bulkhead, that was fit to receive this second mount.  It looked like this:
It's mostly a void space the frame of which doubles as a jack-knife couch support. 
As with the front mount, the under-blocking had to be as non-hooking as possible (no busted shins on sharp corners), and it had to conform to the available space, which in this case was narrower than what had been available at the front.  Therefore, rather than cutting a standard 45 degree angle on the block, I had to compute the angle instead.
Trig!  I got to do trig!  I haven't been this excited since I had to solve two equations with two unknowns on one of my client's waste disposal cost matrices. 
Here's the view from above down into that space.  My bad for not vacuuming out the dog hair prior to taking the pic.
You can see that there's a structural cross-member spanning the space (the little shelf with the most dog hair on it).  That means that my rear blocking plate had to be cut in half for this one, vs. a solid plate in the front of the van.  Plus we decided to install a sheet metal top plate to strengthen the area further.  As usual, all my prototypes were first cut out of cardboard.

Like this.
And this.  It's a tight space behind there, so I fit the cardboard first, then chopped up the plywood backing plate that came with the extra receiver. 
Action shot - screw holes being drilled in the upper metal plate.
Post cutting and drilling, pre-painting. 

The three pieces coated and drying in the subtropical sun.
I didn't take pics of how I fashioned the block, because that process was much the same as in Part 1.  Attaching the block was simple - we clamped it on, and drilled holes all the way through.
Like this. 
Getting those plates on the rear side of the bulkhead was not as tough as you might think.
View from above.  We used L-brackets for redundant strengthening. 
There's the top plate.  It's black like the frame of the Atwood jack-knife couch.  We did have to remove the bottom half of the couch to make installation of this plate easier, but that's pretty easy - just four bolts.  
View from above with the couch down.  There's little risk of hitting the block because it does not protrude beyond the couch edge.  It sticks out just enough for the vertical support to clear the edge of the couch.
There's the vertical member, sans table top. 
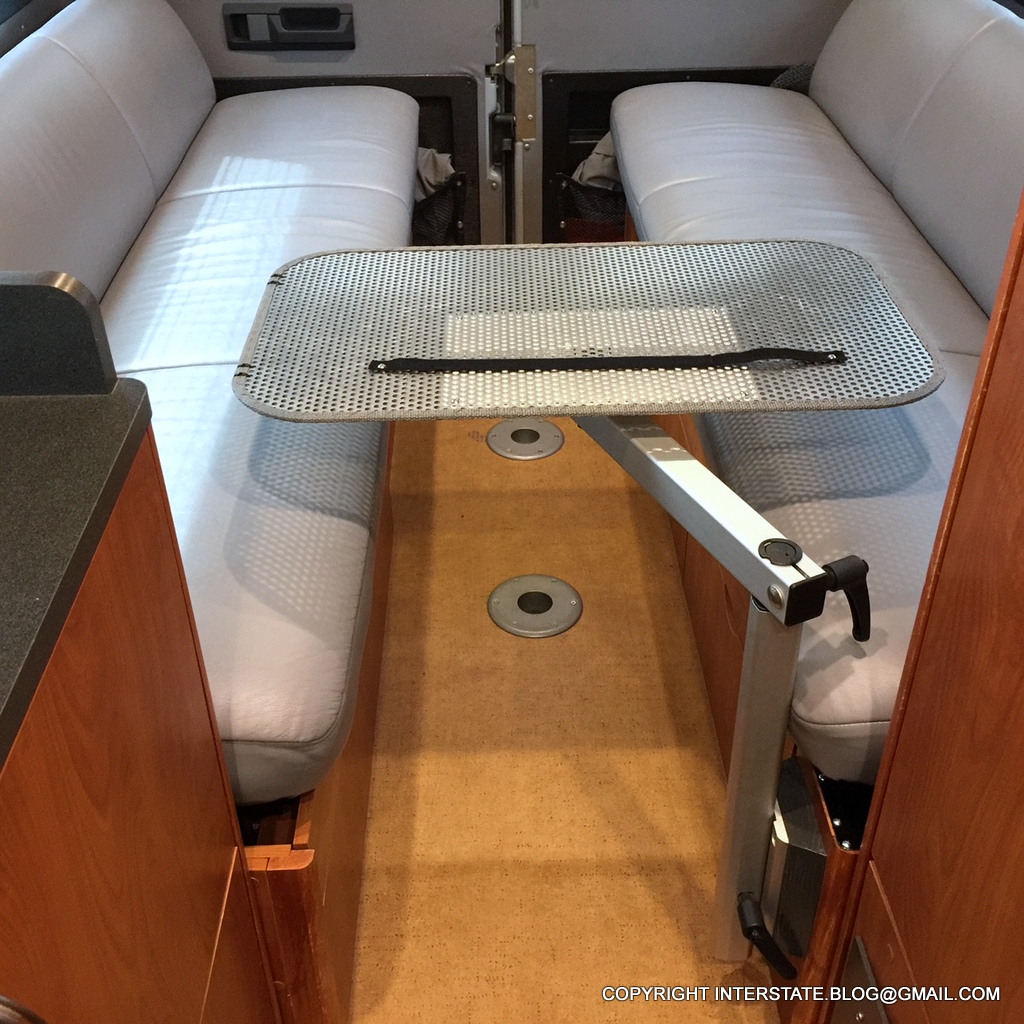
Guess what this means??  I get to delete both the receiving cups and the old table legs from the van inventory.  Removing the receiving cups from the underside of the table made it considerably lighter, which is very helpful given that we are hanging it for storage on the outside of the wet bath door.  It also gives it a cleaner look.

Now you have to endure a bunch of money shots showing the range of motion with the table in this location.


It's really convenient to have a one-piece table that swivels completely out of the aisle when needed.  Initially I wasn't sure if I was going to use that second receiver, but I'm glad I ordered it.
Footloose and cup-free.  Fancy, too. 

20180926 EDIT:  Pic of the new rear mount in action.  I enjoyed it immensely during my recent 5-week trip through the United States and Canada.  I got a lot of important work done on it.


Sunday, May 6, 2018

INSUL-BRIGHT IN THE AIRSTREAM INTERSTATE, PART 2: GALLEY WINDOW

This post follows on Part 1 where I described the creation of a window covering for the Airstream Interstate's sliding door.  That was a different project because that covering basically hangs by Velcro tabs on the outside of the window frame.  This covering was made for what I call the "Airstream signature" window - the un-openable galley window that Airstream installed to maintain stylistic conformance with its historic product line.
If you Google "Airstream window", you'll get something like this collection of rounded-corner windows that tend to be wider than they are tall.  
That window has an inset frame with a wide rubber gasket on the inside.  The visually-cleanest way to make a thermal covering for that window is to inset it.  And the easiest way to inset it is to give it some stiffness so that it will stay in place largely without assistance.

I decided to try building on the existing Reflectix covering that I made for that window.  It already serves as a template.
If I could sandwich the Reflectix and the Insul-bright between an outer and inner cover, that would build on what I'd already done without having to re-invent the wheel.  I started by cutting a piece of Insul-bright to match the size and shape of the Reflectix I had cut a long time ago. 
The obvious question is, how does one sew Reflectix?  Generally I find that anything I can cram beneath the foot of my sewing machine, I can sew.
I started the construction much as in Part 1.  First the back portion went on, and the sandwich was sewn shut by applying a deeper seam. 
It's quite comical sewing Reflectix.  It goes pop-pop-pop-pop just like you are popping regular bubble wrap. 
Then I placed the workpiece and templated out the top metallic fabric cover.  This shows the wrong side of the metallic fabric.
It has been my intention all along to maintain a metallic fabric covering on the surface of these window coverings for conformance with Airstream's aluminum interior wall coverings, but I haven't yet found a metallic fabric that I like.  This is a different one which I am hoping will prove to be less fragile than the stock I used in Part 1.
Easing the corners was a bit of a pain.
You can see that I basically just top-stitched this fabric in place.  I like to have double rows of stitching on these window coverings coverings whether they hang or inset.  It seems to give a good finished look and some body to the outer edges.

There's the back side.  The stitching is a bit wavy because it is a challenge to feed that Reflectix sandwich through the sewing machine.
Money shots:
There it is in place, friction-fit.  I'll probably add a Velcro dot at the top just to be sure it stays well.  
Here's the part that perhaps appealed to me the most:
I've got a bigger burrito now.  This is the new one (right) stored next to one of the Reflectix old ones (left). 
It now looks like I have an actual professional automotive product on the wall instead of a cut sheet of Reflectix insulation.
Much better effect visually, I think.  A finished product which looks like it belongs there.  It makes the Reflectix look a bit trashy in comparison.  
So there's another prototype executed, and I'll report back on how it performs, insulation-wise.
Tryin' to make our ride cooler and cooler, in every sense of the word.