Showing posts sorted by relevance for query hitch. Sort by date Show all posts

Sunday, April 24, 2016

HITCH BOX FOR THE AIRSTREAM INTERSTATE, PART 1: SCOPING

My husband and I know that we want to get a hitch box for our Airstream Interstate.  External storage space is particularly important because I want to be able to use dry ice in our Yeti cooler, to keep food frozen on a timescale of weeks (I explained my rationale in detail over a year ago in this Air Forums thread).  I am not comfortable having dry ice sublimating inside the confined space of the Interstate; I'm concerned it could displace oxygen under certain conditions, which could be dangerous.
This pic shows our Yeti Tundra 50 balanced on our rear hitch step, just to show the size of it relative to the Interstate.  This little sucker must remain outside the van so that it doesn't accidentally gas us to death.  
So we need a hitch box to accommodate the Yeti, but as long as we are committing to the purchase of a hitch box, it makes sense to identify the sweet spots in terms of size, price, and functionality - what else might we want to fit into that same box?  Answer:  An inflatable kayak.
I already own a Sea Eagle 330, but it is rather shot at this point due to old age.  So this is not the exact kayak I would take, but for the planning purposes of sizing the hitch box, we used this one because anything larger would be a non-starter for us.  These kayaks have come a long way technologically in recent years, and are worth having, in my opinion.  You can get a lot of boating out of device that rolls up nicely into a small portable package.  
I went through a few iterations as to how I thought the hitch box should be optimally dimensioned, but let me cut to the chase with my final decision:
Nothing gets ordered or created in our house without first being fully mocked up out of cardboard.  That's the Yeti roughly in the center, the Sea Eagle rolled up at right, and the seats, PFDs, and air pump stashed on the left side.  I use the PFDs that have the carbon dioxide inflation cylinders, so they don't take up much space. 
The problem with most of the off-the-shelf hitch boxes I've found on the market is that they are not sufficiently deep for my needs.  I need to be able to lift the lid of the hitch box, reach in, and pop the rubber keepers on the Yeti such that I can open it and retrieve food without having to physically lift it out of the hitch box.  It has to function as a fully open-able box within a box, in other words.  
The magic numbers on this cardboard mock-up, inner dimensions, are 22 inches deep by 40 inches wide by 24 inches tall.  And here's what the mock-up looks like on the back of our Interstate:
It looks about right.  This size doesn't overpower the back of the van.  The one caveat with this configuration is that I don't think any kayak paddles would come close to fitting in a box this size - they're probably all going to be too long, even the click-together kinds that separate into halves.  But paddles are light and linear, plus we always carry a ten-foot Telesteps telescoping ladder, so we are going to be lashing our paddles to the roof rack, beside the solar panels.  If you prefer your paddles down low, you're going to need a bigger box than this.  Or perhaps you could put them in your interior closet.  
Now, having established what would work and how, the challenge becomes sourcing.

To make a long story short, I have done a lot of research and nothing I've seen in the pre-made market has struck me as representing a sensible investment.  One of the most popular hitch box models is called the Stowaway, but I'm not encouraged by the reviews of it, which I've combed over repeatedly.  They are made of plastic, some users complain that they leak rainwater into the interior, and most consequentially, some reviewers claim that fifteen seconds with a crow bar is all it takes to pop one open.  That simply is not sufficient durability or security for the substantial sum of money that the manufacturer is charging for them.

Yeti coolers in particular are ultra-high theft targets - I've read newspaper reports of Yeti theft rings (!!) in the greater Houston area, if you can imagine that.  As the joke goes, the only way to stop a Yeti from being stolen is to buy a Coleman.  While I realize that no hitch box will ever be impenetrable, I want to at least deter the kind of smash-and-grab scenario to which the Stowaway seems too vulnerable.

Our next step is to identify a suitable fabber who might be able to build this for us.  My husband and I don't yet see eye to eye on what the configuration should look like.  Without a doubt, we need some kind of a swing-away mechanism because we use the back doors of the Interstate for ingress-egress.  My mechanical engineer husband is concerned about the moment arm created by having a heavy hitch box on a swing-away hitch platform. The hitch is rated to take the dead weight, but the forces created by lateral swing weren't necessarily what the engineer had in mind when spec'ing that hitch.  So hubster would prefer something that instead attaches directly to the rear bumper for greater strength and stability - but that would probably require us to replace the bumper, and at this point I have yet to be convinced - I'm not really feeling that option ($$$$ ca-CHING!) when a simpler solution might get the job done.  Conversely, if a concrete rationale emerges as to why a non-hitch solution would be strongly preferable, I'm all ears.  The only thing I won't consider at this point is a trailer.  We simply don't need something that large.

Anyway, in one or more near-future posts, I will report on our progress toward finding a fabrication solution.

Updates:  Subsequent links on our solution.

CUSTOM HITCH CARRIER FOR THE AIRSTREAM INTERSTATE, PART 2: OUTSIDE THE BOX

CUSTOM HITCH CARRIER FOR THE AIRSTREAM INTERSTATE, PART 3: TRIM OUT

Monday, July 4, 2016

CUSTOM HITCH CARRIER FOR THE AIRSTREAM INTERSTATE, PART 2: OUTSIDE THE BOX

I tried - I really, really tried! - to find an off-the-shelf solution for carrying either our original Yeti Tundra 50 cooler, or a replacement cooler, on the rear bumper of our Airstream Interstate.  Some of that agony is described in this recent Air Forums thread, and other parts of it are on different threads still, including this inaugural discussion from almost two years ago.  And even more agony is described in Part 1 of this post.
A wing, a prayer, and an over-stuffed mini-van that became the inspiration for our September 2014 Airstream Interstate purchase, for we drove that floggin' mini-van on a 6,000 mile trip earlier that same year.  While a mini-van may suck for long-haul comfort and convenience, it sure swallows a Yeti cooler with ease.  Which is very much unlike an Interstate.

Here's a key piece of information, though:  That Yeti you see above was packed with water ice and thus could be safely stored inside the mini-van.  The same would not necessarily be true if it had been stuffed with dry ice, which off-gasses carbon dioxide that could potentially displace oxygen and create a safety hazard. 
To make a painfully long story short, no existing exterior carrying product met our needs.  Or, if something did show potential to meet our needs, it was either:

(a) too heavy given our GVWR restrictions
(b) not yet in final design, let alone production, and thus not readily available commercially
(c) not sufficiently engineered to be as durable or as secure as we needed (pretty much every mass-produced hitch carrier fit that description)
(d) scandalously expensive if it was sufficiently engineered, or
(e) some combination of the above.
Do you see that custom bumper upfit in this pic chosen at semi-random from the internet?  This one is carrying a spare tire, but an apparatus to carry a cooler would be constructed in a similar fashion.  This thing is gorgeous, it's superbly engineered, and it's as heavy as hell.  Two out of three ain't bad, but we needed something lighter.  
As the old saying goes, if you want something done right, you have to do it yourself.  And so we did.  Here's the sequence of steps involved in the production of our custom hitch solution.  As usual, I'm giving general descriptions only here, and if someone wants greater specifics, please feel free to email me and we can discuss.
The journey started with a trip to a local steel supply shop to pick up the raw materials, which they were sizing down for us in this photo.  
My brilliant husband designed this apparatus with the intention of minimizing weight while maximizing strength, durability, and security.  It started with the frame of a shallow tray into which the Yeti could be placed. 
Bottom braces were then cut and welded into place. 
It was slow going with plenty of rest and water breaks on this fabrication effort, as late June temperatures climbed toward 100 degrees.  
Art shot of raw materials - I insisted on buying an itty bitty Texas embellishment, about 3 inches across. 
Did I mention that it was almost 100 degrees?  As hubs did the welding - in cargo shorts despite the sparks flying everywhere - I watched in amusement from the relative comfort of the Interstate where I ran the A/C, mounted the Reflectix window covering keepers, and templated the cab for a custom weather mat overlay (no blog post to come because that project turned out to be a total failure).  I think I got the better end of that deal, although I did trip breakers about ten times trying to keep the Interstate cool by shore-powering it into a regular household circuit (hubs had dibs on our 220 circuit for the welder).  
From this pic you can start to get a feel for how this hitch carrier was engineered to be different from most other products on the market.  See that square tube cross piece that has been inset into the Yeti frame?  That is part of its extra strength.

Here's another view of the Yeti in its proto-hitch tray.  Note how this is shaping up to be much smaller and lighter than a conventional hitch platform or basket.  It only has to be large enough and heavy enough to get the job done safely.  

As for the positioning of this Yeti carrier relative to the rear end of the Interstate, that was determined by trial and error.  I knew I had to compromise on this design - originally I had wanted a swing-away arm so that I could keep a cooler back there and still open both rear doors.  But I had to meet practicality half way and adjust my expectations such that only one of the two doors could be opened at all times without restriction (that much was non-negotiable).  If I need to open both doors at some destination, then I will simply have to drop the cooler to the ground for the evening and tether it with a lock - no big deal.
Husband and I settled on this configuration - the Yeti centered on the port rear door, and a large platform which will serve multiple purposes on the right, as outlined in cardboard (we don't do anything around here without first mocking up out of cardboard).    
The back door on the passenger side is the one with the door handle - that's why it was chosen as the one to be open-able.  And the large platform underneath it will serve as:

(1) a generous step (much better than the tiny hitch step I'm currently using)
(2) an exterior seat (it's the perfect height)
(3) A small table or staging platform if no picnic table is present at a location, and
(4) a potential lashing point for general cargo that doesn't require the same magnitude of structural support as a loaded Yeti 50 cooler (I'm thinking perhaps a future inflatable kayak in a stuff sack).

This photo shows the hitch connector being positioned with support plates that were later welded into place. 
After everything was welded up, both my husband and I spent quite some time grinding and polishing all those welds.  The point was not to make it look flawless but to prevent future cuts and scrapes from burrs as we were handling it.  This was my husband's first major welding project and I could see his skill growing each day that he worked on it.

Now, on the issue of the cooler itself, I was initially very skeptical that it could be attached securely, given that Yetis are such high theft targets.  We took a two-fold approach to addressing that risk.
My husband welded two heavy steel bars that will extend down through the Yeti's security ports (the bars are 3/8" by 5/4" and weigh 2.5 pounds each).  They will lock to the hitch apparatus individually in a way that will make removal extremely difficult, certainly with enough robustness to thwart the typical smash-and-grab theft scenario.  At the same time, they will prevent the cooler from bouncing off the shallow tray as we go over bumps.  This approach kills two birds with one stone - security and stability.  
Additionally, I made the Yeti itself a much less desirable theft target by defacing it utterly.  I spray painted my phone number, emblazoning it across the entire width of the cover.  And I also added various stickers and patches, some with industrial-strength adhesive.  Nobody will ever be able to steal and fence this thing as a virgin untraceable cooler.  It is now ruined for many theft purposes.  
This minimalist hitch apparatus ended up weighing 57 pounds - significantly lighter than many of the other options we identified in the commercial market.  Either one of us can get it on and off the hitch without assistance (although in my case, there may be some cuss words involved).
After many rounds of welding, the moment finally came when it was ready for me to de-grease, prime, and paint.  Notice those two key-hole slots on either side of the Yeti (open) side of the apparatus.  Those are where the security bars come down to be locked in place.

Oh, and see all the little rings welded on the side?  They are there in case we have to lash cargo to it.  Now that we have this base apparatus completed, in the future we can fabricate additional accessories to fit the needs of a particular trip.  Perhaps a bike carrier insert, for instance, if we need bikes but not the cooler.  
Most if not all jurisdictions require rear license plates to be illuminated, and we addressed that by fabricating a bracket that will accept a light that wires to the hitch's existing electrical pig tail.
Spray painting in action.  Square tube was used for the bottom of the bracket so that it would stand out about an inch and a half from the front of the Yeti cooler.  That allows for easy placing and removing of the cooler (it's not too tight a space).  This because the Yeti blocks the original door mount for the plate.  
Incidentally, it wasn't lost on us that we created an apparatus that was so unique and custom that it may end up being a more desirable theft target than the Yeti cooler it was originally intended to secure.
Ooooh la la!  Sexy!  Some women model swimwear - I model Pewag security chain.  Arm for scale.  
I procured this Pewag chain so that I could supplement the hitch pin, as some of those can reportedly be defeated using a sledgehammer even if they are the locking type.  I'm not going to publish how I used this, but if anyone wants to discuss, feel free to email me.

And now for the great reveal, aka the money shot:
Smiling dog mirrors owner's mood.  
We will be adding a bed liner traction coating to the step / seat / table portion of the apparatus to make it non-slip.  I will also add some DOT C2 reflective tape to the trailing edge, because when the cooler is not in place, it's difficult to see from a position behind the interstate.  I'll do that after the bed liner product is applied.
Minimalist.  Streamlined.  Wonderful.  Looks like the Interstate was born with it already there in place.  But from a practical standpoint, it needs more visibility so that other drivers do not accidentally get too close.  
I will also be crafting an insulating and waterproofing slip-on cover for the cooler; all that spray paint and sticker defacing helps to discourage theft, but it needs to be covered during severe weather, including the heat of our summer.  (EDIT:  Those trim-out elements are described in Part 3 of this series).

Last but not least, the most efficient way I deduced to handle carbon dioxide overpressure in the Yeti cooler was to buy a couple of extra drain plugs (West Marine has two for ten bucks) and drill a small hole in the one that is intended for use with dry ice.  The intact plug will be reserved for use with water ice.
Just a small hole, because Yetis are well-known for being air-tight, and according to internet reports, a great deal of pressure will build up in the cooler.  This was a better way to deal with the situation than piercing the cooler itself, which would have been a non-reversible decision.  
One more shot of the pooch, who was thoroughly bored with my photo shoot by the time this one was taken.
"Yeah, whatever.  It's time to get over yourself and feed me."

For those readers who are not familiar with the construction of Yetis, her butt is right up against one of the two steel bars that extends downward from the lid and locks beneath the apparatus. 
Thanks for reading.
:-)
One day soon, it won't be my driveway that I'll be sitting there staring at.  It will be the next million dollar view.  

Sunday, July 10, 2016

CUSTOM HITCH CARRIER FOR THE AIRSTREAM INTERSTATE, PART 3: TRIM OUT

In Part 1 of this series, I described the predicament we faced in obtaining a hitch carrier for our Yeti cooler.  Part 2 described our solution, which we (mostly my husband) custom-fabricated ourselves. But we also needed to accessorize this accessory, so here's Part 3 to describe those add-ons designed to make this project easier and safer to use.
The first thing I needed to do was to fashion a cover for the Yeti, both to repel road dirt and to provide an extra measure of protection from the fierce southern sun.  We noticed as we were building the hitch carrier that the Yeti would become almost too hot to touch as it was sitting there in its carrier rack, and that cannot bode well for its on-road insulating potential.  To help combat this solar heat loading, I cut a top piece of closed-cell foam (cut from a six dollar sleeping bag pad obtained at Walmart), because the top is where the worst of the sun's incident energy lands.  I also fashioned a cover out of what is now being called "reflective" tarp.

I had the camera flash on for this pic so that the "Woman Working" reflective sign would light up like that.
:-)
It used to be that most tarps were blue, and the "blue roof" phenomenon is well-known to those of us who live in hurricane country.
A collection of tarp-covered roofs, reportedly from somewhere in Florida, as the pic appeared in some FL newspapers. 
But at some point in the recent past, someone apparently got the brilliant idea that something closer to a radiant barrier would be a better bet for tarps, and they started making them out of this semi-reflective silver material instead.

Here are a few pointers on sewing a device like this cover.
I got a tarp of approximate size 7' x 9' at Harbor Freight for about eight bucks.  This project only consumed a portion of it.

 A really good T-square is indispensable for this job. 
This cover didn't need to be completely waterproof - the bottom of our hitch basket is open, after all.  So I wasn't shooting for waterproof-ness, but neither did I want any horizontal seams to invite water in.  Using the T-square, I cut out an appropriately-sized cross-shaped portion of the tarp, leaving margins for four side seams.  
As with almost all of my projects, I tend to fit as I go rather than relying on precise measurements.  This is especially true of strange materials that are not typically run through a sewing machine, like tarp, for instance.  It was a challenge to sew - I had to foot it myself as the machine would not advance it in the usual way, probably because it was too slippery.  I folded together the side seams and fit them one by one, sewing right sides together using an outdoor grade of heavy thread, and then turning the resulting cover right-side out when finished. 
If you read my blog posts, every once in a while, you will be forced to listen to me pontificate about some aspect of healthy lifestyle.  Today the topic is yoga, which is my all-time favorite exercise practice.  How many women in their 50's do you know who have the strength and flexibility to sit spread-eagle on the floor like this for the purposes of completing a sewing project?  How many women in their 50's have the strength and flexibility to work both on the roof of an Airstream Interstate, and upside down squeezed under the chassis?  Without yoga, I simply wouldn't have the physical capacity to do any of these things, and life would be so much more restrictive and less fun.  OK, sermon now concluded.  
Here's what the proto-cover looked like once all seams were completed and right sides were turned back out.
Dog be like, "Huh?? The Interstate is in the driveway - are we leaving soon?!"

Once the project had reached this stage, I needed to put it back on the carrier in order to fit the bottom seam, which is shown cuffed up here like a pair of 1970's bell-bottom pants.  
I'll show the finished tarp below, but let me also mention the other accessories.  I wanted to obtain a product called 3M Safety Walk to line the step of what I'm now calling the "back porch", but I couldn't buy it in a convenient size, so I went with this instead:
A competing product, apparently, and both the size and price were right.  
Two of these pieces fit quite nicely.  There's one piece dry-fit above, as I was sanding out a patch for the other.  
I also edged both the hitch carrier and the hitch apparatus beneath it with DOT C2 reflective tape.  Small quantities are available for sale at big box auto supply stores such as O'Reilly Auto Parts.

Reverting to the tarp cover for the cooler, once I completed the bottom hem, I just cinched it with two ordinary rubber bungee cords linked together, but we may eventually do something more polished, such as snaps or marine fasteners, as time allows.

This money shot is also a night shot.

That pic above doesn't appear nearly as homey as this one below, which I took using a flash to show up the DOT C2. "[A] report by the National Highway Traffic Safety Administration (NHTSA), an agency under the United States Department of Transportation states that reflective tape can effectively reduce impacts into trailers by 29%", said this article.  I wonder what the percentage would be for the extended rear ends of camper vans?  As my high school Driver Ed teacher used to chant, "See or be seen."
Home is where the see-able back porch is.  

Monday, July 31, 2017

HITCH CARRIER EXPANSION FOR THE AIRSTREAM INTERSTATE

Last year, I published a post trilogy (Parts One, Two, and Three) describing our EPIC struggle to obtain a hitch carrier that met our specific travel and family needs.  We ended up custom DIYing the best carrier that either of us have ever seen, bar none.
And our dog agreed. 
Fast forward a year and a nagging voice in my head kept saying, "Lady, yer gonna need a chain saw where yer goin' next!"  And the chain saw we picked requires a gas can.  And a gas can presents a serious challenge for carriage in a Class B camper van.
It was just a small gas can, a Wavian 2.5 gallon military spec steel jerry can, but still, it presented a big challenge.
I wanted to do something as simple as possible - maybe bolt it temporarily to the back of our existing hitch carrier, because it will only need to live there briefly during local trips when we were actually hauling a couple of gallons of gasoline to our property.  But my husband had other ideas, and due to the cuteness factor of this project, I could not find it within myself to object to his plan.

Basically, he built a custom bracket that bolts onto our existing carrier.

The secret to retrofitting this device, the need for which we had not foreseen when we designed the original hitch carrier, was to "hang" the bracket off that main structural member, and extend it out to the driver's side.
Close-up of those two main bolts.
The Wavian frame could therefore be bolted, in turn, directly to that bracket.
View from above, without the gas can in place. 
The result was just too precious for words.
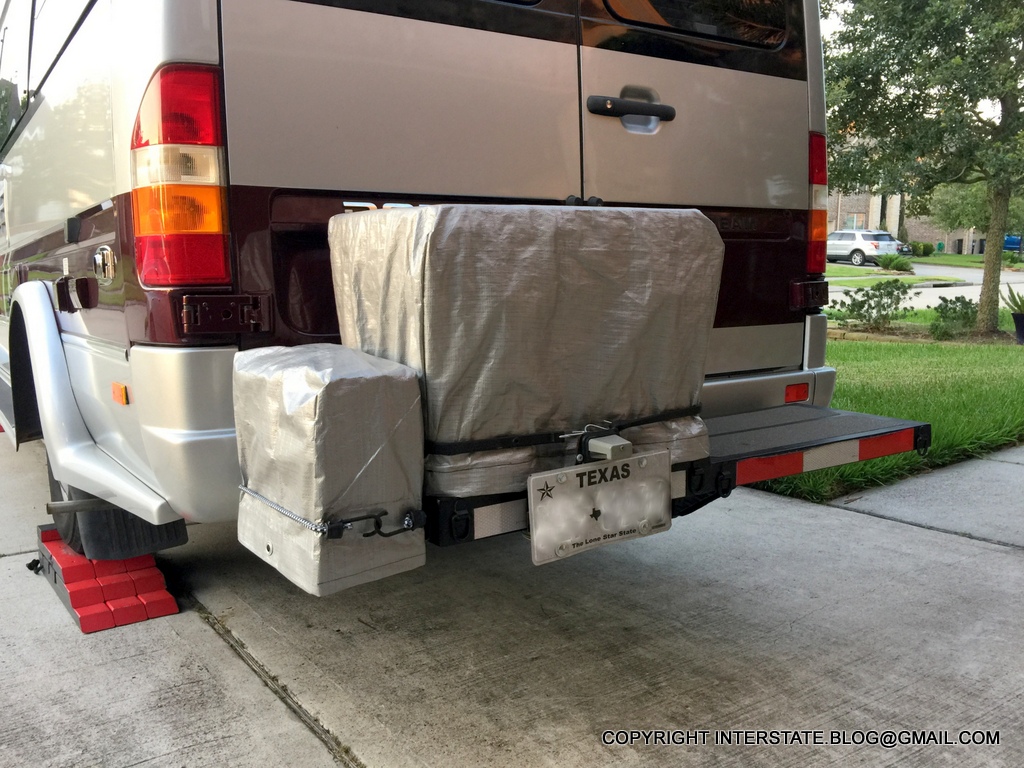
The Yeti cooler had a baby!  And it looks like it was a mixed marriage because coolers don't typically give birth to jerry cans!
Of course I made a matching sun shield / modesty cover out of silver tarp for the gas can.
I used the same approach as for the Yeti cooler, described in Part 3 of that trilogy linked above.
#vansizedsewing
You'd almost think that we designed the hitch carrier this way, given the fit in the remaining space and the fact that the gas can does not extend one millimeter beyond the body of the Sprinter.
Couldn'ta planned it better if we'd tried.  
Anyway, mother and baby are doing fine, and I'm dying from the cuteness factor here.
Awwwww!!!  It's not often that I get to use the word 'cute' in a Class B context!

No, ours is way cuter than that.

Wednesday, April 26, 2017

CUSTOM REAR DOOR SCREEN FOR THE AIRSTREAM INTERSTATE

I'll warn you in advance that this can be a tedious and frustrating project.  But with commercially-available Airstream Interstate-compatible screens routinely selling for $350 to $500 (rear doors, Sprinter aftermarket) to $3,000 (Airstream OEM option for the sliding door, per owners who have reported getting cost estimates), you can get through it by reminding yourself of all the money you are saving because you suffered through the aggravation of fighting neodymium magnets in a sewing context.  Because in contrast to the pricey versions, my rear screen version costs about $20, and when I eventually get to the point of making a side screen, it won't be much more than that.

The Mercedes Sprinter van body is curved in three dimensions.  It's not just a flat panel with side-to-side curves.  There is also front-to-back curvature.  For this reason, it's almost bloody impossible to properly fit a screen to it through a process of conventional measuring.  The only sane way I found to tackle this project was to repeatedly fit it step by step.  Here's a general description of my process.

I began by taking a piece of no-see-um netting, available on Amazon for about seven bucks, and physically fitting it to the curb-side door opening, with neodymium dot magnets.  If you look closely at this pic, you can see white pin heads on three sides.  Those are the intended magnet positions that resulted from this initial fitting exercise. 
I should clarify that, for this version 2.0 of my screen, I decided to make a screen for just the one door.  My original plan (and my v. 1.0 prototype) was a full-width screen spanning both doors, but we subsequently added a custom hitch carrier that usually carries a Yeti cooler, blocking the street-side door from opening.  Furthermore, the Yeti side of the van is where my husband sleeps, and he doesn't like sleeping with his door open, whereas I do.  For these reasons, I re-designed this v. 2.0 screen to just cover my side, my door.  This makes for a more manageable crafting project, and it also makes for easier administration of the resulting screen.  For instance, if it starts to rain in the middle of the night, it's much easier to wrangle one door rather than two, in order to shut it quickly, especially when the hitch carrier is in place such that I have the rear step to use for this process.

Onward.
Once I cut the no-see-um shape based on that initial magnet fitting to the door frame, I began cutting side trim pieces out of a common black polyester liner fabric that is available in any fabric store.  During my earlier v. 1.0 screen trials, I found side strips to be essential in discouraging insects.  They tend to follow the light, plus their sense of mammalian exhaled carbon dioxide if they are biting insects.  They will walk all the way to the edge of any given barrier in an attempt to get around it.  If there's no border, they'll walk to the edge of the screen and circumvent it by squeezing underneath.  But if there's a border such as what is shown as being added above, they'll stop there.

I wanted about a 3 inch border, so for the top and center which are straight runs, I cut 8 inch strips, hemmed them on each raw edge, and basically sandwiched (more like taco'd) the no-see-um netting in them.  In other words I folded them into a hemmed V-shape and inserted the edge of the cut no-see-um netting into the fold.

Notice that I transposed onto the resulting fitted trim pieces all the original white pins which mark the magnet locations.  This is essential to sustain the integrity of the fit through this trimming process.  
The heavily-curved side piece took a bit more work to cut properly.
I laid the cut no-see-um netting on the polyester fabric and used it as a template for the first curved cut.
But then, of course, I had to basically trim off the remaining straight edge to create a curved strip of uniform width.  
Then I repeated the process of folding this curved strip in half, hemming each raw edge, and fitting it to the rest of the workpiece.  (Seam ironing at each stage is essential in this process, of course.  If you are a seamstress or seamster, you already know that).
Like this.

Notice how the bottom is still raw.  The final step, once this top section is fully fitted, magnet-ed, and sewn, is to add a solid piece on the bottom to take it all the way down to floor level.  Because we have jack-knife couches, I chose not to run the no-see-um all the way to the floor.  Having a solid fabric across the bottom discourages our dog from getting too engaged with whatever she sees outside beyond this screen.  She's well-behaved but I wanted to restrict her vision in this area so that she would be less inspired to try to push through it.  
Then there's the arduous and curse-producing process of hand-sewing in each magnet.
I used a combination of larger plastic-coated neodymiums that were left over from a previous project, and smaller dot magnets.  The larger ones I placed in areas where there was an abundant width of metal door frame exposed.  Smaller ones were used in tighter areas. 
It's very important to hand-baste in the magnets before the side seams are sewn up.  You have to be able to reach under the pinned trim to do this in the proper order.  Order of operations, in other words.
And then it becomes a real pain in the ass to complete the trim sewing, because the neodymiums will stick to everything - your sewing machine plate and foot, each other, your scissors, your pins, etc.  It takes more patience than any human should be forced to summon.  
For the smaller dot magnets, I took a different approach.  I inserted each intended magnet into the places on the trim pocket where they were supposed to go, but then (this is important) I held them in place by adding a temporary magnet on the OUTside of the fabric.  This basically held them captive in the correct locations and allowed me to hand-baste them securely into place without them sliding around, or flying across the room in response to some attractive piece of nearby metal, as neodymiums tend to do.  
If you choose to try this project, understand that it is best done as an iterative process.  You might not get it exactly right on the first try, but you can always carefully re-open your seams and make adjustments as needed.
For instance, working around the lower door hinge was a pain.  I had to get everything sewn and every other magnet in place before I could determine conclusively where this supplemental magnet, represented by the white pin head, needed to be placed.  That two-pronged door keeper you see folds inward when the door shuts (Edit: There also has to be room to be able to reach in and detach this keeper, if the door is to be folded back to the Sprinter body).  I couldn't have it potentially snagging the screen and yanking it off the door frame, because I was designing this screen to stay in place regardless of whether the door is open or shut.  So I'll carefully open up this section of side seam, slide in and anchor another dot magnet at the pin head location, and close it back up again. 
One thing to keep in mind is that it's important to exploit every anchoring opportunity, because in some places, they are limited by the door mechanics and trim.
For instance on the bottom threshold, our 2006 Sprinter reveals this exposed, recessed bolt.  Sure enough, I positioned a neodymium dot to attach to this bolt to help anchor the bottom edge. 
Here's an illustration of why I chose to use variable magnet sizes.  There's just a tiny piece of exposed metal inward of these door contact points.  Airstream's trim covers up most of that section of the Sprinter van body, and I did not want to remove that trim because its aesthetics are pleasing.  Therefore I didn't have room here to place a wider magnet of any kind and still be able to shut the door with the screen in place.  So there are tiny dot magnets just to the inside left of these contact points. 
Now for a couple of money shots.  If you are meticulous and a person skilled in the textile arts, you can spot a few errors I've made in this design.  But if you make your own screen using methods similar to what I've presented here, I'd suggest not sweating the small stuff.  The screen is black and its trim pieces are also black.  It becomes very difficult to see imperfections and personally, I have so many Interstate projects that I intend to complete that I did not want to devote an excessive amount of time to making this project "perfect".  It's a door screen, not an evening gown.
View from the outside in.  See what I mean?  It doesn't exactly jump out and slap you in the face visually.  Nor is it supposed to.

You can see in the photo above the solid piece I attached to the bottom of the no-see-um section.  I took this pic before I had totally completed the clean-up work on the piece, so I hadn't even ironed that section yet.  You can see the original bolt fold near the no-see-um screen. 
And here's the more important view, which is from the inside out.
Not a perfect execution, but presentable.  
And how does it work in practice?
This week, I tested it after dark in a Gulf of Mexico coastal salt marsh, which of course is mosquito heaven.  It does function as designed.  I had no bug penetration to speak of (the far larger problem remains bugs that follow me into the Interstate when I'm entering the vehicle or when I let the dog out to pee).  
 For more discussion on Airstream Interstate screens in general (pros and cons of various approaches), see this Air Forums thread.