Engineers, please realize that we know this work is sloppy and incomplete - it is so by design. Our intent here is not to establish rigorous quantitative proof of a specific result so much as it is to give a more general "feel" for the outcome of this van improvement project. We are DIYers and bloggers, not automotive researchers. But at the same time, we have to supply some de minimis level of actual measurements and data in order to substantiate our qualitative (quality of life) claims, so that's what we've tried to do here, is split that difference.
OK, with that massive disclaimer aside, we undertook a project to add sound deadening improvements to our 2007 Airstream Interstate. This Class B RV was built on a T1N Mercedes Sprinter cargo van, and no cab noise control had been integrated into the design of Airstream's upfit.
We had already realized substantial improvements by commissioning a custom carpet job for the cab, but that left the remainder of the body in its original "tin can" condition.
 |
| Here's a picture of that carpeting job. After we got this, we noticed, "Wow - we can actually hold a conversation on the road now!" |
 |
| But here's what the door looked like on the inside with the finish trim removed. Tin can. |
I must confess that I didn't take many photos of this project because part of me doubted that it would amount to much. We had already done the carpet, and I assumed that most of the controllable road noise had been coming through the floor, courtesy of the wheels. So my show-and-tell is limited in the sections that follow.
My husband chose the vendor Sound Deadener Showdown LLC as the supplier of the products that we used in the doors and on the firewall. It's basically a 3-part process as follows, and as demonstrated more completely on their website:
- Control vibration and resonance using what that vendor calls CLD Tiles.
- Block sound with a dense barrier that consists of mass-loaded vinyl (MLV).
- Absorb middle to high frequency sound using a closed-cell foam product.
In tackling those additions, first, the interior door trim has to be carefully disassembled. There are various sources of information on how to do that, including this Sprinter Forum thread.
Next, the CLD Tiles are added. Here's a photo of the interior of one of our doors with those in place. They intentionally don't cover the entire interior door surface.
 |
| Those silver rectangular things. |
Here are some scraps of the other two products on our garage floor.
 |
| The MLV is on the bottom. It reminds me of dance floor material, what they cover dance studio floors in. |
After the CLD Tiles are applied (they have an adhesive back), sheets of the other products are cut to fit the inner door frame area, with cut-outs for all the little knobs and pieces and whatnot. Unfortunately, I don't have any pics of those materials as they are added to the interior of the trim section. I will say that it's easiest to lay the trim section upside-down on a cushioned surface so as to not damage it, and fit them that way.
Once those are fitted, the trim piece is then replaced on the door, and re-attached using the integrated clips and bolts that hold it on.
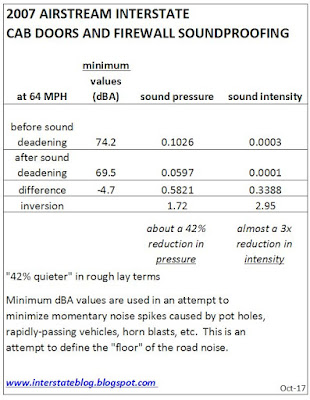
Here are two data compilations showing noise measurements taken before and after the completion of this project.
In this graph above, you can clearly see the that suite of "after" measurements is reflecting lower road noise levels as measured in the cab. Laypeople need to realize that the decibel scale is not a linear scale - what looks like a small average reduction here is actually substantial. I'll explain more about that in the chart that follows.
There are visible differences in the two data suites - most notably, why is there so much greater spread among the "after" measurements? Well, we tried to hold all variables constant, but we don't dictate what transpires on Houston's freeways. Traffic was worse during the "after" measurements. I was stomping the accelerator more frequently, trying to hold proper speed for sound measurements, I was lane-weaving, and I was having more vehicles blast past me. That explains a lot of it.
Despite those distributional differences, you can clearly see the effect of the sound deadening effort, which becomes even more apparent when we attempt to look at it in baseline terms rather than looking at the more complete suite of data above.
 |
| My husband used the Omni calculator for some of these calculations. I'm omitting details for brevity. |
The human sensory apparatus is not very good at defining absolute sound intensities, light brightness levels, etc. in anything remotely resembling quantitative terms. I can't tell you definitively what's twice as bright or half as loud using my ears or eyeballs. I can tell you perceptually that this door and firewall sound deadening job has made a BIG improvement in driving quality of life. I can say, "Our Interstate is much quieter now." By these rough mathematics, the typical level of freeway speed noise was reduced almost by half. Very roughly speaking. Which was a big surprise to both my husband and me. We expected to maybe realize a little in the way of gains. We got a lot.
It cost about $250 for the materials we used in this project, plus we have some left over from that purchase. I'd say it's well worth it, and I recommend a similar approach for anyone who has a camper van in which this kind of improvement was not a part of the original upfit.


No comments:
Post a Comment