The tables that were produced for many of the T1N
Airstream Interstates are ideal if you intend to serve dinner for four. But they are large, awkward, weigh about 20 pounds without the legs, and are not very practical for streamlined applications including computer work.
 |
| Here's one of the photos from the original sales listing for our rig. Big, big table. |
So I decided to replace it with something much more efficient and purpose-built. This blog post describes that process.
 |
| Here's another view of the original table, this time positioned bottom side up, beside a cardboard mock-up of my target design. I don't use a rinky-dink little laptop or pad computer - I have a full engineering "mobile workstation" that I haul almost everywhere I go. Therefore the table had to be designed around it. |
 |
| In order to get the leg flange spacing correct in my cardboard mock-up, I simply placed the cardboard on top of the existing table and stepped on it creating flange impressions that I could then trace, heh heh. |
A table replaced in an Airstream should be made of what, exactly? Solid aluminum, natch.
 |
| I picked a perforated aluminum sheet product, which I ordered in the size I needed for my specific application, which was 28" x 16". |
I ordered from
Online Metals which gave excellent service and quick delivery (my total was $88 which included the sheet in massively-protected packaging, plus shipping). The exact description of the product I ordered is as follows, and this is important for consistency with the hardware sizing that will be described below (the vendor sells several different specs of perforated product):
0.125" (0.25" holes-0.375" STAGGER) ALUMINUM PERFORATED SHEET 3003-H14
Eighth-inch sheet is not very thick and will bend if abused, but my table was not going to be very large and furthermore, it would have two pedestal legs with wide flanges. For that reason, I didn't think heavier aluminum would be necessary. The piece as cut weighs about 3 pounds, which is a far cry from the 20 pound OEM table that preceded it.
Here are some pics of the put-together, including hardware references.
 |
The perforated sheet arrived perfectly cut, but I had to edge it myself (the factory-cut edges were razor sharp; even before edging them, I had to file them down a bit). That proved to be a challenge because my preferred edging material, which is 0.125 inch opening U-channel aluminum, is not really produced in the market (omitting long story). I could have perhaps gotten some adequately-sized J-channel and epoxied it around the edges of this sheet, but in the end I went with polypropylene belt webbing from Joann Fabrics. They don't seem to have it listed on the internet, but it's the kind of webbing you would literally make a thin belt with. I stitched it into place using a tapestry needle and some embroidery floss of exactly the same shade of gray so that the stitching would not be noticeable. The stitching process took as much time as two episodes of Law and Order with fast-forwarded commercials. Cost was about seven bucks for all materials (be sure to use those Joann coupons that you can fetch on your phone).
The webbing looks darker than it really is in this photo because of the lighting. You'll see truer-to-life photos below. |
 |
| Here's the beauty of using this particular perforated aluminum sheet product: The holes are spaced such that they can be made to align with the holes in the Airstream OEM flanges, at least the flanges used on our T1N Interstate table. Furthermore those holes are exactly the same size. Therefore, no drilling or other modification of the perforated sheet was necessary. Here you can see light shining through three holes on the right side. The left side of the photo is overpowered by the glare. |
 |
| Tap photo to expand for clarity - Here's two of three types of hardware that I chose (I messed up this photo by placing hex nut packages twice; the third piece of hardware, which is the little locking washers, will be shown below). Some young man named Justin, a CSR in the League City Lowes hardware store, helped me tremendously to narrow down what would work best for this application. He suggested using stainless steel for an upscale look, and hex button caps in particular because they don't look like regular plain construction bolts. So Justin gets major artistic credit on this project. |
 |
| Here is what the hex bolts look like when inserted. Notice how I'm also reversing the order of nut-washer-bolt relative to what Airstream had originally done. They screwed from beneath, to to speak, because their table top was solid. Mine is perforated, so I need the prettier bolt heads to show at the top. The top is a little bit lumpy either way, whether it's bolt-up or bolt-down, but this is a computer table and I'll be incorporating a shock pad (shown below), so that does not matter. |
 |
For the actual positioning of the flanges on the perforated sheet, what I did was mark the approximate centers of where they ought to be using masking tape, and then I kind of "massaged the sheet around" until it found what seemed to be the best location relative to the other parts.
In other words, I put the pedestals in the floor, I put the flanges on the pedestals, and then I positioned the sheet on top and scooted it around until the alignment made the most sense. The holes do line up, but not on the square, so this process is a bit subjective. You just have to make sure that it makes sense for your application. For instance if you wanted to use this type of table for general purposes and you had people of different sizes, perhaps husband and wife, maybe you'd want to set the flanges off-center so that the larger person would have more room. With perforated aluminum, the possibilities are endless and you can change your mind later on and just move things around.
Here, too, is the third piece of hardware I mentioned - lock washers, because the table will be subject to vibration and I don't want the flanges working their way loose. |
In every great blog post, there must be a money shot, and here it is, in all of its industrial chic glory:
 |
For less than a hundred bucks, I've got a table that is as practical as it is stunning. Incidentally, that pic of the bison on the computer was taken during our last major trip, so it's only a propos that I show that image as we are getting ready for our next major trip. This table creation was part of our make-ready process.
See now how the belt webbing around the edge blends in? I like it - thematically it works for a vehicle because it's reminiscent of seat belt webbing. Plus I ended up concluding that I wanted something of a textile nature on the table instead of the entire assembly being 100% cold metal. I've already bumped into this table several times. The polypro webbing is good for sliding over the legs that come into contact with it. |
There are a few additional things to note about the details of this table.
 |
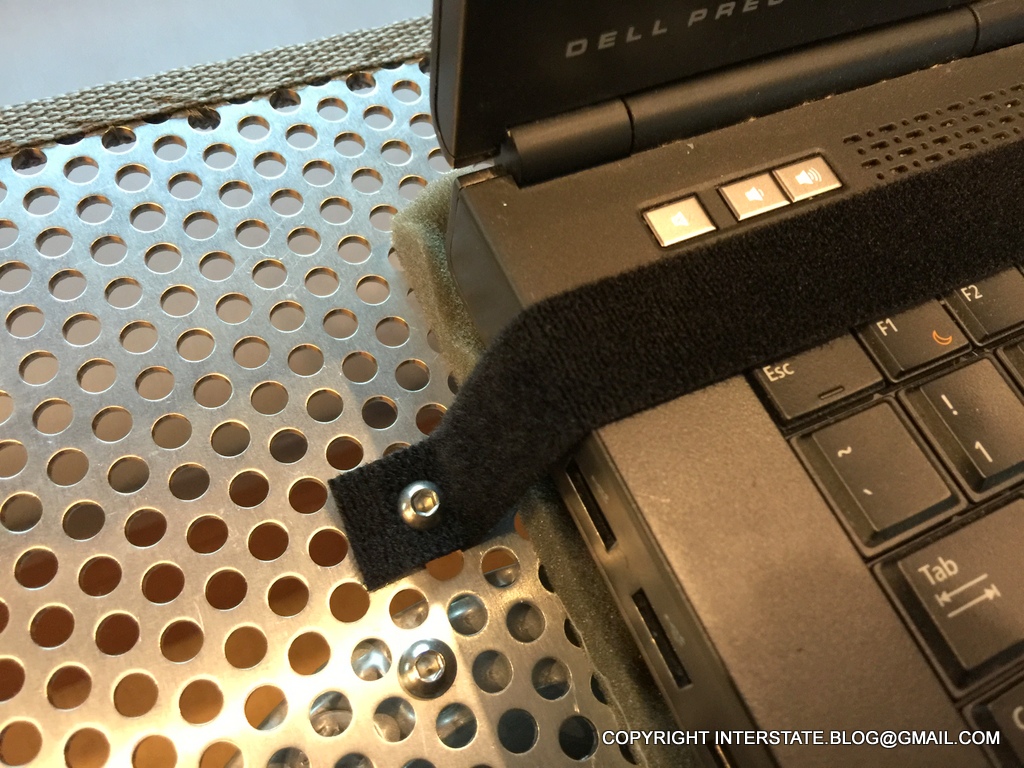
Number one, you will notice that I've got Velcro keeper straps holding the computer down. This is because I don't want to have to worry about the computer if I'm working while the vehicle is in motion. Notice how my Velcro is held in place with the same hex bolts running through the table top. Notice also that I'm not blocking the computer's ventilation holes with the strap. Particularly if I close the cover with this Velcro strap in place, that computer is not going anywhere unless a major accident occurs. It is held very tight to the table this way.
The beauty of having a Velcro strap like this is that it can be moved around as needed. Just re-position the hardware in the perforated aluminum. Get a different computer? New size? Second monitor? Just move the straps and re-bolt in place. Simple. |
Number two, you'll also notice that I have a piece of convoluted foam (aka "egg crate foam") beneath this computer for use as a shock pad. That is because, several years ago, I lost my primary business machine to a drop sensor corruption. I'm not a casual computer user - I run a small business off that one souped-up mobile workstation that you see here. Every high-end laptop contains a drop sensor designed to protect the hard disk(s) in the event of a fall, and it does so by instantly locking the disk(s) in place to prevent impact damage. Well, if the damned sensor malfunctions, then the computer freezes during normal use and essentially bricks! Rough treatment produces wear and tear on drop sensors, and rough treatment is part and parcel of the rear end of an Airstream Interstate. Therefore I have protected the computer against acute shocks (think major pot-holes) by setting it on this foam. Which, incidentally, also helps keep it from sliding around.
Now a word on storage practicalities.
 |
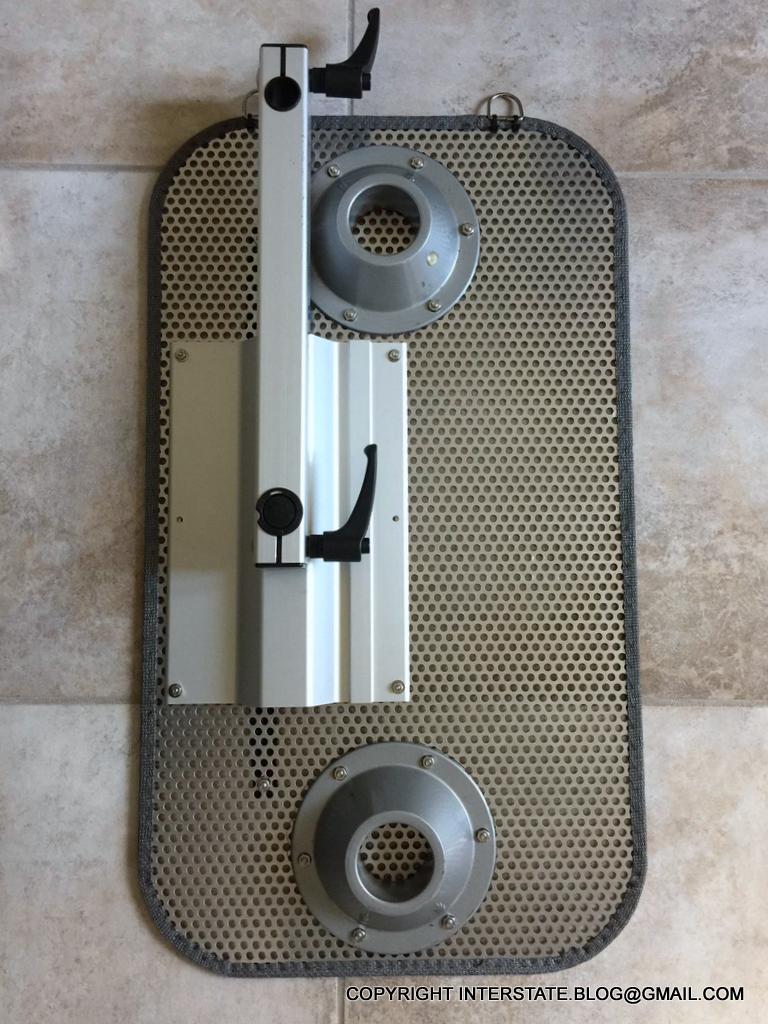
| This little buddy is so much easier to store than the OEM Airstream table! Here is a view of the underside. Notice how short the bolts are that hold on the flanges (per the hardware specs given above). You don't want to scoot your thighs under this table and have long bolts gash your skin. Therefore the bolt ends and their corresponding washers and nuts are very short and almost flush with the bottom of the flanges. |
 |
| You must admit, that is a thing of sheer Class B beauty and efficiency. Notice how the computer keeper straps also hold the convoluted foam base and mouse pad for storage. |
As for the storage itself, the table is so small that there are several possibilities even within the tiny space of the
Airstream Interstate.
 |
| For the short term, I'm thinking of storing it in the closet, with a few more Velcro pieces to hold everything in position. |
I couldn't be happier with this project, nor could I be happier that finally I was able to execute something that I vitally need without my over-worked husband having to lay a finger on it. This project was all on me, thank goodness!! Stay tuned for more of my husband's absolutely unprecedented creative work where our Interstate is concerned, work which will be the subject of near-future posts.
Edit 20180510: I made two changes to the table following this blog post.
First, I adapted it to also function as a Lagun table top, such that I can use it with both mounts - the original twin pedestals and the Lagun mount. You can read about the Lagun project
here.
Second, I rounded the corners!!! Sometimes we don't get things exactly right on the first attempt. Sometimes we have to iterate. Why did I leave them square in the first place? Probably because at the time, I wasn't sure that we could cut aluminum as cleanly as we would need to do, but my fears were unfounded (in other words, a jigsaw in the hands of my husband proved me wrong). Here's a pic of the revised table, the shape of which now closely mirrors the Airstream signature window in our rig's galley kitchen.
 |
| Even better, especially given my more dynamic use of it, in which I squeeze in and out of the passenger seat with it in place (hence having no corners to catch my clothing on is an improvement). |


No comments:
Post a Comment