Sunday, September 20, 2015

MAGNETIC ORGANIZER FOR THE AIRSTREAM INTERSTATE

It's still a shirt-soaking inferno in southeast Texas, so we are still doing DIY projects instead of taking weekend trips.  While northern folk bemoan the coming winter, we exult over our impending freedom from the crushing heat of summer (93 degrees as I write this and as we head into the final week of September).  The cold fronts are coming, the cold fronts are coming...
Get out the RVs.  Finally.  
One of the users on the Air Forums WDYGFYTT thread inspired me to finally figure out the construction of the magnetic organizer that I have wanted to install behind the driver's seat in our mid-bath model Airstream Interstate.  In one or two other Air Forums threads, we had previously bemoaned the lack of magnet-friendly surfaces in the Interstate, and I finally got around to doing something about it.  Here's the project build sequence, with two caveats.
This is the sheet metal product I used, but I offer this suggestion:  Get a sheet of slightly heavier gauge steel if you want your magnets to have better staying power.  The product spec tab says this is 30 gauge (0.32 mm), and it was all that was available in our local store.  The smaller sheets sold by Home Depot cite 28 gauge (0.40 mm), and that might be better for both rigidity and magnet holding power, supposing you can find it in larger sizes.   Gauge chart here
The side wall of the Interstate is curved, so I did my usual thing in templating with butcher paper. 
Pushing the pencil into the seam.  If you do this, it will likely make a template that is about a quarter of an inch wider than what you really need.  We had to trim ours down.  
Tracing from the paper template onto the sheet metal.  That familiar Sprinter T1N body curve.  
We made the cut using sheet metal shears (masking tape added for scratch prevention), but there are probably other ways to do it.  You must be careful with sheet metal this thin, because it is very easy to put unsightly bends, dents, and kinks in it.  Again, I think a slightly heavier gauge would be better for the project.   
And there is the money shot, installed with 6 stainless steel screws (corners and middle on each side).  I have not yet optimized the magnetic array on it yet, but you get the idea from the way I've staged it here.  What was formerly unused space now has a purpose.  Most importantly, it doesn't look home-made.  I intentionally designed it such that the top edge of the metal is in a line with the top edge of the aluminum facing on the wet bath door (the aluminum and the galvanized steel don't look appreciably different).  That way it almost looks as if it wraps around the corner of the wet bath, as if Airstream had originally installed it that way.  
This is where I plan to keep my magnetic do-done list - right behind the driver's seat (see this post for creation instructions).  When I turn around to grab the seat belt, there's the list staring right back at me.  It, too, is held on using magnets.
The other caveat I will add is that the larger the surface area of any given magnet or magnetic device, the better I've found they perform in a moving vehicle. Counter-intuitively, those magnetic spice tins (which I will use for spare fuses and other small odds 'n' ends) that you see in the photo above, the spice tins with their bottom-covering sheet magnets, hold much more securely than their stronger but smaller neodymium counterparts.

You can see in that close-up photo above that the screws we used to attach this fitted sheet metal piece are reminiscent of Airstream's rivets.  Once again, stylistic consistency is one of the keys to having any given DIY project turn out well.  

Friday, September 11, 2015

DO-DONE MAGNETIC PUNCH LIST FOR THE AIRSTREAM INTERSTATE

1.  THE PROBLEM.

At first I felt a little dumb and guilty, like I was the only newbie making these mistakes, until I read a post on Air Forums where a trailer owner admitted to having sacrificed not one but two un-lowered TV antennas to overpass collisions.  Then I realized I wasn't the only one who is prone to RV-related forgetfulness.   
Cartoon illustrating this regrettable phenomenon.
Fair Use statement:  Nonprofit personal blog for the purposes of commentary; minimal image reproduction quality.  
Someone's idea of a forgetfulness work-around.  Haw haw haw.
HT:  Fellow blogspotters Hidden Valley RV
And then I recalled Apollo 13, where duct tape and scrap paper were necessary to augment the punch list for a mission that had been otherwise funded to the tune of $2 billion (in 2015 dollars).
Screen shot from the Apollo 13 movie, showing a representation of a reminder that astronaut Jack Swigert used on his vehicle control panel.   
When it comes to failing to execute the full motorhome recommended pre-departure punch list, I have done it all:
  • I've driven away with the bath door flapping on its hinges (we leave it ajar for ventilation while parked). 
  • I've driven away with the interior coach lights still on, only to have to pull over once it gets dark and the light begins interfering with my visibility.
  • I've driven away with the refrigerator door flapping on its hinges (ditto on ventilation while it is not running).
  • I've left for a trip forgetting to fill the fresh water tank. 
  • I once scared the crap out of a passenger by failing to secure a canister of dog food, such that it came smashing to the floor.
Photo of the inside of our Interstate, annotated for dramatic effect. 
So why is this happening?  Why are people smashing their still-raised TV antennas and smashing dog food containers into their floors?  Why aren't they getting all that stuff squared away before they drive off in their motorhome or trailer?
It's happening because they are failing to execute their punch lists.

Image attribution:  Microsoft clip art. 
And why are people failing to execute their punch lists?  Because they don't have any.  

2.  WHAT'S AVAILABLE.  

Motorhomes and trailers don't come with punch lists.  You have to buy, adapt, download, or make one yourself.  And when I began looking into what the options were, what I found surprised me, as this brief photo tour shows.  (I will follow the photo tour with instructions on how I made our current working prototype punch list). 
In some respects, I found that we had better organizational assets in the 1940's than we do today.  Screengrab of an old grocery list from this Etsy site. Red means it is needed, white means it is not.  I like this because it provides immediate and crystal clear visual cues on what would otherwise be an impossibly long list to have to read.  
These days, a lot of "do-done" boards and checklists are actually made by crafters and geared toward raising children, habituating them toward focus and organization.  
An example of magnetic chore charts, which is another term for punch list or "do-done" list. 
I searched high and low for a customize-able device similar to this one, a tool that would allow me to change IN and OUT to DO and DONE and customize the wording on the left side.  I found nothing like this for sale.  
Here is the bizarre thing - this exact I/O marker-sliding logic has been extensively integrated into Apple electronic functionality, but not into physical products.    
It would not serve either my husband or I to have a version of this sliding button punch list on our iPhones, because we both need to access the same list.  That is one of our biggest challenges - the fact that we are two people are making changes to the configuration of the Interstate, changes that the other person doesn't necessarily learn about until it manifests inconveniently while the vehicle is underway.

3.  OUR SOLUTION

There were many different ideas I explored before capitulating and embracing the K.I.S.S. principle for my prototype.  


Let me briefly describe my failures so that you won't make the same mistakes I did if you try to design your own ergonomic device.  

I didn't want the old standby, a printed checklist or "cheat sheet" as I have seen other RV owners use, for the simple reason that it's not optimally dynamic.  If you do nothing more than make a list of things you should be doing pre-departure, it's questionable as to whether that can actively signal what you have been doing.  If it is a physical checklist with boxes and something is not checked, is that because it hasn't yet been done, or because it doesn't need to be done? And if for some reason you have to start changing things around midway through the process, you'd have to start a new piece of paper and re-enter some of your checks, or erase some of your checks... this is too complicated.  I ended up concluding that, of course a conventional checklist is a viable idea, but I am just not sure that it's the most efficient option, because it triggers a lot of reading that may not be necessary or easy to do if you are in a hurry and/or fatigued.
Suggested checklists abound on the internet (there are even Pinterest pages of RVing checklists), and, WHOA!, some of them are absolute doozies (in terms of being thorough), such as this one from the ChangingGears website.  And this isn't even the whole checklist... there is more!  This example doesn't necessarily bode well where human factors are concerned.  In designing our checklist device, I wanted to try to simplify this process using the 80/20 rule - what are the most common oversights I make, and what do I really need to have on my list to get the maximum benefit from minimum work?  I didn't want the resulting device to be overly daunting such that it took too much time and effort to execute. 

Speaking of simplifying, we bought this little five dollar bugger, but this is just one reminder among many that need to be made.  Plus if you are sitting in the driver's seat, you can't see it on the antenna crank.  Plus I initially taped a static punch list onto the back of ours, but we still forgot to do what was printed there.  Not optimal.

Image screengrabbed from this travel blog post titled "Don't wind test your RV antenna".  Duh. Guilty as charged - I have made that mistake, too.  Mostly very early in the morning when I'm still groggy.  Fortunately it suffered no damage. 
To that end, I knew I wanted to incorporate a dynamic list into a magnetic white board, but the question was how.  My initial favorite idea was a red-green stop-go magnetic system - you flip each red magnet over to its green side when the corresponding punch list item has been executed OR when it does not apply (very important ergonomically).  That is one way to use the same list over and over without having to use a new sheet of paper for each iteration (as with a conventional pen-and-paper checklist).

The problem was that the conventional white board "flip-over" magnets that I bought from Magnatag were too weak to stay in place in a vibrating motor vehicle - the product was not designed for that application.  So then I bought a couple of red-green neodymium magnets from Apex and immediately the opposite problem manifested - they were too strong and wanted to stick to each other far more than they wanted to stay in place on my white board.
From the sublime to the ridiculous:
The Magnatag on the right and the Apex on the left.  The Apex is a superb product, but you are never going to prevent them from sticking to each other if your application requires that they be utilized in close proximity.  
So unfortunately there would be no stop-go, red-green elegant simplicity on my resulting punch board.  Instead, I went back to first principles and developed the following simple solution using products that are all found at any big-box office supply store.
I didn't use any of the products listed below in a manner exactly consistent with their originally-intended use, but that's the fun of being a maker and a DIYer.

Ed Harris channeling Gene Kranz in a meme made by others and based on an Apollo 13 movie screengrab.  
Here is the product list needed for this project.
  • A magnetic white board suitable for your application.  There are numerous colors and styles.  I used this one:
The Quartet dry-erase board.  At 5.5 by 14 inches, it is small enough for the Interstate.  It looks like it was designed for use in a school locker.  
Tap the image to expand for clarity if you wish to read all of my individual action items.  
  • Magnetic business card backers.  Unfortunately you only need about 3, but you may have to buy a package of between 25 and 100, depending on what the store is stocking.  Maybe ask a business owner friend for a few.  Key idea:  These backers have a large surface area with a corresponding very low mass, such that they tend to magnetically adhere to the white board without sliding around when the Interstate is on the road and experiencing its usual vibrations and bumps.  
  • A couple of business cards.  I used some of my own, stuck onto the magnetic backers upside down so that the printing was concealed. 
The assembly sequence is very simple:

1.  Download the Avery template for your punch list.
2.  Fill in your punch list using the print template.  My chosen standard action items are shown in the photo above (except I later added "House battery ON" and "Trash OUT"). 
3.  Print onto the label sheet using a laser printer.
4.  Stick business cards or other cardstock pieces on the magnetic backings.
5.  For the size of the white board I bought, I cut six tags from each magnetic business card.
Each cut piece was 1.5 cm thick.  I drew a faint pencil line at each cut line, and then just cut them apart using ordinary scissors.  
6.  Peel each printed Avery label off and stick it on a strip of the cut magnetic business cards.
7.  Take your Sharpies and carefully draw your desired lines and permanent text on your magnetic white board.
8.  I also left a space on our white board for where dry-erase notes can be written in.  This is very important in our case because both my husband and I have been known to dismantle sections of the Interstate in order to work on it.  We need a reminder for those events.  

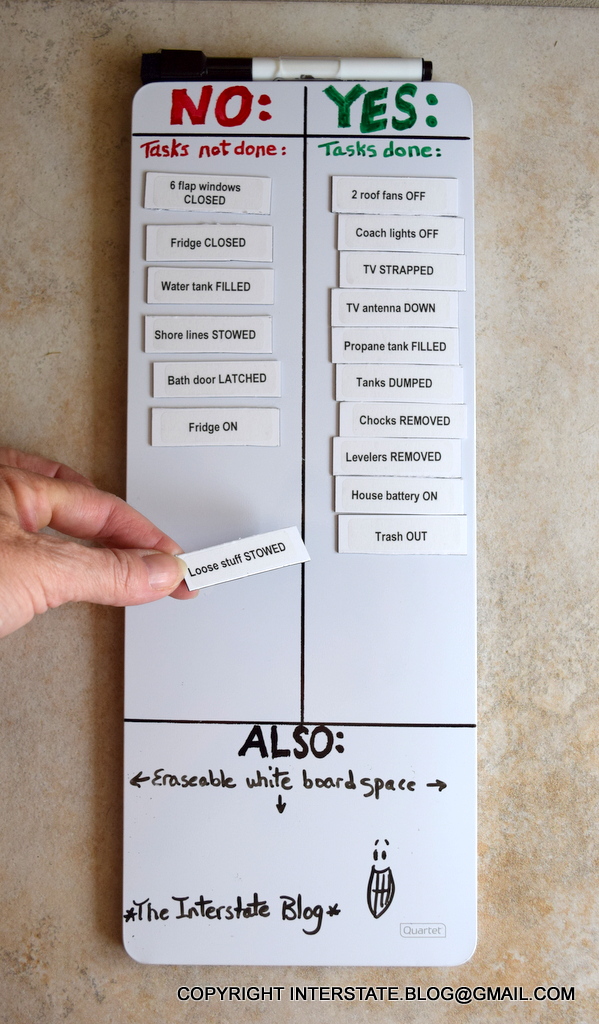
Here is the prototype.  I tried to achieve 80/20 efficiency by making it a two-tier reminder system.  I put the most common items on the magnetic bits and left a dry-erase portion for noting less common to-do's.  
Pick up the individual printed magnetic pieces and move them to the YES - Tasks done side as they are completed.  This is what I meant by dynamic.  This kind of device may seem like overkill, but when you are suffering from travel-related mental fatigue, you need all the cues and help you can get.  A tool like this could mean the difference between forgetting to do something important and not forgetting it.  
Incidentally, the way the list is reading in that photo above is the same as how I leave our Interstate parked in our off-site garage.  Stuff is intentionally left open and unsecured in order to maximize the Interstate's ability to get aired out - with high humidity and prevailing summer temperatures inside the garage hovering around 100 degrees, good ventilation is absolutely critical. Now that we have this magnetic board, no more will I have to tell my husband, "Remember to shut all the flaps before you drive away."  
Do you see the resemblance?? Eh?? Eh??  Separated at birth, they were!!
In my next post, I'll talk about ideas for mounting this in the vehicle for maximum efficiency of use. 
One of my favorite A13 memes. Life in an Airstream Interstate has, in fact, been compared to life in a spaceship.  Shuttle or otherwise.  

Monday, August 31, 2015

GADGETS GALORE FOR THE AIRSTREAM INTERSTATE

Following up on the Air Forums Small Space Living thread and also my earlier post titled "Best of Small Space Living" in which I had summarized handy items to make Class B living easier, here are a few more products that I've recently added to our Airstream Interstate travel kit.
Downsizing Win #1:  Exchanging a conventional stick-house-sized tea kettle on the right for the compact one liter version on the left = most of the capacity with none of the bulk.
Sourcing:  I got this from a merchant in Canada, who swore to me that it's the exact tea kettle that is kept on every Cape Island fishing boat operating off the northeast tip of Nova Scotia.  This exact model is traceable through Alibaba but does not seem to be available for retail sales outside the Commonwealth (if you are in Canada, try the World Famous mass retailer website, which is apparently not accessible from America).  However, MSR makes this model which is very similar.
Downsizing Win #2:  Miniature stainless steel wine glasses to replace the oversized space-gobbling polycarbonate versions I had originally gotten at Walmart.  These are available through West Marine, and would you believe that some of the customer reviews criticize their small size (6.5 oz)?  For crying out loud, people - refill!!

If you are REALLY obsessive about saving space, there is also a version with a detachable stem
Safety Win:  No glass in the motorhome!  GSI makes this collapsible wine carafe so that the bulky bottle can stay at home.  Some user reviews complain about leaking, but for ten bucks, I'm willing to give it a try.  
Boondocking win:  This odd little USB-powered (thus you can recharge using 12 V!!!  Yippee!!!) personal fan.  When I'm boondocking in excessive southern heat, I want just a bit of air movement over me at night.  Not like a full sized roaring fan, just a slight circulation.  This device delivers that, although if you buy one, read the Amazon reviews first.  The product was obviously cobbled together from unrelated parts, leading to a clip that is so strong I need both hands to open it, but a base attachment mechanism that is unexpectedly fragile.  I can live with these eccentricities because I haven't found another like it on the market. 
Organizational win:  Tablet holder from Walmart, fits on back of seat head rest.  Straps could be used to hold many other objects.  About $15. 
Dead space win:  For a long time I searched for a collapsible basket that would fit safely into the under-cabinet dead space next to our fresh water tank and water pump.  I finally found this one, called a "rugby striped bin" at The Container Store.  
Here are some additional make-life-easier products that I probably posted to Small Space Living at one time or another.
This nylon camping sink lines the Dometic and can help prevent premature filling of the small gray water tank.  The sink has carry handles, so the water can be removed and dumped outside, which is particularly handy during boondocking.  This is the Advanced Elements 10-liter portable fold-up pocket sink.  Sea to Summit also makes a version, but I've previewed it in REI's brick and mortar, and it was not clear to me that it would be superior to this cheaper version.  
BTW, sink inserts are not uncommon among Class B owners, who all face the same challenge of gray water storage limitations.  Here's another idea shown in Brent Rose's Connected States introductory video.  
Military grade 10-liter potable water jerry can from Lexington Container Company.  This fits into the lower cabinet beside my fresh water tank.  For the reasons explained in this thread, I don't drink water directly from the fresh water tank. 
Seat pocket organizer from Home Depot for 77 cents.  I'm a fan of the Big Orange Retail Giant (BORG) so I put this here for amusement value as much as anything else.  It is held in place by a mini-bungee cord.  
Silicone funnel makes fresh water filling and bleaching easier.  About four bucks from a kitchen supply store. 
Collapsible traffic cone from Walmart.  Walmart has a fantastic assortment of camping and RVing supplies. 
Sometimes cheap is a good thing.  Polyester sheets from Walmart, very light weight but more importantly, should be quicker-drying than cotton in excessively wet or humid conditions.  That is important for boondocking in hot southern weather.  
No space in a Class B for full-sized towels, so these microfiber versions are a better fit.  Shown here is the Shandali product in two sizes
Also, this little kitchen hand towel is great because it attaches to the cupboard handle and stuffs up into its own miniature sack when not in use, thus is kept out of the way (unlike the pooch). Pactowel Nano Lite.  
Nalgene bottles... can't say enough good things about them.  This is a 1-liter version that fits perfectly in our Dometic fridge. 

Logitech UE Boom portable Bluetooth speaker.  I went with this in lieu of swapping out the in-vehicle stereo for an upgrade.  This is water resistant as well.  In this photo, it is suspended from the camera monitor using a Geartie.  
One of my favorites:  The Pacsafe Travelsafe 12L.  Achieves a measure of internal security with next to no bulk, no appreciable weight, and a low price point.  Can be concealed in all those strange nooks and crannies that are found in a Class B and locked to the vehicle frame.  No security device guarantees against theft, but this one would sure make it more difficult, especially if the thieves didn't happen to be carrying bolt cutters with them. 

First-world gadgets for first-world space challenges.  Except the ones I have listed above are not useless!!
:-)

Saturday, July 18, 2015

WET BATH FLOOR MAT FOR AIRSTREAM INTERSTATE

Following up on this Air Forums thread, we decided to go with perforated rubber (SBR) instead of teak for our wet bath.  A good point was made in that thread about sand grains carried in on shoes and potentially being ground into the floor of the wet bath, and in fact, I had noticed some wear on our floor (which is otherwise unused to the point of still having the factory stickers in place).  A custom teak floor mat version was quoted in a separate Air Forums thread at about $350 plus tax plus shipping to have made.  Flow through rubber?  About $12, assuming you will use the residual pieces somewhere else.  This series of pics describes the sourcing and fitting.
First, create a template using butcher paper.
Next, get thee to the Big Orange Retail Giant (BORG) and locate this commercial-grade rubber anti-fatigue mat.  I cannot find a URL at this price, but the item codes are in the inset for reference.  Note that there's also a product called a "flow-through rubber mat" which is widely for sale, especially at restaurant supply stores, but when advertised using those words, they tend to be about twice the cost of "anti-fatigue".  
Advisory:  This mat was not intended to be walked on in bare feet.  Some people might find its texture not to their liking.  But I wanted the very heavy gauge  and stiffness of a commercial rubber product because I was worried about it potentially sliding around when wet. 
Cuts are best accomplished by folding over the mat and scoring it repeatedly with a scalpel-like very sharp instrument.  Rubber does not like to cut easily.  This is best done as a two-person job - one person to hold the mat upright and the other to cut along the fold.  Two people because the whole mat is quite heavy.  
Twins in form only, not in substance. 
Money shot!  I think it looks tres cool.  Circle motif once again (rivets).  
We both jumped up and down on it to ensure it would not slide around.  We have not yet tested it under wet conditions but flow-through mats are designed to be used wet so I'm not anticipating any issues.  Spousal approval was easy to get for this project.  The un-cut mat spent a week tossed onto our garage floor before we found the time to size and install it, and my husband decided he liked walking on it because of the cushioning effect.  
One caveat:  This is an industrial grade of rubber and we are a bit worried about it transferring pure black shadows (staining) onto the pure white fiberglass floor of the wet bath.  I don't know if this is a real risk or not, but better safe than sorry, so I'm only going to leave it in place on the floor while we are on the road.  While the Interstate is in storage, it will remain on our countertop (we have a piece of shelf liner to cover the glass stove and sink top and I'll just leave it on top of that).

I still have over half of the original mat left over.  I will either trim that and use it as a slop mat next to our garage utility sink, or maybe I will cut a piece to fit the Interstate floor near its rear doors, because that is a location where I drag in a ton of sand and mud on my feet.  A holed mat segment would help to catch and contain some of that mess before it spreads over the rest of the motorhome.
With the bucket of money I saved on this little project versus what I might have paid for teak, I'll be able to also afford one of these!  Yippee!