Tuesday, October 27, 2015

STUBBLEFIELD CG, SAM HOUSTON NATIONAL FOREST, TEXAS

Following a Texas A&M afternoon football game, we headed east to the Stubblefield Lake Recreation Area in Sam Houston National Forest for an overnight stay followed by adventures on the Lone Star Hiking Trail the next morning.
Here is a general orientation map showing Stubblefield (near the top) relative to Lake Conroe and IH-45.  PDF maps are available from the Forest Service and also from the Lone Star Hiking Club, which is the go-to source for info on this trail.  
Here's a closer-in map view, which makes an important distinction between the Stubblefield campground and its Overflow campground.   
There is no chance of getting last-minute camping reservations on weekends in most areas of Texas right now.  This is our prime time of year with ideal weather for outdoor recreation.  Additionally, much of the state experienced destructive floods earlier this year, which left many of our public and private facilities closed and has squeezed outdoor enthusiasts into a smaller selection of local destinations.  The main Stubblefield campground is first-come-first-served, and provides campsites with amenities for a fee.  The Overflow campground is basically an unimproved parking lot offering dry camping, and that's where we ended up because we rolled into the area well after dark, long after all the pay spots were taken.
View of the Overflow campground shortly after dawn the next morning, with our Airstream Interstate Sprinter-based Class B RV at photo left.  This place served as a temporary home to a wide variety of tent campers, RVers, and trailer folks.  
I'm a "football widow" at this time of year, so I enjoy any opportunity to snag my husband for a hike, no matter how much we have to work around the game schedule.

Football season or not, every good hike begins with a good breakfast.  I didn't turn on the generator to make toast on this day (I'm a toast aficionado), because none of the other RVers or dry-camping trailer owners turned on their generators.  Nobody wants to make the first racket!!  And that's fine because we enjoyed the peace and quiet.  
We found the Overflow campground to have a crude "speed bump" formed out of pushed-up gravel.  Getting in was not a problem, but given the long wheel base of the Sprinter, we had to use our Valterra leveling blocks to vault the rear wheels over the incline on the way out, in order to prevent damage to the undercarriage.  You can see how close to the ground the running board is at photo right.  
After we finished breakfast in the Overflow campground, we headed over to the trail head parking area in the main Stubblefield campground, which was by that time starting to clear out (it was a Sunday).  It's not necessary to pay a day use fee (I think) if you just park at the trail head and don't use any of the camping facilities available there.  
Dog is anxious to get underway.  
The Lone Star Hiking Trail is 128 miles long, and the part we hiked on this day represented just a tiny fraction of it.  
I thought I knew the forests of the greater Houston area, as I have lived here for decades now.  But this one held a few surprises.  
In many respects it was a familiar edge-of-Piney-Woods, pine-and-palmetto Houston transitional forest, although the Stubblefield area boasts a more mature assemblage of vegetation than many other local areas that were last logged more recently. That assemblage included a lot of standing deadwood. This is prime Red-Cockaded Woodpecker habitat, although we neither saw nor heard any on our hike.  
Every once in a while we would see this bizarre sight - a lightning strike victim surrounded by forest that remained untouched. 
Something else new to me and not nearly as enjoyable - this type of sticker that I have never encountered in any other forest understory around here.  They required pulling out one by one.  
I'm constantly amazed at the quality of photos obtained by the iPhone, such as this one.  I carried my phone plus one of my trusty Nikon DSLRs on this hike.
This is Nikon work, obviously.  Despite local drought conditions, Cardinal flower was in good supply.  
As were other wildflowers at the edge of Lake Conroe. 
This section of trail remains inland for about three miles, and then approaches the lake. 
Husband and dog watch a squawking great egret go by.  
A bit of macro photography during the break before the hike back. 
Here's a trace of that part of the trail, one-way, using the free Map My Walk app for iPhone.  I'm not much of an app user, but I find that one to be somewhat useful.  
All in all, a beautiful hike, plus we gained confidence in our ability to find last-minute dry-camping resources in the National Forest during peak season.  I'm looking forward to our next exploration.

Sunday, October 11, 2015

STORING MANY SHOES IN AN AIRSTREAM INTERSTATE

Shoe storage doesn't sound like something that would warrant a blog post, but I often have to travel with at least four pairs of of the danged things, two of which are massive:  street shoes, hiking boots, steel-toed boots, and public shower flip-flops.  Add one other person to that traveling mix and suddenly there are at least six pairs of shoes.  In the small space of an Airstream Interstate, this can become a case of All Shoes, All The Time.  I got tired of tripping over the danged things in the middle of the night and having them tumble from overhead cabinets, so I decided to give them special accommodations.

For smaller women's shoes storage, I simply expanded on the idea I had for food storage in Airstream's triangular overhead cabinets, except this time I used my Container Store over-door shoe pocket remnants for some actual shoe storage.
Our model of Interstate has three drop-down under-cabinet doors for accessing the fresh water tank, the water pump, and the black tank.  I used one of the fresh water access doors for two pairs of smaller women's shoes.  
The procedure is identical to what I had done for the small individual food items - cut a row of shoe pockets, sew a sleeve into which a length of shelf-hanging bar can be inserted, and then screw the resulting assemblage to the back of the cabinet door.  
t
Tevas and shower flip-flops (I walked 7 miles in those Tevas so far this week). Conveniently, both of these are now stored right next to the bed.  We have learned the hard way not to store shoes anywhere under the bed.  They become temporarily off-limits once the bed is opened up and someone is sleeping in it, duh.   
Two down, three or four to go.  Next I wanted to figure out what the heck to do with two large pairs of hiking boots and/or one pair of hikers and one pair of steel toes.
I had this wasted space on top of our black water tank that was annoying me (I hate waste).  I can't imagine what I'd store on top of a black water tank besides nasty shoes.  
Especially in our Gulf Coast region with its characteristic clay "gumbo" soils, hiking boots can get incredibly nasty.  I wanted some kind of a catchment device to store the mud, sweat and tears associated with a hard hike.
I found my solution in this Sterlite brand storage tote that I had bought previously at Walmart for about five bucks.  
It looks rather large at first sight, but check this out:
It had the perfect footprint (pun intended) for two pairs of hiking boots, and the footprint was all that mattered for this little project. 
I took a box cutter and chopped the top section off until I was left with a pan about six inches high.  
This can slide into place on top of the black tank in a way that does not interfere with any PEX water lines or electrical components.  The shoes are not very heavy and the bottom of the cut-down storage container has a large surface area, so it will not place undue weight on the black tank. 
In order to keep it from sliding around on top of that tank, I used adhesive-backed Velcro to secure one corner of it in place on the tank surface.  When I want to remove it, I slide one finger between the pan and the tank to release the Velcro.
Presto!  Easy access and it does not matter how muddy they get - it stays within the pan, which I can remove and wash.  
Well, I have to carry more than I would prefer, but at least now I have places to put most of them.  

Sunday, September 20, 2015

MAGNETIC ORGANIZER FOR THE AIRSTREAM INTERSTATE

It's still a shirt-soaking inferno in southeast Texas, so we are still doing DIY projects instead of taking weekend trips.  While northern folk bemoan the coming winter, we exult over our impending freedom from the crushing heat of summer (93 degrees as I write this and as we head into the final week of September).  The cold fronts are coming, the cold fronts are coming...
Get out the RVs.  Finally.  
One of the users on the Air Forums WDYGFYTT thread inspired me to finally figure out the construction of the magnetic organizer that I have wanted to install behind the driver's seat in our mid-bath model Airstream Interstate.  In one or two other Air Forums threads, we had previously bemoaned the lack of magnet-friendly surfaces in the Interstate, and I finally got around to doing something about it.  Here's the project build sequence, with two caveats.
This is the sheet metal product I used, but I offer this suggestion:  Get a sheet of slightly heavier gauge steel if you want your magnets to have better staying power.  The product spec tab says this is 30 gauge (0.32 mm), and it was all that was available in our local store.  The smaller sheets sold by Home Depot cite 28 gauge (0.40 mm), and that might be better for both rigidity and magnet holding power, supposing you can find it in larger sizes.   Gauge chart here. 
The side wall of the Interstate is curved, so I did my usual thing in templating with butcher paper. 
Pushing the pencil into the seam.  If you do this, it will likely make a template that is about a quarter of an inch wider than what you really need.  We had to trim ours down.  
Tracing from the paper template onto the sheet metal.  That familiar Sprinter T1N body curve.  
We made the cut using sheet metal shears (masking tape added for scratch prevention), but there are probably other ways to do it.  You must be careful with sheet metal this thin, because it is very easy to put unsightly bends, dents, and kinks in it.  Again, I think a slightly heavier gauge would be better for the project.   
And there is the money shot, installed with 6 stainless steel screws (corners and middle on each side).  I have not yet optimized the magnetic array on it yet, but you get the idea from the way I've staged it here.  What was formerly unused space now has a purpose.  Most importantly, it doesn't look home-made.  I intentionally designed it such that the top edge of the metal is in a line with the top edge of the aluminum facing on the wet bath door (the aluminum and the galvanized steel don't look appreciably different).  That way it almost looks as if it wraps around the corner of the wet bath, as if Airstream had originally installed it that way.  
This is where I plan to keep my magnetic do-done list - right behind the driver's seat (see this post for creation instructions).  When I turn around to grab the seat belt, there's the list staring right back at me.  It, too, is held on using magnets.
The other caveat I will add is that the larger the surface area of any given magnet or magnetic device, the better I've found they perform in a moving vehicle. Counter-intuitively, those magnetic spice tins (which I will use for spare fuses and other small odds 'n' ends) that you see in the photo above, the spice tins with their bottom-covering sheet magnets, hold much more securely than their stronger but smaller neodymium counterparts.

You can see in that close-up photo above that the screws we used to attach this fitted sheet metal piece are reminiscent of Airstream's rivets.  Once again, stylistic consistency is one of the keys to having any given DIY project turn out well.  

Friday, September 11, 2015

DO-DONE MAGNETIC PUNCH LIST FOR THE AIRSTREAM INTERSTATE

1.  THE PROBLEM.

At first I felt a little dumb and guilty, like I was the only newbie making these mistakes, until I read a post on Air Forums where a trailer owner admitted to having sacrificed not one but two un-lowered TV antennas to overpass collisions.  Then I realized I wasn't the only one who is prone to RV-related forgetfulness.   
Cartoon illustrating this regrettable phenomenon.
Fair Use statement:  Nonprofit personal blog for the purposes of commentary; minimal image reproduction quality.  
Someone's idea of a forgetfulness work-around.  Haw haw haw.
HT:  Fellow blogspotters Hidden Valley RV
And then I recalled Apollo 13, where duct tape and scrap paper were necessary to augment the punch list for a mission that had been otherwise funded to the tune of $2 billion (in 2015 dollars).
Screen shot from the Apollo 13 movie, showing a representation of a reminder that astronaut Jack Swigert used on his vehicle control panel.   
When it comes to failing to execute the full motorhome recommended pre-departure punch list, I have done it all:
  • I've driven away with the bath door flapping on its hinges (we leave it ajar for ventilation while parked). 
  • I've driven away with the interior coach lights still on, only to have to pull over once it gets dark and the light begins interfering with my visibility.
  • I've driven away with the refrigerator door flapping on its hinges (ditto on ventilation while it is not running).
  • I've left for a trip forgetting to fill the fresh water tank. 
  • I once scared the crap out of a passenger by failing to secure a canister of dog food, such that it came smashing to the floor.
Photo of the inside of our Interstate, annotated for dramatic effect. 
So why is this happening?  Why are people smashing their still-raised TV antennas and smashing dog food containers into their floors?  Why aren't they getting all that stuff squared away before they drive off in their motorhome or trailer?
It's happening because they are failing to execute their punch lists.

Image attribution:  Microsoft clip art. 
And why are people failing to execute their punch lists?  Because they don't have any.  

2.  WHAT'S AVAILABLE.  

Motorhomes and trailers don't come with punch lists.  You have to buy, adapt, download, or make one yourself.  And when I began looking into what the options were, what I found surprised me, as this brief photo tour shows.  (I will follow the photo tour with instructions on how I made our current working prototype punch list). 
In some respects, I found that we had better organizational assets in the 1940's than we do today.  Screengrab of an old grocery list from this Etsy site. Red means it is needed, white means it is not.  I like this because it provides immediate and crystal clear visual cues on what would otherwise be an impossibly long list to have to read.  
These days, a lot of "do-done" boards and checklists are actually made by crafters and geared toward raising children, habituating them toward focus and organization.  
An example of magnetic chore charts, which is another term for punch list or "do-done" list. 
I searched high and low for a customize-able device similar to this one, a tool that would allow me to change IN and OUT to DO and DONE and customize the wording on the left side.  I found nothing like this for sale.  
Here is the bizarre thing - this exact I/O marker-sliding logic has been extensively integrated into Apple electronic functionality, but not into physical products.    
It would not serve either my husband or I to have a version of this sliding button punch list on our iPhones, because we both need to access the same list.  That is one of our biggest challenges - the fact that we are two people are making changes to the configuration of the Interstate, changes that the other person doesn't necessarily learn about until it manifests inconveniently while the vehicle is underway.

3.  OUR SOLUTION

There were many different ideas I explored before capitulating and embracing the K.I.S.S. principle for my prototype.  


Let me briefly describe my failures so that you won't make the same mistakes I did if you try to design your own ergonomic device.  

I didn't want the old standby, a printed checklist or "cheat sheet" as I have seen other RV owners use, for the simple reason that it's not optimally dynamic.  If you do nothing more than make a list of things you should be doing pre-departure, it's questionable as to whether that can actively signal what you have been doing.  If it is a physical checklist with boxes and something is not checked, is that because it hasn't yet been done, or because it doesn't need to be done? And if for some reason you have to start changing things around midway through the process, you'd have to start a new piece of paper and re-enter some of your checks, or erase some of your checks... this is too complicated.  I ended up concluding that, of course a conventional checklist is a viable idea, but I am just not sure that it's the most efficient option, because it triggers a lot of reading that may not be necessary or easy to do if you are in a hurry and/or fatigued.
Suggested checklists abound on the internet (there are even Pinterest pages of RVing checklists), and, WHOA!, some of them are absolute doozies (in terms of being thorough), such as this one from the ChangingGears website.  And this isn't even the whole checklist... there is more!  This example doesn't necessarily bode well where human factors are concerned.  In designing our checklist device, I wanted to try to simplify this process using the 80/20 rule - what are the most common oversights I make, and what do I really need to have on my list to get the maximum benefit from minimum work?  I didn't want the resulting device to be overly daunting such that it took too much time and effort to execute. 

Speaking of simplifying, we bought this little five dollar bugger, but this is just one reminder among many that need to be made.  Plus if you are sitting in the driver's seat, you can't see it on the antenna crank.  Plus I initially taped a static punch list onto the back of ours, but we still forgot to do what was printed there.  Not optimal.

Image screengrabbed from this travel blog post titled "Don't wind test your RV antenna".  Duh. Guilty as charged - I have made that mistake, too.  Mostly very early in the morning when I'm still groggy.  Fortunately it suffered no damage. 
To that end, I knew I wanted to incorporate a dynamic list into a magnetic white board, but the question was how.  My initial favorite idea was a red-green stop-go magnetic system - you flip each red magnet over to its green side when the corresponding punch list item has been executed OR when it does not apply (very important ergonomically).  That is one way to use the same list over and over without having to use a new sheet of paper for each iteration (as with a conventional pen-and-paper checklist).

The problem was that the conventional white board "flip-over" magnets that I bought from Magnatag were too weak to stay in place in a vibrating motor vehicle - the product was not designed for that application.  So then I bought a couple of red-green neodymium magnets from Apex and immediately the opposite problem manifested - they were too strong and wanted to stick to each other far more than they wanted to stay in place on my white board.
From the sublime to the ridiculous:
The Magnatag on the right and the Apex on the left.  The Apex is a superb product, but you are never going to prevent them from sticking to each other if your application requires that they be utilized in close proximity.  
So unfortunately there would be no stop-go, red-green elegant simplicity on my resulting punch board.  Instead, I went back to first principles and developed the following simple solution using products that are all found at any big-box office supply store.
I didn't use any of the products listed below in a manner exactly consistent with their originally-intended use, but that's the fun of being a maker and a DIYer.

Ed Harris channeling Gene Kranz in a meme made by others and based on an Apollo 13 movie screengrab.  
Here is the product list needed for this project.
  • A magnetic white board suitable for your application.  There are numerous colors and styles.  I used this one:
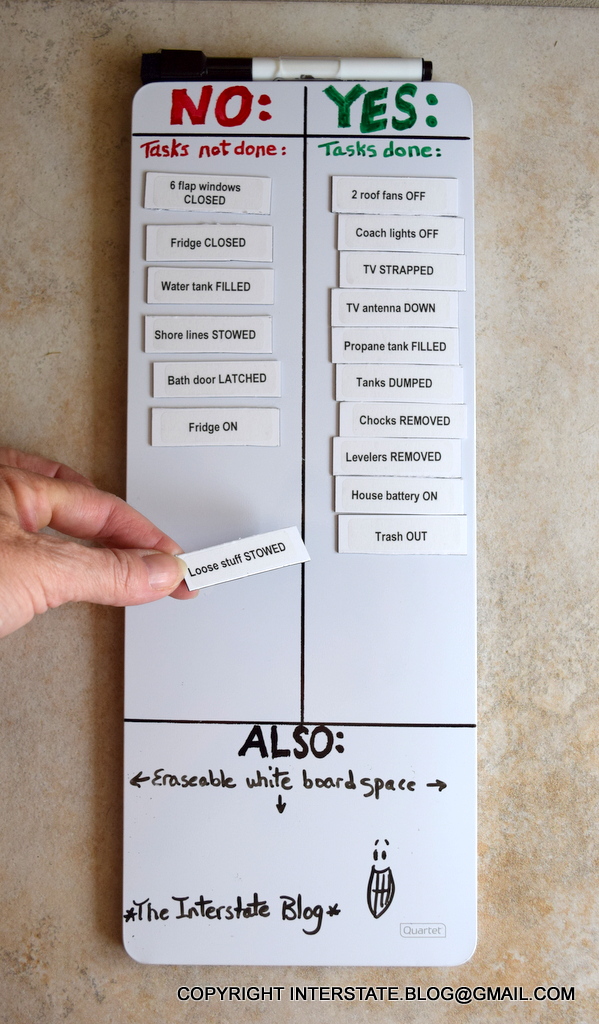
The Quartet dry-erase board.  At 5.5 by 14 inches, it is small enough for the Interstate.  It looks like it was designed for use in a school locker.  
Tap the image to expand for clarity if you wish to read all of my individual action items.  
  • Magnetic business card backers.  Unfortunately you only need about 3, but you may have to buy a package of between 25 and 100, depending on what the store is stocking.  Maybe ask a business owner friend for a few.  Key idea:  These backers have a large surface area with a corresponding very low mass, such that they tend to magnetically adhere to the white board without sliding around when the Interstate is on the road and experiencing its usual vibrations and bumps.  
  • A couple of business cards.  I used some of my own, stuck onto the magnetic backers upside down so that the printing was concealed. 
The assembly sequence is very simple:

1.  Download the Avery template for your punch list.
2.  Fill in your punch list using the print template.  My chosen standard action items are shown in the photo above (except I later added "House battery ON" and "Trash OUT"). 
3.  Print onto the label sheet using a laser printer.
4.  Stick business cards or other cardstock pieces on the magnetic backings.
5.  For the size of the white board I bought, I cut six tags from each magnetic business card.
Each cut piece was 1.5 cm thick.  I drew a faint pencil line at each cut line, and then just cut them apart using ordinary scissors.  
6.  Peel each printed Avery label off and stick it on a strip of the cut magnetic business cards.
7.  Take your Sharpies and carefully draw your desired lines and permanent text on your magnetic white board.
8.  I also left a space on our white board for where dry-erase notes can be written in.  This is very important in our case because both my husband and I have been known to dismantle sections of the Interstate in order to work on it.  We need a reminder for those events.  

Here is the prototype.  I tried to achieve 80/20 efficiency by making it a two-tier reminder system.  I put the most common items on the magnetic bits and left a dry-erase portion for noting less common to-do's.  
Pick up the individual printed magnetic pieces and move them to the YES - Tasks done side as they are completed.  This is what I meant by dynamic.  This kind of device may seem like overkill, but when you are suffering from travel-related mental fatigue, you need all the cues and help you can get.  A tool like this could mean the difference between forgetting to do something important and not forgetting it.  
Incidentally, the way the list is reading in that photo above is the same as how I leave our Interstate parked in our off-site garage.  Stuff is intentionally left open and unsecured in order to maximize the Interstate's ability to get aired out - with high humidity and prevailing summer temperatures inside the garage hovering around 100 degrees, good ventilation is absolutely critical. Now that we have this magnetic board, no more will I have to tell my husband, "Remember to shut all the flaps before you drive away."  
Do you see the resemblance?? Eh?? Eh??  Separated at birth, they were!!
In my next post, I'll talk about ideas for mounting this in the vehicle for maximum efficiency of use. 
One of my favorite A13 memes. Life in an Airstream Interstate has, in fact, been compared to life in a spaceship.  Shuttle or otherwise.